Introduction
Hash tables are used in almost every C program. Since the C language only allows the use of integers as the keys of arrays, PHP designed a hash table to map the key names of strings into arrays of limited size through a hash algorithm. This will inevitably cause collisions, and PHP uses a linked list to solve this problem.
There are many ways to implement hash tables, none of which are perfect. Each design focuses on a certain focus, some reduce CPU usage, some use memory more rationally, and some can support thread-level expansion.
The reason why there is diversity in the ways to implement hash tables is that each implementation method can only improve its own focus and cannot cover everything.
Data structure
Before we start the introduction, we need to declare some things in advance:
The key name of the hash table may be a string or an integer . When it is a string, we declare the type as zend_string; when it is an integer, we declare it as zend_ulong.
The order of the hash table follows the insertion order of elements in the table.
The capacity of the hash table is automatically expanded and contracted.
Internally, the capacity of a hash table is always a multiple of 2.
Each element in the hash table must be zval type data.
The following is the structure of HashTable:
struct _zend_array {
    zend_refcounted_h gc;
    union {
        struct {
            ZEND_ENDIAN_LOHI_4(
                zend_uchar    flags,
                zend_uchar    nApplyCount,
                zend_uchar    nIteratorsCount,
                zend_uchar    reserve)
        } v;
        uint32_t flags;
    } u;
    uint32_t          nTableMask;
    Bucket           *arData;
    uint32_t          nNumUsed;
    uint32_t          nNumOfElements;
    uint32_t          nTableSize;
    uint32_t          nInternalPointer;
    zend_long         nNextFreeElement;
    dtor_func_t       pDestructor;
};This structure occupies 56 bytes.
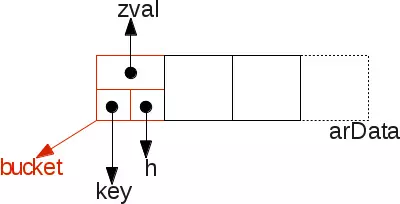
The most important field is arData, which is a pointer to Bucket type data. The Bucket structure is defined as follows:
typedef struct _Bucket {
    zval              val;
    zend_ulong        h;                /* hash value (or numeric index)   */
    zend_string      *key;              /* string key or NULL for numerics */
} Bucket;A pointer to a zval type data is no longer used in Bucket, but is to use the data itself directly. Because in PHP7, zval no longer uses heap allocation, because the data that requires heap allocation will be stored as a pointer in the zval structure. (such as PHP strings).
The following is the structure of arData stored in memory:

We noticed that all Buckets are stored in order.
Inserting elements
PHP will ensure that the elements of the array are stored in the order of insertion. In this way, when using foreach to loop through the array, it can be traversed in the order of insertion. Suppose we have an array like this:
$a = [9 => "foo", 2 => 42, []];
var_dump($a);

array(3) {
    [9]=>
    string(3) "foo"
    [2]=>
    int(42)
    [10]=>
    array(0) {
    }
}All data are adjacent in memory.

#In this way, the logic of processing the iterator of the hash table becomes quite simple. Just traverse the arData array directly. Traversing adjacent data in memory will greatly utilize the CPU cache. Because the CPU cache is able to read the entire arData , accessing each element will be on the microsecond level.
size_t i;
Bucket p;
zval val;

for (i=0; i < ht->nTableSize; i++) {
    p   = ht->arData[i];
    val = p.val;
    /* do something with val */
}As you can see, the data is stored sequentially in arData. In order to implement such a structure, we need to know the location of the next available node. This position is saved in the nNumUsed field in the array structure.
Whenever new data is added, ht->nNumUsed++ will be executed after we save it. When the nNumUsed value reaches the maximum value of all elements in the hash table (nNumOfElements), the "compression or expansion" algorithm will be triggered.
The following is a simple implementation example of inserting elements into a hash table:
idx = ht->nNumUsed++; /* take the next avalaible slot number */
ht->nNumOfElements++; /* increment number of elements */
/* ... */
p = ht->arData + idx; /* Get the bucket in that slot from arData */
p->key = key; /* Affect it the key we want to insert at */
/* ... */
p->h = h = ZSTR_H(key); /* save the hash of the current key into the bucket */
ZVAL_COPY_VALUE(&p->val, pData); /* Copy the value into the bucket's value : add operation */
We can see that when inserting, it will only be inserted at the end of the arData array, and will not fill in the deleted elements. node.
删除元素
当删除哈希表中的一项元素时,哈希表不会自动伸缩实际存储的数据空间,而是设置了一个值为 UNDEF 的 zval,表示当前节点已经被删除。
如下图所示:

因此,在循环数组元素时,需要特殊判断空节点:
size_t i;
Bucket p;
zval val;

for (i=0; i < ht->nTableSize; i++) {
    p   = ht->arData[i];
    val = p.val;
    if (Z_TYPE(val) == IS_UNDEF) { /* empty hole ? */
        continue; /* skip it */
    }
    /* do something with val */
}即使是一个十分巨大的哈希表,循环每个节点并跳过那些删除的节点也是非常快速的,这得益于 arData 的节点在内存中存放的位置总是相邻的。
哈希定位元素
当我们得到一个字符串的键名,我们必须使用哈希算法计算得到哈希后的值,并且能够通过哈希值索引找到 arData 中对应的那个元素。
我们并不能直接使用哈希后的值作为 arData 数组的索引,因为这样就无法保证元素按照插入顺序存储。
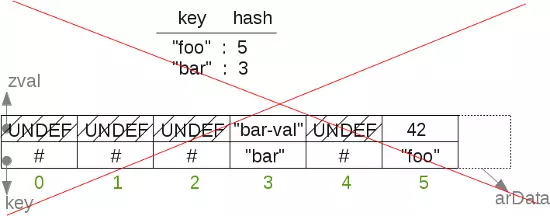
举个例子:如果我插入的键名先是 foo,然后是 bar,假设 foo 哈希后的结果是5,而 bar哈希后的结果是3。如果我们将 foo 存在 arData[5],而 bar 存在 arData[3],这意味着 bar 元素要在 foo 元素的前面,这和我们插入的顺序正好是相反的。

所以,当我们通过算法哈希了键名后,我们需要一张 转换表,转换表保存了哈希后的结果与实际存储的节点的映射关系。
这里在设计的时候取了个巧:将转换表存储以 arData 起始指针为起点做镜面映射存储。这样,我们不需要额外的空间存储,在分配 arData 空间的同时也分配了转换表。
以下是有8个元素的哈希表 + 转换表的数据结构:

现在,当我们要访问 foo 所指的元素时,通过哈希算法得到值后按照哈希表分配的元素大小做取模,就能得到我们在转换表中存储的节点索引值。
如我们所见,转换表中的节点的索引与数组数据元素的节点索引是相反数的关系,nTableMask 等于哈希表大小的负数值,通过取模我们就能得到0到-7之间的数,从而定位到我们所需元素所在的索引值。综上,我们为 arData 分配存储空间时,需要使用 tablesize * sizeof(bucket) + tablesize * sizeof(uint32) 的计算方式计算存储空间大小。
在源码里也清晰的划分了两个区域:
#define HT_HASH_SIZE(nTableMask) (((size_t)(uint32_t)-(int32_t)(nTableMask)) * sizeof(uint32_t))
#define HT_DATA_SIZE(nTableSize) ((size_t)(nTableSize) * sizeof(Bucket))
#define HT_SIZE_EX(nTableSize, nTableMask) (HT_DATA_SIZE((nTableSize)) + HT_HASH_SIZE((nTableMask)))
#define HT_SIZE(ht) HT_SIZE_EX((ht)->nTableSize, (ht)->nTableMask)

 Bucket *arData;
arData = emalloc(HT_SIZE(ht)); /* now alloc this */
我们将宏替换的结果展开:
(((size_t)(((ht)->nTableSize)) * sizeof(Bucket)) + (((size_t)(uint32_t)-(int32_t)(((ht)->nTableMask))) * sizeof(uint32_t)))
碰撞冲突
接下来我们看看如何解决哈希表的碰撞冲突问题。哈希表的键名可能会被哈希到同一个节点。所以,当我们访问到转换后的节点,我们需要对比键名是否我们查找的。如果不是,我们将通过 zval.u2.next 字段读取链表上的下一个数据。
注意这里的链表结构并没像传统链表一样在在内存中分散存储。我们直接读取 arData 整个数组,而不是通过堆(heap)获取内存地址分散的指针。
这是 PHP7 性能提升的一个重要点。数据局部性让 CPU 不必经常访问缓慢的主存储,而是直接从 CPU 的 L1 缓存中读取到所有的数据。
所以,我们看到向哈希表添加一个元素是这样操作的:
idx = ht->nNumUsed++;
    ht->nNumOfElements++;
    if (ht->nInternalPointer == HT_INVALID_IDX) {
        ht->nInternalPointer = idx;
    }
    zend_hash_iterators_update(ht, HT_INVALID_IDX, idx);
    p = ht->arData + idx;
    p->key = key;
    if (!ZSTR_IS_INTERNED(key)) {
        zend_string_addref(key);
        ht->u.flags &= ~HASH_FLAG_STATIC_KEYS;
        zend_string_hash_val(key);
    }
    p->h = h = ZSTR_H(key);
    ZVAL_COPY_VALUE(&p->val, pData);
    nIndex = h | ht->nTableMask;
    Z_NEXT(p->val) = HT_HASH(ht, nIndex);
HT_HASH(ht, nIndex) = HT_IDX_TO_HASH(idx);同样的规则也适用于删除元素:
#define HT_HASH_TO_BUCKET_EX(data, idx) ((data) + (idx))
#define HT_HASH_TO_BUCKET(ht, idx) HT_HASH_TO_BUCKET_EX((ht)->arData, idx)

h = zend_string_hash_val(key); /* get the hash from the key (assuming string key here) */
nIndex = h | ht->nTableMask; /* get the translation table index */

idx = HT_HASH(ht, nIndex); /* Get the slot corresponding to that translation index */
while (idx != HT_INVALID_IDX) { /* If there is a corresponding slot */
    p = HT_HASH_TO_BUCKET(ht, idx); /* Get the bucket from that slot */
    if ((p->key == key) || /* Is it the right bucket ? same key pointer ? */
        (p->h == h && /* ... or same hash */
         p->key && /* and a key (string key based) */
         ZSTR_LEN(p->key) == ZSTR_LEN(key) && /* and same key length */
         memcmp(ZSTR_VAL(p->key), ZSTR_VAL(key), ZSTR_LEN(key)) == 0)) { /* and same key content ? */
        _zend_hash_del_el_ex(ht, idx, p, prev); /* that's us ! delete us */
        return SUCCESS;
    }
    prev = p;
    idx = Z_NEXT(p->val); /* get the next corresponding slot from current one */
}
return FAILURE;转换表和哈希表的初始化
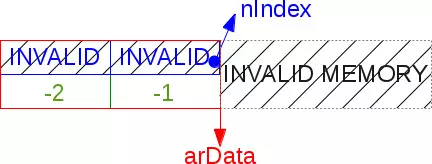
HT_INVALID_IDX 作为一个特殊的标记,在转换表中表示:对应的数据节点没有有效的数据,直接跳过。
哈希表之所以能极大地减少那些创建时就是空值的数组的开销,得益于他的两步的初始化过程。当新的哈希表被创建时,我们只创建两个转换表节点,并且都赋予 HT_INVALID_IDX 标记。
#define HT_MIN_MASK ((uint32_t) -2)
#define HT_HASH_SIZE(nTableMask) (((size_t)(uint32_t)-(int32_t)(nTableMask)) * sizeof(uint32_t))
#define HT_SET_DATA_ADDR(ht, ptr) do { (ht)->arData = (Bucket*)(((char*)(ptr)) + HT_HASH_SIZE((ht)->nTableMask)); } while (0)

static const uint32_t uninitialized_bucket[-HT_MIN_MASK] = {HT_INVALID_IDX, HT_INVALID_IDX};

/* hash lazy init */
ZEND_API void ZEND_FASTCALL _zend_hash_init(HashTable *ht, uint32_t nSize, dtor_func_t pDestructor, zend_bool persistent ZEND_FILE_LINE_DC)
{
    /* ... */
    ht->nTableSize = zend_hash_check_size(nSize);
    ht->nTableMask = HT_MIN_MASK;
    HT_SET_DATA_ADDR(ht, &uninitialized_bucket);
    ht->nNumUsed = 0;
    ht->nNumOfElements = 0;
}注意到这里不需要使用堆分配内存,而是使用静态的内存区域,这样更轻量。
然后,当第一个元素插入时,我们会完整的初始化哈希表,这时我们才创建所需的转换表的空间(如果不确定数组大小,则默认是8个元素)。这时,我们将使用堆分配内存。
#define HT_HASH_EX(data, idx) ((uint32_t*)(data))[(int32_t)(idx)]
#define HT_HASH(ht, idx) HT_HASH_EX((ht)->arData, idx)

(ht)->nTableMask = -(ht)->nTableSize;
HT_SET_DATA_ADDR(ht, pemalloc(HT_SIZE(ht), (ht)->u.flags & HASH_FLAG_PERSISTENT));
memset(&HT_HASH(ht, (ht)->nTableMask), HT_INVALID_IDX, HT_HASH_SIZE((ht)->nTableMask))
HT_HASH 宏能够使用负数偏移量访问转换表中的节点。哈希表的掩码总是负数,因为转换表的节点的索引值是 arData 数组的相反数。这才是C语言的编程之美:你可以创建无数的节点,并且不需要关心内存访问的性能问题。
以下是一个延迟初始化的哈希表结构:

哈希表的碎片化、重组和压缩
当哈希表填充满并且还需要插入元素时,哈希表必须重新计算自身的大小。哈希表的大小总是成倍增长。当对哈希表扩容时,我们会预分配 arBucket 类型的C数组,并且向空的节点中存入值为 UNDEF 的 zval。在节点插入数据之前,这里会浪费 (new_size – old_size) * sizeof(Bucket) 字节的空间。
如果一个有1024个节点的哈希表,再添加元素时,哈希表将会扩容到2048个节点,其中1023个节点都是空节点,这将消耗 1023 * 32 bytes = 32KB 的空间。这是 PHP 哈希表实现方式的缺陷,因为没有完美的解决方案。
编程就是一个不断设计妥协式的解决方案的过程。在底层编程中,就是对 CPU 还是内存的一次取舍。
哈希表可能全是 UNDEF 的节点。当我们插入许多元素后,又删除了它们,哈希表就会碎片化。因为我们永远不会向 arData 中间节点插入数据,这样我们就可能会看到很多 UNDEF节点。
举个例子来说:

重组 arData 可以整合碎片化的数组元素。当哈希表需要被重组时,首先它会自我压缩。当它压缩之后,会计算是否需要扩容,如果需要的话,同样是成倍扩容。如果不需要,数据会被重新分配到已有的节点中。这个算法不会在每次元素被删除时运行,因为需要消耗大量的 CPU 计算。
以下是压缩后的数组:

压缩算法会遍历所有 arData 里的元素并且替换原来有值的节点为 UNDEF。如下所示:
Bucket *p;
uint32_t nIndex, i;
HT_HASH_RESET(ht);
i = 0;
p = ht->arData;

do {
    if (UNEXPECTED(Z_TYPE(p->val) == IS_UNDEF)) {
        uint32_t j = i;
        Bucket *q = p;
        while (++i < ht->nNumUsed) {
            p++;
            if (EXPECTED(Z_TYPE_INFO(p->val) != IS_UNDEF)) {
                ZVAL_COPY_VALUE(&q->val, &p->val);
                q->h = p->h;
                nIndex = q->h | ht->nTableMask;
                q->key = p->key;
                Z_NEXT(q->val) = HT_HASH(ht, nIndex);
                HT_HASH(ht, nIndex) = HT_IDX_TO_HASH(j);
                if (UNEXPECTED(ht->nInternalPointer == i)) {
                    ht->nInternalPointer = j;
                }
                q++;
                j++;
            }
        }
        ht->nNumUsed = j;
        break;
    }
    nIndex = p->h | ht->nTableMask;
    Z_NEXT(p->val) = HT_HASH(ht, nIndex);
    HT_HASH(ht, nIndex) = HT_IDX_TO_HASH(i);
    p++;
} while (++i < ht->nNumUsed);结语
到此,PHP 哈希表的实现基础已经介绍完毕,关于哈希表还有一些进阶的内容没有翻译,因为接下来我准备继续分享 PHP 内核的其他知识点,关于哈希表感兴趣的同学可以移步到原文。
以上就是PHP7 哈希表实现原理的内容,更多相关内容请关注PHP中文网(m.sbmmt.com)!


