1. Overview
1.1 Background
In our daily development, logging is very important. Generally speaking, adding logging to an application has three purposes: to monitor changes in variables in the code and periodically record them to files for statistical analysis by other applications; to track the runtime trajectory of the code as a basis for future audits. ; Acts as a debugger in the integrated development environment, printing code debugging information to a file or console.
1.2 Introduction
Log4j (log for java) is an open source project of Apache, which provides a delicate log management method. Through a configuration file, we can control the output format and destination of each log in multiple options. By defining the level of information, we can also flexibly switch feedback information in the code. Simply put, log4j is an API library that helps developers manage log output. Its most important feature is that the configuration file can flexibly set the priority of log information, the output destination of log information, and the output format of log information.
2.log4j configuration
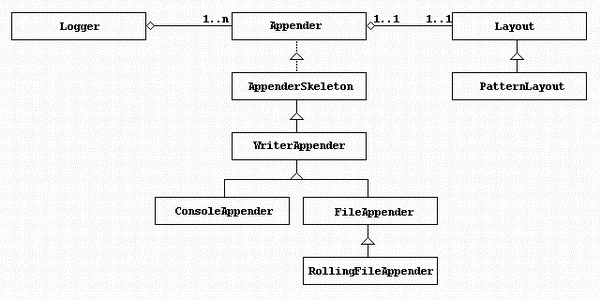
2.1log4j class diagram

Log4j can be dynamically set through the java program. The obvious disadvantage of this method is: if you need to modify the log output level and other information, you must modify it. java file and then recompile it, which is very troublesome.
Using configuration files will make our application more flexible in configuring logs. Log output methods include output priority, output destination, and output format. Log4j supports two configuration file formats, one is an XML format file, and the other is the Java properties file log4j.properties (key=value).
When Log4J is called for the first time, Log4J will Path (../web-inf/class/, of course, it can also be placed in any other directory, as long as the directory is included in the class path), and read the complete configuration of this file. This configuration file tells Log4J in what format, what kind of information, and where to output it. Correspondingly, we need to configure three aspects:
The example is as follows:
2.4.log4j three component description
Log4j has three main components: Loggers (logger), Appender (output source) and Layout. The combined use of these three components can easily record the type and level of information, and control the style and location of log output at runtime. The three components are explained below:
Configure the root Logger, the syntax is:
log4j.appender.appenderName = fully.qualified.name.of.appender.class
log4j.appender.appenderName.option1 = value1
…
log4j.appender.appenderName.option = valueN
"fully.qualified.name.of.appender.class"可以指定下面五个目的地中的一个:
1).org.apache.log4j.ConsoleAppender(控制台)
2).org.apache.log4j.FileAppender(文件)
3).org.apache.log4j.DailyRollingFileAppender(每天产生一个日志文件)
4).org.apache.log4j.RollingFileAppender(文件大小到达指定尺寸的时候产生一个新的文件)
5).org.apache.log4j.WriterAppender(将日志信息以流格式发送到任意指定的地方)
(1).ConsoleAppender选项
Threshold=WARN:指定日志消息的输出最低层次。
ImmediateFlush=true:默认值是true,意谓着所有的消息都会被立即输出。
Target=System.err:默认情况下是:System.out,指定输出控制台
(2).FileAppender 选项
Threshold=WARN:指定日志消息的输出最低层次。
ImmediateFlush=true:默认值是true,意谓着所有的消息都会被立即输出。
File=mylog.log:指定消息输出到mylog.log文件。
Append=false:默认值是true,即将消息增加到指定文件中,false指将消息覆盖指定的文件内容。
(3).DailyRollingFileAppender 选项
Threshold=WARN:指定日志消息的输出最低层次。
ImmediateFlush=true:默认值是true,意味着所有的消息都会被立即输出。
File=mylog.log:指定消息输出到mylog.log文件。
Append=false:默认值是true,即将消息增加到指定文件中,false指将消息覆盖指定的文件内容。
DatePattern='.'yyyy-ww:每周滚动一次文件,即每周产生一个新的文件。当然也可以指定按月、周、天、时和分。
即对应的格式如下:
1)'.'yyyy-MM: 每月
2)'.'yyyy-ww: 每周
3)'.'yyyy-MM-dd: 每天
4)'.'yyyy-MM-dd-a: 每天两次
5)'.'yyyy-MM-dd-HH: 每小时
6)'.'yyyy-MM-dd-HH-mm: 每分钟
4.RollingFileAppender 选项
Threshold=WARN:指定日志消息的输出最低层次。
ImmediateFlush=true:默认值是true,意味着所有的消息都会被立即输出。
File=mylog.log:指定消息输出到mylog.log文件。
Append=false:默认值是true,即将消息增加到指定文件中,false指将消息覆盖指定的文件内容。
MaxFileSize=100KB: 后缀可以是KB, MB或者是 GB.在日志文件到达该大小时,将会自动滚动,即将原来的内容移到mylog.log.1文件。
MaxBackupIndex=2:指定可以产生的滚动文件的最大数。
2.4.3格式(布局)Layout
有时希望根据自己的喜好格式化自己的日志输出。Log4j可以在Appender的后面附加Layout来完成这个功能。
配置Layout,其语法表示为:
log4j.appender.appenderName.layout =fully.qualified.name.of.layout.class
log4j.appender.appenderName.layout.option1 = value1
…
log4j.appender.appenderName.layout.option = valueN
Layout提供了四种日志输出样式,如下所示:
(1).org.apache.log4j.HTMLLayout(以HTML表格形式布局),
(2).org.apache.log4j.PatternLayout(可以灵活地指定布局模式),
(3).org.apache.log4j.SimpleLayout(包含日志信息的级别和信息字符串),
(4).org.apache.log4j.TTCCLayout(包含日志产生的时间、线程、类别等等信息)
HTMLLayout 选项
LocationInfo=true:默认值是false,输出java文件名称和行号
Title=my app file: 默认值是 Log4J Log Messages.
2.PatternLayout 选项
ConversionPattern=%m%n :指定怎样格式化指定的消息。
这里需要说明的就是日志信息格式中几个符号所代表的含义:
-x号:x信息输出时左对齐
%p: 输出日志信息优先级,即DEBUG,INFO,WARN,ERROR,FATAL,
%d: 输出日志时间点的日期或时间,默认格式为ISO8601,也可以在其后指定格式,比如:%d{yyy MMM dd HH:mm:ss,SSS},输出类似:2002年10月18日22:10:28,921
%r: 输出自应用启动到输出该log信息耗费的毫秒数
%c: 输出日志信息所属的类目,通常就是所在类的全名
%t: 输出产生该日志事件的线程名
%l: 输出日志事件的发生位置,相当于%C.%M(%F:%L)的组合,包括类目名、发生的线程,以及在代码中的行数。举例:Testlog4.main(TestLog4.java:10)
%x: 输出和当前线程相关联的NDC(嵌套诊断环境),尤其用到像java servlets这样的多客户多线程的应用中。
%%: 输出一个"%"字符
%F: 输出日志消息产生时所在的文件名称
%L: 输出代码中的行号
%m: 输出代码中指定的消息,产生的日志具体信息
%n: 输出一个回车换行符
可以在%与模式字符之间加上修饰符来控制其最小宽度、最大宽度、和文本的对齐方式。如:
1)%20c:指定输出category的名称,最小的宽度是20,如果category的名称小于20的话,默认的情况下右对齐。
2)%-20c:指定输出category的名称,最小的宽度是20,如果category的名称小于20的话,"-"号指定左对齐。
3)%.30c:指定输出category的名称,最大的宽度是30,如果category的名称大于30的话,就会将左边多出的字符截掉,但小于30的话也不会有空格。
4)%20.30c:如果category的名称小于20就补空格,并且右对齐,如果其名称长于30字符,就从左边把多出的字符截掉。
2.5.log4j配置示例
LOG4J的配置之简单使它遍及于越来越多的应用中:Log4J配置文件实现了输出到控制台、文件、回滚文件、发送日志邮件、输出到数据库日志表、自定义标签等全套功能。
log4j.rootLogger=DEBUG,CONSOLE,A1,im
log4j.addivity.org.apache=true
n 应用于控制台
log4j.appender.CONSOLE=org.apache.log4j.ConsoleAppender
log4j.appender.Threshold=DEBUG
log4j.appender.CONSOLE.Target=System.out
log4j.appender.CONSOLE.layout=org.apache.log4j.PatternLayout
log4j.appender.CONSOLE.layout.ConversionPattern=%d-%c-%-4r[%t]%-5p%c%x-%m%n
n 应用于文件
log4j.appender.FILE=org.apache.log4j.FileAppender
log4j.appender.FILE.File=file.log
log4j.appender.FILE.Append=false
log4j.appender.FILE.layout=org.apache.log4j.PatternLayout
log4j.appender.FILE.layout.ConversionPattern=%d - %c -%-4r [%t] %-5p %c %x - %m%n
n 应用于文件回滚
log4j.appender.ROLLING_FILE=org.apache.log4j.RollingFileAppender
log4j.appender.ROLLING_FILE.Threshold=ERROR
log4j.appender.ROLLING_FILE.File=rolling.log
log4j.appender.ROLLING_FILE.Append=true
log4j.appender.ROLLING_FILE.MaxFileSize=10KB
log4j.appender.ROLLING_FILE.MaxBackupIndex=1
log4j.appender.ROLLING_FILE.layout=org.apache.log4j.PatternLayout
log4j.appender.ROLLING_FILE.layout.ConversionPattern=%d - %c -%-4r [%t] %-5p %c %x - %m%n
n 应用于socket
log4j.appender.SOCKET=org.apache.log4j.RollingFileAppender
log4j.appender.SOCKET.RemoteHost=localhost
log4j.appender.SOCKET.Port=5001
log4j.appender.SOCKET.LocationInfo=true
log4j.appender.SOCKET.layout=org.apache.log4j.PatternLayout
log4j.appender.SOCET.layout.ConversionPattern=[start]%d{DATE}[DATE]%n%p[PRIORITY]%n%x[NDC]%n%t[THREAD]%n%c[CATEGORY]%n%m[MESSAGE]%n%n
# Log Factor 5 Appender
log4j.appender.LF5_APPENDER=org.apache.log4j.lf5.LF5Appender
log4j.appender.LF5_APPENDER.MaxNumberOfRecords=2000n 发送日志给邮件
log4j.appender.MAIL=org.apache.log4j.net.SMTPAppender
log4j.appender.MAIL.Threshold=FATAL
log4j.appender.MAIL.BufferSize=10
log4j.appender.MAIL.From=web@www.wuset.com
log4j.appender.MAIL.SMTPHost=www.wusetu.com
log4j.appender.MAIL.Subject=Log4J Message
log4j.appender.MAIL.To=web@www.wusetu.com
log4j.appender.MAIL.layout=org.apache.log4j.PatternLayout
log4j.appender.MAIL.layout.ConversionPattern=%d-%c-%-4r[%t]%-5p%c%x-%m%n
n 用于数据库
log4j.appender.DATABASE=org.apache.log4j.jdbc.JDBCAppender
log4j.appender.DATABASE.URL=jdbc:mysql://localhost:3306/test
log4j.appender.DATABASE.driver=com.mysql.jdbc.Driver
log4j.appender.DATABASE.user=root
log4j.appender.DATABASE.password=
log4j.appender.DATABASE.sql=INSERT INTO LOG4J (Message) VALUES ('%d - %c -%-4r [%t] %-5p %c %x - %m%n')
log4j.appender.DATABASE.layout=org.apache.log4j.PatternLayout
log4j.appender.DATABASE.layout.ConversionPattern=%d-%c-%-4r[%t]%-5p%c%x-%m%n
log4j.appender.A1=org.apache.log4j.DailyRollingFileAppender
log4j.appender.A1.File=SampleMessages.log4j
log4j.appender.A1.DatePattern=yyyyMMdd-HH'.log4j'
log4j.appender.A1.layout=org.apache.log4j.xml.XMLLayout
n 自定义Appender
log4j.appender.im = net.cybercorlin.util.logger.appender.IMAppender

log4j.appender.im.host = mail.cybercorlin.net
log4j.appender.im.username = username
log4j.appender.im.password = password
log4j.appender.im.recipient = corlin@cybercorlin.net

log4j.appender.im.layout=org.apache.log4j.PatternLayout
log4j.appender.im.layout.ConversionPattern =[framework] %d - %c -%-4r [%t] %-5p %c %x - %m%n
3.在WEB应用中为SPRING配置Log4j
首先需要在web.xml文件中加入下面的配置语句:
<!-- 为避免项目间冲突,定义唯一的 webAppRootKey-->
<context-param>
  <param-name>webAppRootKey</param-name>
  <param-value>myProject.root</param-value>
</context-param>
<!-- 加载log4j的配置文件log4j.properties -->
<context-param>
  <param-name>log4jConfigLocation</param-name>
  <param-value>/WEB-INF/classes/config/log4j/log4j.properties</param-value>
</context-param>
  <!-- 设定刷新日志配置文件的时间间隔,这里设置为60s -->
<context-param>
  <param-name>log4jRefreshInterval</param-name>
  <param-value>60000</param-value>
</context-param>

<!-- 加载Spring框架中的log4j监听器Log4jConfigListener -->
<listener>
  <listener-class>org.springframework.web.util.Log4jConfigListener</listener-class>
</listener>
属性log4jConfigLocation的值建议还是设置为:/WEB-INF/classes/log4j.properties,这样我们在不启动web应用的时候,做一些测试就能够正确地记录日志信息。Log4jConfigListener是spring提供的工具类,它开启一个log4j的监视线程,并每60(log4jRefreshInterval变量定义)秒检测日志配置变化,从而不需要每次重新启动web服务来应用新的配置。在tomcat中没有根据web应用来分开系统属性。所以必须为每一个web应用定义唯一的"webAppRootKey",我们取名为webApp.root.在启动环境后,Log4jConfigListener会将值注入到webApp.root变量。
4.在代码中使用Log4j
4.1.得到记录器
使用Log4j,第一步就是要获取日志记录器,这个记录器将负责控制日志信息。
public static Logger getLogger( String name)
通过指定的名字获得记录器,如果必要的话,则为这个名字创建一个新的记录器。name一般取本类的名字,比如:
static Logger logger = Logger.getLogger ( ServerWithLog4j.class.getName () )
4.2.读取配置文件
当获得了日志记录器之后,第二步将配置Log4j环境,其语法为:
若将log4j.properties放在工程根目录下也可不写此句,程序会自动找到配置文件。
BasicConfigurator.configure (): 自动快速地使用缺省Log4j环境。PropertyConfigurator.configure ( String configFilename) :读取使用Java的特性文件编写的配置文件。
DOMConfigurator.configure ( String filename ):读取XML形式的配置文件。
log4j使用以上3种配置器来初始化,使用PropertyConfigurator适用于所有的系统。如下的语句。
PropertyConfigurator.configure("log4j.properties");对于一般的java project可以不使用上面的语句初始化log4j,log4j会自动在classpath下,找到配置文件并初始化。如果log4j不能自动初始化配置文件,那么就需要用上面的方法进行初始化。
注意:初始化配置文件,最好只在系统启动的时候执行一次,如果执行多次,一是浪费资源,二就是对于老版本的log4j,使用DailyRollingFileAppender时,可能会出现问题。
4.3.插入记录信息(格式化日志信息)
当上两个必要步骤执行完毕,您就可以轻松地使用不同优先级别的日志记录语句插入到您想记录日志的任何地方,其语法如下:
Logger.debug ( Object message ) ;
更多Basic usage tutorial of Java logging software Log4j相关文章请关注PHP中文网!


