1. Foreword
File uploading is a relatively common function. The traditional selection method is more troublesome. You need to click the upload button first, then find the path of the file, and then upload it. It brings big problems to the user experience. HTML5 begins to support the required API for drag and drop upload. Nodejs is also an increasingly popular technology recently. This is also my first contact with nodejs. In nodejs development, one of the most commonly used development frameworks is expess, which is a framework similar to the mvc model. Combined with HTML5 and nodejs express, the drag-and-drop upload function is implemented.
2. Popularization of basic knowledge
1. Basic knowledge of NodeJs
Nodejs is simply a development platform that allows js to run on the server. Nodejs has developed very quickly. Soon, many domestic companies have also begun to use Taobao, etc. Traditional web application development platforms rely on multi-threading to respond to high-concurrency requests. Nodejs adopts a single-threaded, asynchronous IO, and event-driven design model, which brings huge performance improvements to nodejs. This is also the biggest feature of nodejs. In nodejs, all IO operations are performed through callbacks. When nodejs performs IO operations, it will push the IO request to an event queue, wait for the program to process it, wait for the IO to be processed, and then call The callback function returns the result.
For example, when querying the database, the operation is as follows:
mysql.query("SELECT * FROM myTable",function(res){
       callback(res);
});
In the above code, nodejs will not wait for the database to return the result when executing the above statement. , but continue to execute the following statements. After the database obtains the data, it will be sent to the event loop queue. The callback will not be executed until the thread enters the event loop queue.
Regarding more knowledge about nodejs, I have read it for two days and don’t know much. To learn more, you can search on the Internet.
2. Basic knowledge of express
Nodejs is a relatively active open source community. It has a large number of third-party development libraries, among which Express is one of the most extensive and commonly used frameworks. It is also the officially recommended framework of nodejs. In addition to encapsulating common http operations, it also implements routing control, template parsing support, dynamic views, user responses, etc. But it is not a universal framework. Most of its functions are http encapsulation. It is just a lightweight framework. Many functions also need to be integrated with third-party libraries to be implemented.
exress provides very convenient upload function support. After the file upload request, express will receive the file and store the file in a temporary directory. Then in the routing method, we only need to transfer the file from the temporary directory to Just copy the directory to the folder where we want to store user uploads. In the file upload part, the server-side implementation is based on the express function.
3. HTML5 drag and drop upload api
HTML5 provides many new features, drag events and file upload are one of the new features. Due to limited space, we will focus on the code implementation of drag and drop upload later. I won’t list the drag and drop upload apil provided by HTML5 one by one.
3. Drag and drop upload implementation
1. Code implementation
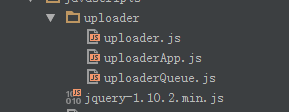
Let’s first look at the file directory of the front-end js :

Among them:
uploader.js mainly implements the encapsulation of the upload function supported by html5.
uploaderQueue.js mainly implements the management of upload file queues, as well as file upload objects, and uploads files in the file queue to the server.
uploaderApp.js is the main entry point for file upload. It mainly implements the monitoring of drag events by the upload window, pushes the dragged file into the upload file queue, and starts the file upload program.
The following is a brief explanation of the core code (required). All codes can be downloaded here: FileUploader
First, simply encapsulate the file upload provided by html5 uploader.js
Thefunction uploader(url, data, files) {
this._files = files;
this._data = data;
this._url = url;
this._xhr = null;
this.onloadstart = {};
this.onload = {};
this.onloadend = {};
this.onprogress = {};
this.onerror = {};
this.ontimeout = {};
this.callback = {};//请求完成后回调
_self = this;
}
uploader.prototype = {
init: function () {
if (!isValid()) {
throw e;
}
this._xhr = new XMLHttpRequest();
this._bindEvents();
},
send: function () {
if (this._xhr == null) {
this.init();
}
var formData = this._createFormData();
this._xhr.open('post', this._url, true);
this._xhr.send(formData);
},
_bindEvents: function () {
_self = this;
this._xhr.upload.loadstart = function (e) {
evalFunction(_self.onloadstart, e);
}
this._xhr.upload.onload = function (e) {
evalFunction(_self.onload, e);
};
this._xhr.upload.onloadend = function (e) {
evalFunction(_self.onloadend, e);
}
this._xhr.upload.onprogress = function (e) {
evalFunction(_self.onprogress, e)
};
this._xhr.upload.onerror = function (e) {
evalFunction(_self.onerror, e);
};
this._xhr.upload.ontimeout = function (e) {
evalFunction(_self.ontimeout, e);
}
this._xhr.onreadystatechange = function () {
if (_self._xhr.readyState == 4) {
if (typeof _self.callback === 'function') {
var status = _self._xhr.status;
var data = _self._xhr.responseText;
_self.callback(status, data);
}
}
}
},
_createFormData: function () {
var formData = new FormData();
this._addDataToFormData(formData);
this._addFileToFormData(formData);
return formData;
},
_addDataToFormData: function (formData) {
if (this._data) {
for (var item in this._data) {
formData.append(item, this._data[item]);
}
}
},
_addFileToFormData: function (formData) {
if (this._files) {
for (var i = 0; i < this._files.length; i++) {
var file = this._files[i];
formData.append('file[' + i + ']', this._files[i]);
}
}
}
};
View Code
var uploaderFactory = {
send: function (url, data, files, callback) {
var insUploader = new uploader(url, data, files);
insUploader.callback = function (status, resData) {
if (typeof callback === 'function') {
callback(status, resData);
}
}
insUploader.send();
return insUploader;
}
};uploader object is mainly a simple encapsulation of the native API provided by HTML5. uploaderFactory provides a simple interface, which can be used to complete file upload calls like jquery's ajax method. The file upload support provided in html5 extends some attributes and methods based on the original XMLHttpRequest, and provides a FormData object to support file upload operations.
File upload queue (uploaderQueue.js) is also a relatively important object. It includes two objects. One is Queue, the file queue object, which is mainly responsible for managing the addition, deletion, modification, query and other operations of the file queue. The other object is UploadEngine, file upload engine, its function is mainly responsible for taking out the file object from the file queue, calling the uploader object to upload the file, and then updating the file status in the file queue. Queue and UploadEngine are both singleton objects.
First look at the file queue object:
(function (upladerQueue) {

 var Status = {
  Ready: 0,
  Uploading: 1,
  Complete: 2
 }

 var _self = null;

 var instance = null;

 function Queue() {
  this._datas = [];
  this._curSize = 0;//当前长度


  _self = this;
 }

 Queue.prototype = {
  add: function (data) {
   var key = new Date().getTime();
   this._datas.push({key: key, data: data, status: Status.Ready});
   this._curSize = this._datas.length;
   return key;
  },
  remove: function (key) {
   var index = this._getIndexByKey(key);
   this._datas.splice(index, 1);
   this._curSize = this._datas.length;
  },
  get: function (key) {
   var index = this._getIndexByKey(key);
   return index != -1 ? this._datas[index].data : null;
  },
  clear: function () {
   this._datas = [];
   this._curSize = this._datas.length;
  },
  size: function () {
   return this._curSize;
  },
  setItemStatus: function (key, status) {
   var index = this._getIndexByKey(key);
   if (index != -1) {
    this._datas[index].status = status;
   }
  },
  nextReadyingIndex: function () {
   for (var i = 0; i < this._datas.length; i++) {
    if (this._datas[i].status == Status.Ready) {
     return i;
    }
   }
   return -1;
  },
  getDataByIndex: function (index) {
   if (index < 0) {
    return null;
   }
   return this._datas[index];
  },
  _getIndexByKey: function (key) {
   for (var i = 0; i < this._datas.length; i++) {
    if (this._datas[i].key == key) {
     return i;
    }
   }
   return -1;
  }
 };

 function getInstace() {
  if (instance === null) {
   instance = new Queue();
   return instance;
  } else {
   return instance;
  }
 }


 upladerQueue.Queue = getInstace();
 upladerQueue.UploadStatus = Status;
})(window.uploaderQueue);The upload file queue uses an array to manage the information of each file object. Each file object has three attributes: key, data, and status. This object Mainly responsible for the functions of adding, deleting, updating, and searching file objects.
Another important object in the upload file queue is the upload engine object (uploadEngine.js)
(function (upladerQueue) {

 var instance = null;
 var _self;

 function uploadEngine() {
  this._url = null;
  this._curUploadingKey = -1;//标志
  this.uploadStatusChanged = {};
  this.uploadItemProgress={};
  _self = this;
 }

 uploadEngine.prototype = {
  setUrl: function (url) {
   this._url = url;
  },
  run: function () {
   if (this._curUploadingKey === -1 && this._url) {
    this._startUpload();
   }
  },
  _startUpload: function () {
   _self = this;
   var index = upladerQueue.Queue.nextReadyingIndex();
   if (index != -1) {
    this._uploadItem(index);
   } else {
    this._curUploadingKey = -1;
    return null;
   }
  },
  _uploadItem: function (index) {
   var data = upladerQueue.Queue.getDataByIndex(index).data;
   _self = this;
   this._readyUploadItem(index);
   var upload = uploaderFactory.send(this._url, null, data.files, function (status, data) {
    _self._completedUploadItem.call(_self, status, data);
   });

   this._uploadItemProgress(upload);
  },
  _uploadItemProgress: function (upload) {
   upload.onprogress = function (e) {
     _self.uploadItemProgress(_self._curUploadingKey,e);
   }
  },
  _readyUploadItem: function (index) {
   this._curUploadingKey = upladerQueue.Queue.getDataByIndex(index).key;
   if (typeof this.uploadStatusChanged === 'function') {
    this.uploadStatusChanged(this._curUploadingKey, upladerQueue.UploadStatus.Uploading);
   }
   upladerQueue.Queue.setItemStatus(this._curUploadingKey, upladerQueue.UploadStatus.Uploading);
  },
  _completedUploadItem: function (status, data) {
   if (typeof this.uploadStatusChanged === 'function') {
    this.uploadStatusChanged(this._curUploadingKey, upladerQueue.UploadStatus.Complete);
   }
   upladerQueue.Queue.setItemStatus(this._curUploadingKey, upladerQueue.UploadStatus.Complete);
   this._startUpload();
  }
 };

 function getInstace() {
  if (instance === null) {
   instance = new uploadEngine();
  }
  return instance;
 }

 upladerQueue.Engine = getInstace();
})(window.uploaderQueue);该对象比较简单主要提供一个run以及setUrl方法,用于启动上传引擎,以及设置上传路径的功能。内部使用递归的方法把文件队列中的方法全部上传到服务端。使用uploadItemProgress通知外部上传的进度,使用uploadStatusChanged通知文件上传状态,以便更新UI.
uploaderApp.js中主要包括三个对象,一个是类似jquery的一个简单的jquery对象(App$)。主要用于绑定事件。一个是uploaderArea对象,是拖曳上传的窗口区域,另一个是入口对象uploaderMain对象。主要用于初始化对象,对外部提供一个init方法,来初始化整个对象。
了解关于App$以及uploaderArea对象的代码请下载 源代码 ,下面仅对uploaderMain对象做简单的说明。
(function (app) {
 var _self;

 function uploaderMain(id) {
  this._id = id;
  this._area = null;
  this.uploaders = [];

  this._URL = 'file/uploader';
 }

 uploaderMain.prototype = {
  init: function () {
   _self = this;
   this._initArea();
   this._initQueueEng();
  },
  _initQueueEng: function () {
   uploaderQueue.Engine.setUrl(this._URL);
   uploaderQueue.Engine.uploadStatusChanged = function (key, status) {
    if (status === uploaderQueue.UploadStatus.Uploading) {
     _self._area.hideItemCancel(key);
    } else if (status === uploaderQueue.UploadStatus.Complete) {
     _self._area.completeItem(key);
     _self._area.showItemCancel(key);
    }
   }
   uploaderQueue.Engine.uploadItemProgress = function (key, e) {
    var progress = e.position / e.total;
    _self._area.changeItemProgress(key, Math.round(progress * 100));
   }
  },
  _initArea: function () {
   this._area = new app.area(this._id);
   this._area.init();
   this._area.drop = function (e) {
    var key = uploaderQueue.Queue.add({files: e.dataTransfer.files});
    uploaderQueue.Engine.run();
    return key;
   }
   this._area.cancelItem = function (key) {
    uploaderQueue.Queue.remove(key);
   }
  }
 };


 app.main = uploaderMain;
})(window.uploaderApp);在uploaderMain对象,相当于各个对象之间的中介,主要就是做对象的初始化功能、以及对象之间相互调用。使各个对象之间相互协作完成整个模块的功能。对外提供一个init方法来初始化整个程序,在html页面中只需如下代码:
<script type="text/javascript"> var main=new uploaderApp.main('container'); main.init(); </script>
以上代码就是创建一个入口对象,然后使用init方法来启动整个程序。
以上是对前端js的主要方法做的简单解释,如果想详细了解请下载源代码。下面简单看下后端js(nodejs)端实现的主要代码。
在express基础知识时,已经讲过在express已经对文件上传功能做了完整的封装,当路由到action时,文件已经完成上传只是文件上传到了一个临时目录,这个临时目录我们可以在app.js中配置的,配置方式如下:
app.use(express.bodyParser({
  uploadDir:__dirname+'/public/temp'
}));这样在文件上传后文件就存放在/public/temp目录下,文件名也是express通过一定的算法随机获取的。在我们写的action中只需要把存在临时目录中的文件移动到服务端存放文件的目录下,然后删除临时目录下的文件即可。具体代码如下:
function uploader(req, res) {
 if (req.files != 'undifined') {
  console.dir(req.files);
  utils.mkDir().then(function (path) {
   uploadFile(req, res, path, 0);
  });

 }
}

function uploadFile(req, res, path, index) {
 var tempPath = req.files.file[index].path;
 var name = req.files.file[index].name;
 if (tempPath) {
  var rename = promise.denodeify(fs.rename);
  rename(tempPath, path + name).then(function () {
   var unlink = promise.denodeify(fs.unlink);
   unlink(tempPath);
  }).then(function () {
    if (index == req.files.file.length - 1) {
     var res = {
      code: 1,
      des: '上传成功'
     };
     res.send(res);
    } else {
     uploadFile(req, res, path, index + 1);
    }
   });
 }
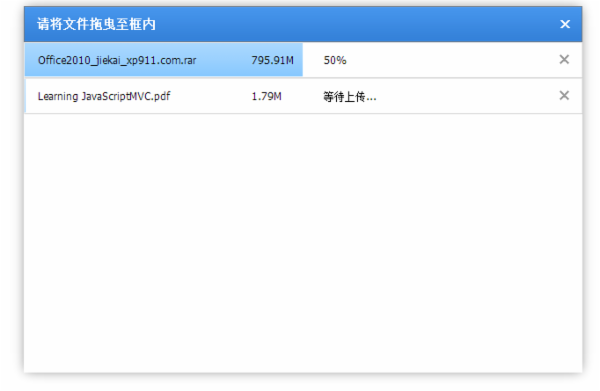
}2、实现效果

更多Nodejs+express+html5 实现拖拽上传相关文章请关注PHP中文网!


