This article will introduce you to the life cycle of Activity. If you have studied iOS, the life cycle of Activity is very similar to the life cycle of ViewController in iOS. Life cycle is not difficult to understand. A person's life cycle is nothing more than birth, old age, illness and death, and the life cycle of a flower is when it blooms and fades. The life cycle of Activity in Android is nothing more than the process from Activity creation to death. This blog will introduce the different stages in the Activity life cycle and take a peek at the Activity life cycle through examples. It is crucial to understand the life cycle of Activity, because only by understanding each stage of each life cycle can you do different things in different stages.
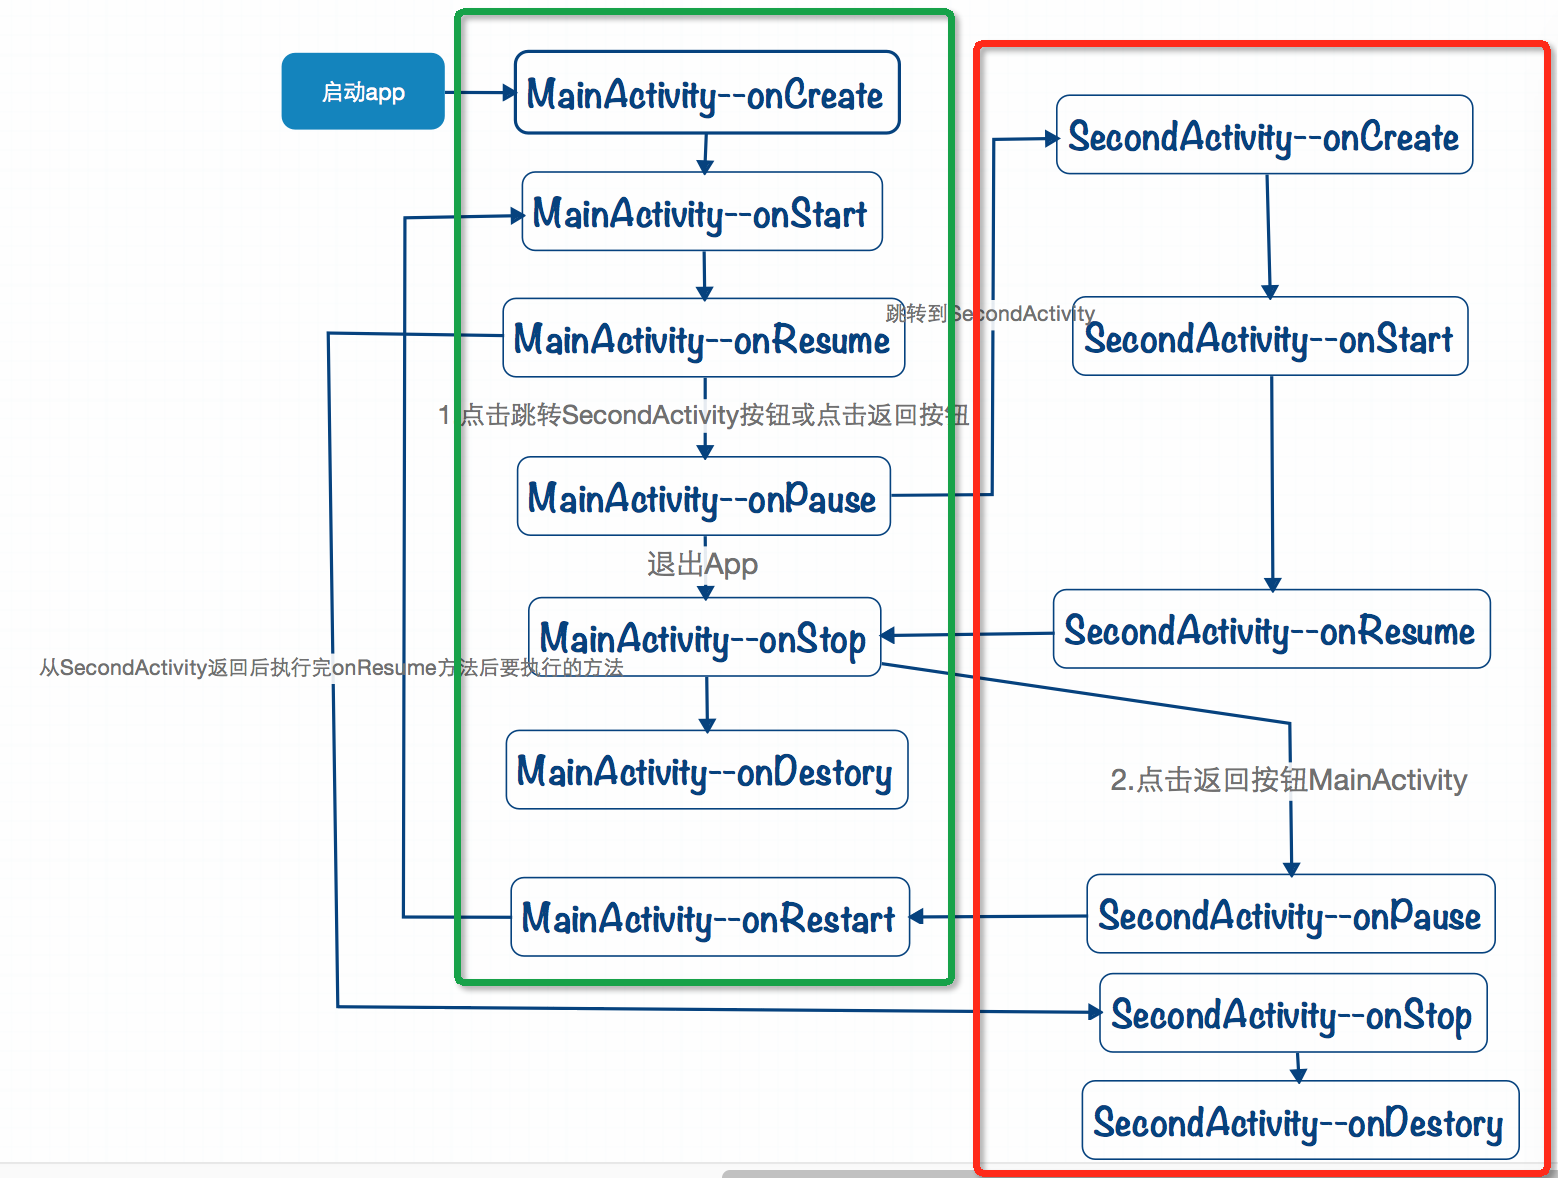
Next we will introduce the life cycle of Activity through an example. In this Demo, there will be a MainActivity. MainActivity is the first Activity displayed after the App is started. There is a button on MainActivity. Clicking this button will jump to SecondActivity. Clicking the return key will return from SecondActivity to MainActivity. Clicking the return key will exit the App. Through these series of Activity switching, we will observe the Activity life cycle by printing Log.
1. Code writing
In fact, the code of this blog is very simple. It is to rewrite the methods at different stages of the Activity life cycle, and then print Log in the method to mark stage of this life cycle. The UI of the Demo is also very simple, so I won’t go into too much detail on the layout file of the Activity. Next, take a look at the key codes in the two activities.
1. The code below is the key code in MainActivity. It rewrites different stages of the Activity life cycle, and then prints the log to mark which method in which Activity. Get the Button by id in the onCreate() method, then bind the click event to the button, and jump to SecondActivity when the button is clicked. The specific code is as follows.
@Override
  protected void onCreate(Bundle savedInstanceState) {
    super.onCreate(savedInstanceState);
    setContentView(R.layout.activity_main);
    Log.d("lifeCycle", "MainActivity: 我是onCreate方法,我会在Activity第一次被创建是调用");
    Button jumpButton = (Button) findViewById(R.id.jump_second_button);
    jumpButton.setOnClickListener(new View.OnClickListener() {
      @Override
      public void onClick(View v) {
        //跳转到SecondActivity
        Intent intent = new Intent(MainActivity.this, SecondActivity.class);
        startActivity(intent);
      }
    });
  }
  //Ctrl + O 选择父类中的方法进行重写
  @Override
  protected void onStart() {
    super.onStart();
    Log.d("lifeCycle", "MainActivity: 我是onStart方法,我会在Activity由不可见变为可见时调用");
  }
  @Override
  protected void onResume() {
    super.onResume();
    Log.d("lifeCycle", "MainActivity: 我是onResume方法,我在Activity处于运行状态时调用");
  }
  @Override
  protected void onPause() {
    super.onPause();
    Log.d("lifeCycle", "MainActivity: 我是onPause方法,我会在Activity暂停时调用");
  }
  @Override
  protected void onStop() {
    super.onStop();
    Log.d("lifeCycle", "MainActivity: 我是onStop方法,我会在Activity停止时调用");
  }
  @Override
  protected void onRestart() {
    super.onRestart();
    Log.d("lifeCycle", "MainActivity: 我是onRestart方法,我会在Activty从停止状态变为运行状态时调用");
  }
  @Override
  protected void onDestroy() {
    super.onDestroy();
    Log.d("lifeCycle", "MainActivity: 我是onDestroy方法,我会在Activty销毁之前调用");
}2. The above method is also rewritten in SecondActivity. The only difference is to change the MainActivity in the above log to SecondActivity. The code is similar and will not be pasted above.
2. Run and observe the printed log
Run our app, then observe the printed log, and analyze the Activity life cycle through examples. The specific steps are as follows:
1. Create and activate Activity
The Log printed when you open the App for the first time is as shown below. MainActivity is the first thing you see when you open the App. Through Log, we can easily see that the following three methods must be called when MainActivity appears for the first time. After the three methods below, MainActivty will be created, then become visible, and finally in a running state.
(1).onCreate() method: This method will be called when the Activity is created for the first time. In the previous Demo, we loaded the layout and or controls of the Activity and associated events in this method.
(2).onStar()t method: Then the onStart() method will be executed. This method will be called when the Activity changes from invisible to visible.
(3).onResume method: After the Activity becomes visible, the onResume method must be called to change to the running state.

2. Switching between Activities
To be clearer, before clicking the button to jump to SecondActivity, we can clear the Log. There is a garbage on the left below The bucket mark is used to clear previously printed logs. The log printed below is the log printed when the jump button is clicked. During this switching process, MianActivty will stop running and become invisible, and SecondActivy will be created and in a running state. Specific steps are as follows.
(1).onPause() method: When the jump button is clicked, the running MainActivity will call onPause() to become stopped, but it is still visible.
(2). Then the SecondActivity calls the onCreate() method to create, the onStart() method to display, and the onResume() method to run.
(3).onStop() method: When SecondActivity is running, MainActivity is completely invisible, so the onStop() method will be called to enter a completely invisible stop state.

3. Return from another Activity
Click the return key from SecondActivity to return to MainActivity from SecondActivity. The Log below is the Log printed when the return button is clicked.
(1)onPause() method: After clicking the return button, SecondActivity will call the onPause() method and enter the paused running state.
(2)onRestart() method: Then MainActivity will call the onRestart() method to change from the stopped state to the running state. Then MainActivity will call the onStart method from invisible to visible, and then call the onResume() method to finally enter the running state.
(3)当返回到MainActivity中并且MainActivity处于运行状态后,SecondActivity会调用onStop方法,停止运行并不可见。因为SecondActivty做的事出栈操作,停止运行后,就会调用onDestory方法进行销毁。下此在进入SecondActivity中时,还是从onCreate方法进行执行。

4.Activity退出并销毁
接着在MainActivity中点击返回按钮就会退出App了,下方是退出App时打印的Log信息。MainActivty先调用onPause()方法变为暂停运行状态,然后再调用onStop()方法停止运行,最后调用onDestroy()方法进行销毁。

三.生命周期流程图
1.上面是用语言通过实例打印出的Log来描述两个Activity切换的生命周期,接下来将用一个流程图来描述这一过程,具体流程图如下。

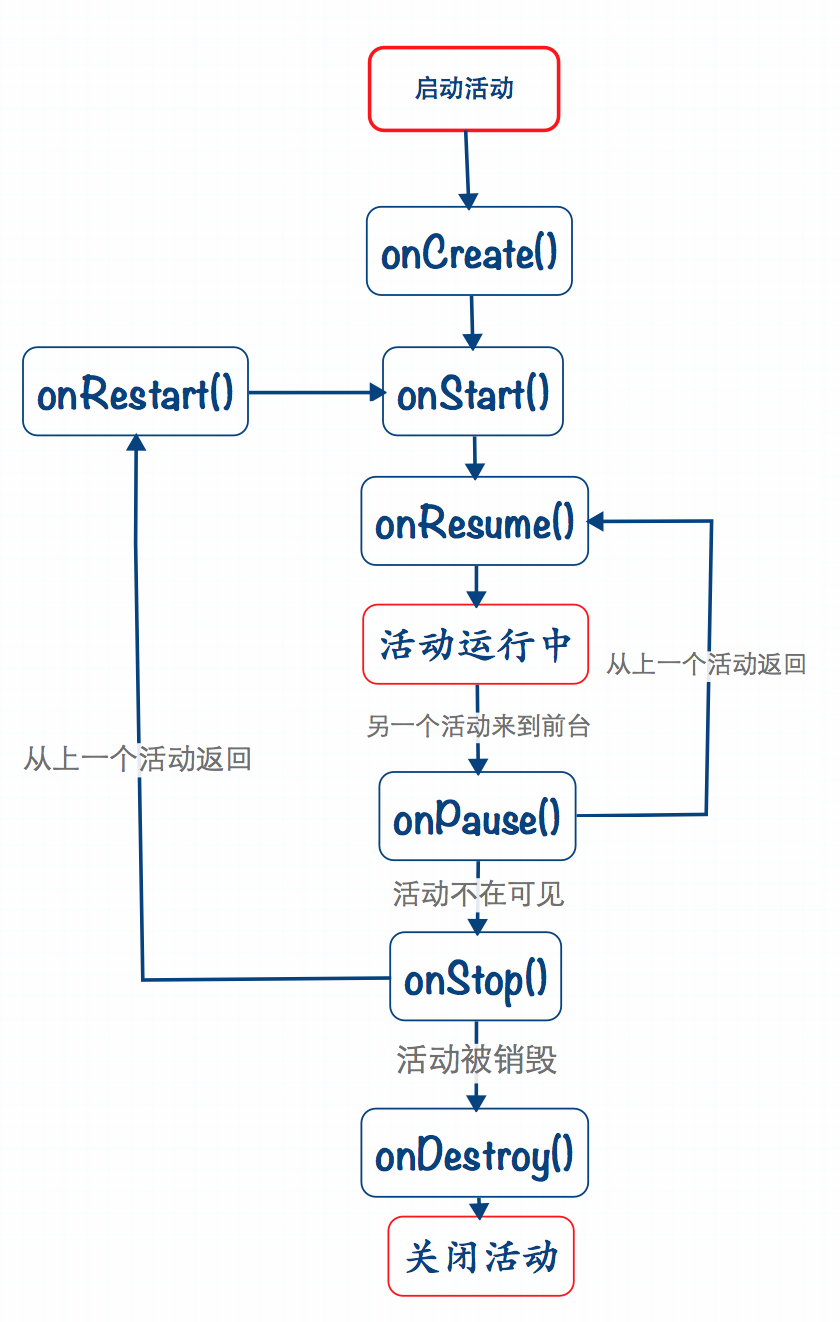
2.通过上面的实例不难分析出一个Activity的生命周期分为哪些阶段,并且很容易的看出哪些阶段在什么时候执行,所以我们很容易的画出一个Activity的生命周期,下方的流程图是一个Activity的生命周期。

四.Activity的加载模式
Activity的启用模式也较为简单,它会在活动切换时用到。Activity的启动模式分为四种,standard、singleTop、singleTask、singleInstance模式。接下来将为大家详细的介绍一下这几种加载模式。
Activity的加载模式可以在配置文件AndroidManifest.xml中进行配置,配置项为android:launchMode具体如下图所示:

1.standard模式
在Activity的栈中无论该活动有没有加入栈,活动就会被创建。测试方式是把MainActivity的launchMode设置成standard, 在MainActivity中添加一个按钮,点击按钮使用Intent跳转到当前Activity,看onCreate方法中打印的Log。点击按钮的方法如下:
Button launchModelButton = (Button) findViewById(R.id.launch_model_button);
    launchModelButton.setOnClickListener(new View.OnClickListener() {
      @Override
      public void onClick(View v) {
        Intent intent = new Intent(MainActivity.this, MainActivity.class);
        startActivity(intent);
      }
    });
standard加载模式的栈如下所示,无论栈中有没有该对象的实例,都会被创建。
2.singleTop模式
只要被创建的活动不位于栈的顶部,该活动就会被创建入栈。如果将要被创建的活动位于栈的顶部,该活动的实例就不会被创建。测试方法,把上面的模式直接改成singleTop模式,MainActivty往自己身上跳转就不会从新创建一个新的实例,会重用之前在栈顶中的实例。如果是MainActivty跳转到SecondActivty, 然后SecondActivity再次跳转到MainActivty, 那么此时的MainActivity将会被创建,因为栈顶是SecondActivity。如下所示:

3.singleTask模式
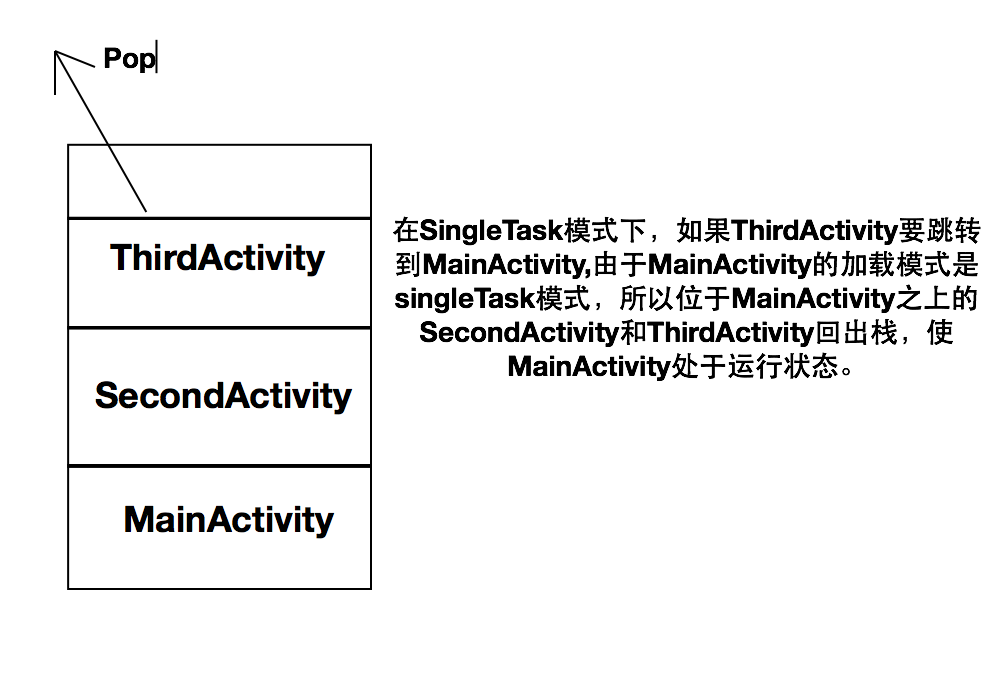
单任务模式,这个也不难理解,如果从MainActivty跳转到SecondActivity, 如果再从SecondActivty跳转到MainActivity, 在单任务模式下MainActivity已经在栈中,就会把它之前的Activity出栈,使其处于在栈顶活跃的位置。原理如下图所示:

4.singleInstance
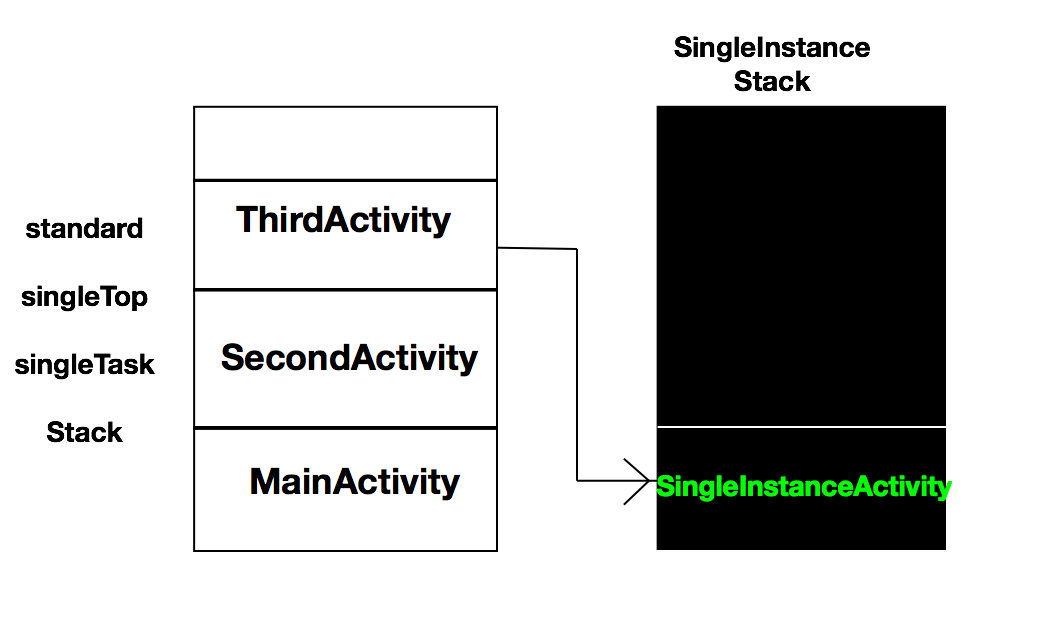
可以看成单例模式,这个比较特殊,被设置成singleInstance的Activity将会放入另一个栈中,因为这样为了便于共用。上面3中模式位于同一个栈中。下方ThirdActivity跳转到一个加载模式为singleInstance的Activity中。

Today’s Activity life cycle ends here, and the relevant content will be updated in the next blog.
For more detailed explanations of the life cycle and loading mode of Activity in Android development, please pay attention to the PHP Chinese website!


