Sometimes too many instructions can cause problems with misremembering or confusion. Therefore, when memorizing this article, we will use interleaved memory and cross-reference to make it less likely to make mistakes.
This article mainly talks about six instructions:
v-if//v-show//v-else//v-for//v-bind//v-on
1. v-if conditional rendering Instruction, determine whether to render the element based on the bool value of the subsequent expression;
eg:
HTML:
<p id="example01">
<p v-if="male">Male</p>
<p v-if="female">Female</p>
<p v-if="age>25">Age:{{age}}</p>
<p v-if="name.indexOf('lin')>0">Name:{{name}}</p>
</p>
JS:
var vm= new Vue({
 el:"#example01",
 data:{
  male:true,
  female: false,
  age:29,
  name:'colin'
 }
 })
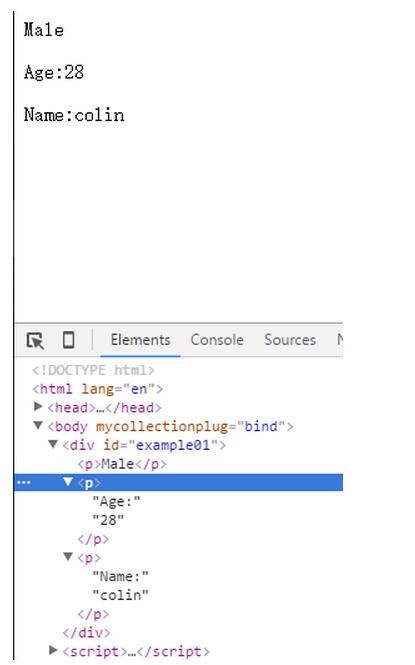
Page rendering effect:

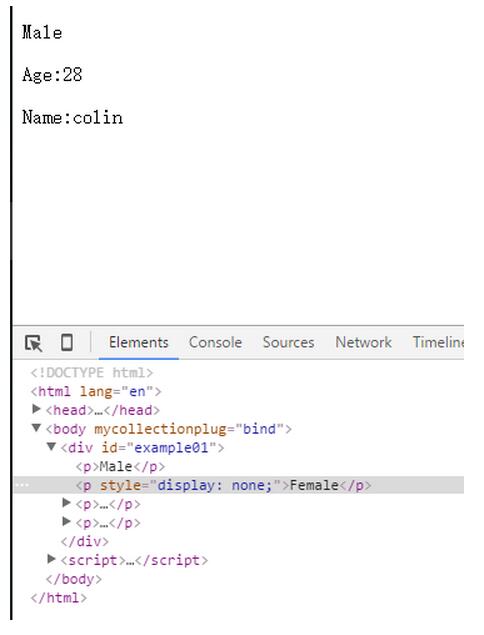
So, the v-if instruction only renders elements whose expression behind it is true; v-show instruction is introduced here, because the difference between the two is that the v-show instruction will render elements whose expression behind it is false, like this The css code will be added to the element: style="max-width:90%"; Change the above v-if example code to v-show, and the page rendering effect is:

2, v-show is similar to v-if. It will only render elements whose expression behind them is false, and will add css code to such elements: style="max-width:90%";
3, v-else must follow the v-if/v-show directive, Otherwise it will not work;
If the expression of the v-if/v-show directive is true, the else element is not displayed; if the expression of the v-if/v-show directive is false, the else element is displayed on the page ;
eg:
<p id="app">
<h1 v-if="age >= 25">Age: {{ age }}</h1>
<h1 v-else>Name: {{ name }}</h1>
<hr>
<h1 v-show="name.indexOf('cool') = 0">Name: {{ name }}</h1>
<h1 v-else>Sex: {{ sex }}</h1>
</p>
<script>
var vm = new Vue({
el: '#app',
data: {
age: 21,
name: 'keepcool',
sex: 'Male'
}
})
</script>
4, v-for Similar to JS traversal, the usage is v-for="item in items", items is an array, and item is an array element in the array.
eg:
CSS:
<style>
table,th,tr,td{
  border:1px solid #ffcccc;
  border-collapse: collapse;
 }
</style>
HTML:
<p id="example03">
 <table>
 <thead>
 <tr>
  <th>Name</th>
  <th>Age</th>
  <th>Sex</th>
 </tr>
 </thead>
 <tbody>
 <tr v-for="person in people">
  <td>{{ person.name }}</td>
  <td>{{ person.age }}</td>
  <td>{{ person.sex }}</td>
 </tr>
 </tbody>
 </table>
</p>
JS:
<script>
var vm = new Vue({
el: '#example03',
data: {
people: [{
name: 'Jack',
age: 30,
sex: 'Male'
}, {
name: 'Bill',
age: 26,
sex: 'Male'
}, {
name: 'Tracy',
age: 22,
sex: 'Female'
}, {
name: 'Chris',
age: 36,
sex: 'Male'
}]
}
})
</script>
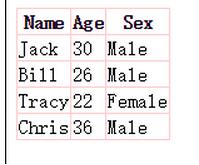
Page effect:

5, v-bind this Directives are used to update HTML features responsively, such as binding a class element or the style of an element.
eg, to highlight the current page number in the paging function, you can use the bind command.
<ul class="pagination">
<li v-for="n in pageCount">
<a href="javascripit:void(0)" v-bind:class="activeNumber === n + 1 ? 'active' : ''">{
{ n + 1 }}</a>
</li>
</ul>
6, v-on is used to listen to DOM events of specified elements, such as click events.
eg:
<p id="example04">
 <input type="text" v-model="message">
 <button v-on:click="greet">Greet</button>
 <!-- v-on指令可以缩写为@符号-->
 <button @click="greet">Greet Again</button>
 </p>
<script>
 var exampleData04={
 message:"Nice meeting U"
 };
 var vm2=new Vue({
 el:"#example04",
 data:exampleData04,
 methods:{
  greet:function(){
  alert(this.message);
  }

 }
 })
</script>The above is the summary of common instructions of Vue.js (v-if, v-for, etc.). For more related content, please pay attention to the PHP Chinese website (m.sbmmt.com)!


