Foreword
The detailed steps of Android custom View are skills that every Android developer must master, because we will always encounter the need for custom View during development. In order to improve my technical level, I systematically studied it and wrote down some experiences here. I hope everyone will point out any shortcomings in time.
Process
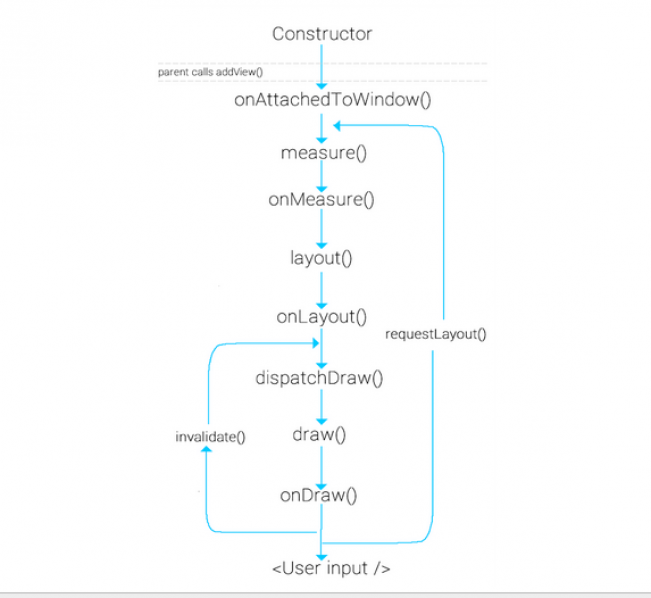
In Android, layout request drawing is started at the Android framework layer. Drawing starts from the root node and measures and draws the layout tree. Expand performTraversals in RootViewImpl. What it does is measure (measure the size of the view), layout (determine the position of the view) and draw (draw the view) on the required view. The following picture can well show the drawing process of the view:

When the user calls requestLayout, only measure and layout will be triggered, but draw will also be triggered when the system starts calling
The following will introduce these processes in detail .
measure
measure is a final method in View and cannot be overridden. It measures and calculates the size of the view, but it will call back the onMeasure method, so when we customize the View, we can override the onMeasure method to measure the View as we need. It has two parameters widthMeasureSpec and heightMeasureSpec. In fact, these two parameters contain two parts, namely size and mode. size is the measured size and mode is the view layout mode
We can obtain it through the following code:
int widthSize = MeasureSpec.getSize(widthMeasureSpec);
int heightSize = MeasureSpec.getSize(heightMeasureSpec);
int widthMode = MeasureSpec.getMode(widthMeasureSpec);
int heightMode = MeasureSpec.getMode(heightMeasureSpec);
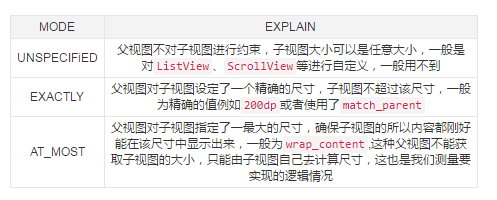
The obtained mode types are divided into the following three types:

setMeasuredDimension
obtain the view through the above logic Width and height, finally call the setMeasuredDimension method to pass the measured width and height. In fact, in the end, the setMeasuredDimensionRaw method is called to assign attributes to the passed value. The calling logic for calling super.onMeasure() is also the same.
The following is an example of customizing a verification code View. Its onMeasure method is as follows:
@Override
    protected void onMeasure(int widthMeasureSpec, int heightMeasureSpec) {
        int widthSize = MeasureSpec.getSize(widthMeasureSpec);
        int heightSize = MeasureSpec.getSize(heightMeasureSpec);
        int widthMode = MeasureSpec.getMode(widthMeasureSpec);
        int heightMode = MeasureSpec.getMode(heightMeasureSpec);
        if (widthMode == MeasureSpec.EXACTLY) {
            //直接获取精确的宽度
            width = widthSize;
        } else if (widthMode == MeasureSpec.AT_MOST) {
            //计算出宽度(文本的宽度+padding的大小)
            width = bounds.width() + getPaddingLeft() + getPaddingRight();
        }
        if (heightMode == MeasureSpec.EXACTLY) {
            //直接获取精确的高度
            height = heightSize;
        } else if (heightMode == MeasureSpec.AT_MOST) {
            //计算出高度(文本的高度+padding的大小)
            height = bounds.height() + getPaddingBottom() + getPaddingTop();
        }
        //设置获取的宽高
        setMeasuredDimension(width, height);
}You can set different attributes for the layout_width and layout_height of the custom View to achieve different mode types, and you can see different Effect
measureChildren
If you are customizing a View that inherits ViewGroup, you must also measure the size of the subview when measuring its own size. Generally, the size of the subview is measured through the measureChildren(int widthMeasureSpec, int heightMeasureSpec) method.
protected void measureChildren(int widthMeasureSpec, int heightMeasureSpec) {
        final int size = mChildrenCount;
        final View[] children = mChildren;
        for (int i = 0; i < size; ++i) {
            final View child = children[i];
            if ((child.mViewFlags & VISIBILITY_MASK) != GONE) {
                measureChild(child, widthMeasureSpec, heightMeasureSpec);
            }
        }
}Through the above source code, you will find that it actually traverses each subview. If the subview is not hidden, the measureChild method is called. Then take a look at the measureChild source code:
protected void measureChild(View child, int parentWidthMeasureSpec,
            int parentHeightMeasureSpec) {
        final LayoutParams lp = child.getLayoutParams();
        final int childWidthMeasureSpec = getChildMeasureSpec(parentWidthMeasureSpec,
                mPaddingLeft + mPaddingRight, lp.width);
        final int childHeightMeasureSpec = getChildMeasureSpec(parentHeightMeasureSpec,
                mPaddingTop + mPaddingBottom, lp.height);
        child.measure(childWidthMeasureSpec, childHeightMeasureSpec);
}You will find that it first calls the getChildMeasureSpec method. Get the width and height respectively, and finally call the measure method of View. From the previous analysis, we already know that what it does is calculate the size of the view. The parameters in measure are obtained through getChildMeasureSpec. Let’s take a look at the source code:
public static int getChildMeasureSpec(int spec, int padding, int childDimension) {
        int specMode = MeasureSpec.getMode(spec);
        int specSize = MeasureSpec.getSize(spec);

        int size = Math.max(0, specSize - padding);

        int resultSize = 0;
        int resultMode = 0;

        switch (specMode) {
        // Parent has imposed an exact size on us
        case MeasureSpec.EXACTLY:
            if (childDimension >= 0) {
                resultSize = childDimension;
                resultMode = MeasureSpec.EXACTLY;
            } else if (childDimension == LayoutParams.MATCH_PARENT) {
                // Child wants to be our size. So be it.
                resultSize = size;
                resultMode = MeasureSpec.EXACTLY;
            } else if (childDimension == LayoutParams.WRAP_CONTENT) {
                // Child wants to determine its own size. It can't be
                // bigger than us.
                resultSize = size;
                resultMode = MeasureSpec.AT_MOST;
            }
            break;

        // Parent has imposed a maximum size on us
        case MeasureSpec.AT_MOST:
            if (childDimension >= 0) {
                // Child wants a specific size... so be it
                resultSize = childDimension;
                resultMode = MeasureSpec.EXACTLY;
            } else if (childDimension == LayoutParams.MATCH_PARENT) {
                // Child wants to be our size, but our size is not fixed.
                // Constrain child to not be bigger than us.
                resultSize = size;
                resultMode = MeasureSpec.AT_MOST;
            } else if (childDimension == LayoutParams.WRAP_CONTENT) {
                // Child wants to determine its own size. It can't be
                // bigger than us.
                resultSize = size;
                resultMode = MeasureSpec.AT_MOST;
            }
            break;

        // Parent asked to see how big we want to be
        case MeasureSpec.UNSPECIFIED:
            if (childDimension >= 0) {
                // Child wants a specific size... let him have it
                resultSize = childDimension;
                resultMode = MeasureSpec.EXACTLY;
            } else if (childDimension == LayoutParams.MATCH_PARENT) {
                // Child wants to be our size... find out how big it should
                // be
                resultSize = View.sUseZeroUnspecifiedMeasureSpec ? 0 : size;
                resultMode = MeasureSpec.UNSPECIFIED;
            } else if (childDimension == LayoutParams.WRAP_CONTENT) {
                // Child wants to determine its own size.... find out how
                // big it should be
                resultSize = View.sUseZeroUnspecifiedMeasureSpec ? 0 : size;
                resultMode = MeasureSpec.UNSPECIFIED;
            }
            break;
        }
        //noinspection ResourceType
        return MeasureSpec.makeMeasureSpec(resultSize, resultMode);
}Is it a little easier to understand? What it does is to obtain the corresponding size according to the mode type as mentioned earlier. The mode to which the subview belongs is determined based on the mode type of the parent view and the LayoutParams type of the subview. Finally, the obtained size and mode are integrated and returned through the MeasureSpec.makeMeasureSpec method. Finally, it is passed to measure, which is the value of the two parts contained in widthMeasureSpec and heightMeasureSpec mentioned earlier. The whole process is measureChildren->measureChild->getChildMeasureSpec->measure->onMeasure->setMeasuredDimension, so the subview can be measured and calculated through measureChildren.
layout
layout is also the same. The onLayout method will be called back internally. This method is used to determine the drawing position of the subview, but this method is an abstract method in ViewGroup, so if the View you want to customize inherits ViewGroup, you must Implement this method. But if you inherit View, you don't need it. There is an empty implementation in View. The position of the subview is set by passing the calculated left, top, right and bottom values through the layout method of the View. These values are generally calculated with the help of the width and height of the View. The width and height of the View can be calculated through getMeasureWidth and GetMeasureHeight method, the value obtained by these two methods is the value passed by setMeasuredDimension in onMeasure above, that is, the width and height measured by the subview.
getWidth, getHeight and getMeasureWidth, getMeasureHeight are different. The former is a value that can only be obtained after onLayout, which are left-right and top-bottom respectively; while the latter is a value that can only be obtained after onMeasure. However, the values obtained by these two methods are generally the same, so pay attention to the timing of the call.
The following is an example of defining a View that places subviews at the four corners of the parent view:
@Override
    protected void onLayout(boolean changed, int l, int t, int r, int b) {
        int count = getChildCount();
        MarginLayoutParams params;

        int cl;
        int ct;
        int cr;
        int cb;

        for (int i = 0; i < count; i++) {
            View child = getChildAt(i);
            params = (MarginLayoutParams) child.getLayoutParams();

            if (i == 0) {
                //左上角
                cl = params.leftMargin;
                ct = params.topMargin;
            } else if (i == 1) {
                //右上角
                cl = getMeasuredWidth() - params.rightMargin - child.getMeasuredWidth();
                ct = params.topMargin;
            } else if (i == 2) {
                //左下角
                cl = params.leftMargin;
                ct = getMeasuredHeight() - params.bottomMargin - child.getMeasuredHeight()
                 - params.topMargin;
            } else {
                //右下角
                cl = getMeasuredWidth() - params.rightMargin - child.getMeasuredWidth();
                ct = getMeasuredHeight() - params.bottomMargin - child.getMeasuredHeight()
                 - params.topMargin;
            }
            cr = cl + child.getMeasuredWidth();
            cb = ct + child.getMeasuredHeight();
            //确定子视图在父视图中放置的位置
            child.layout(cl, ct, cr, cb);
        }
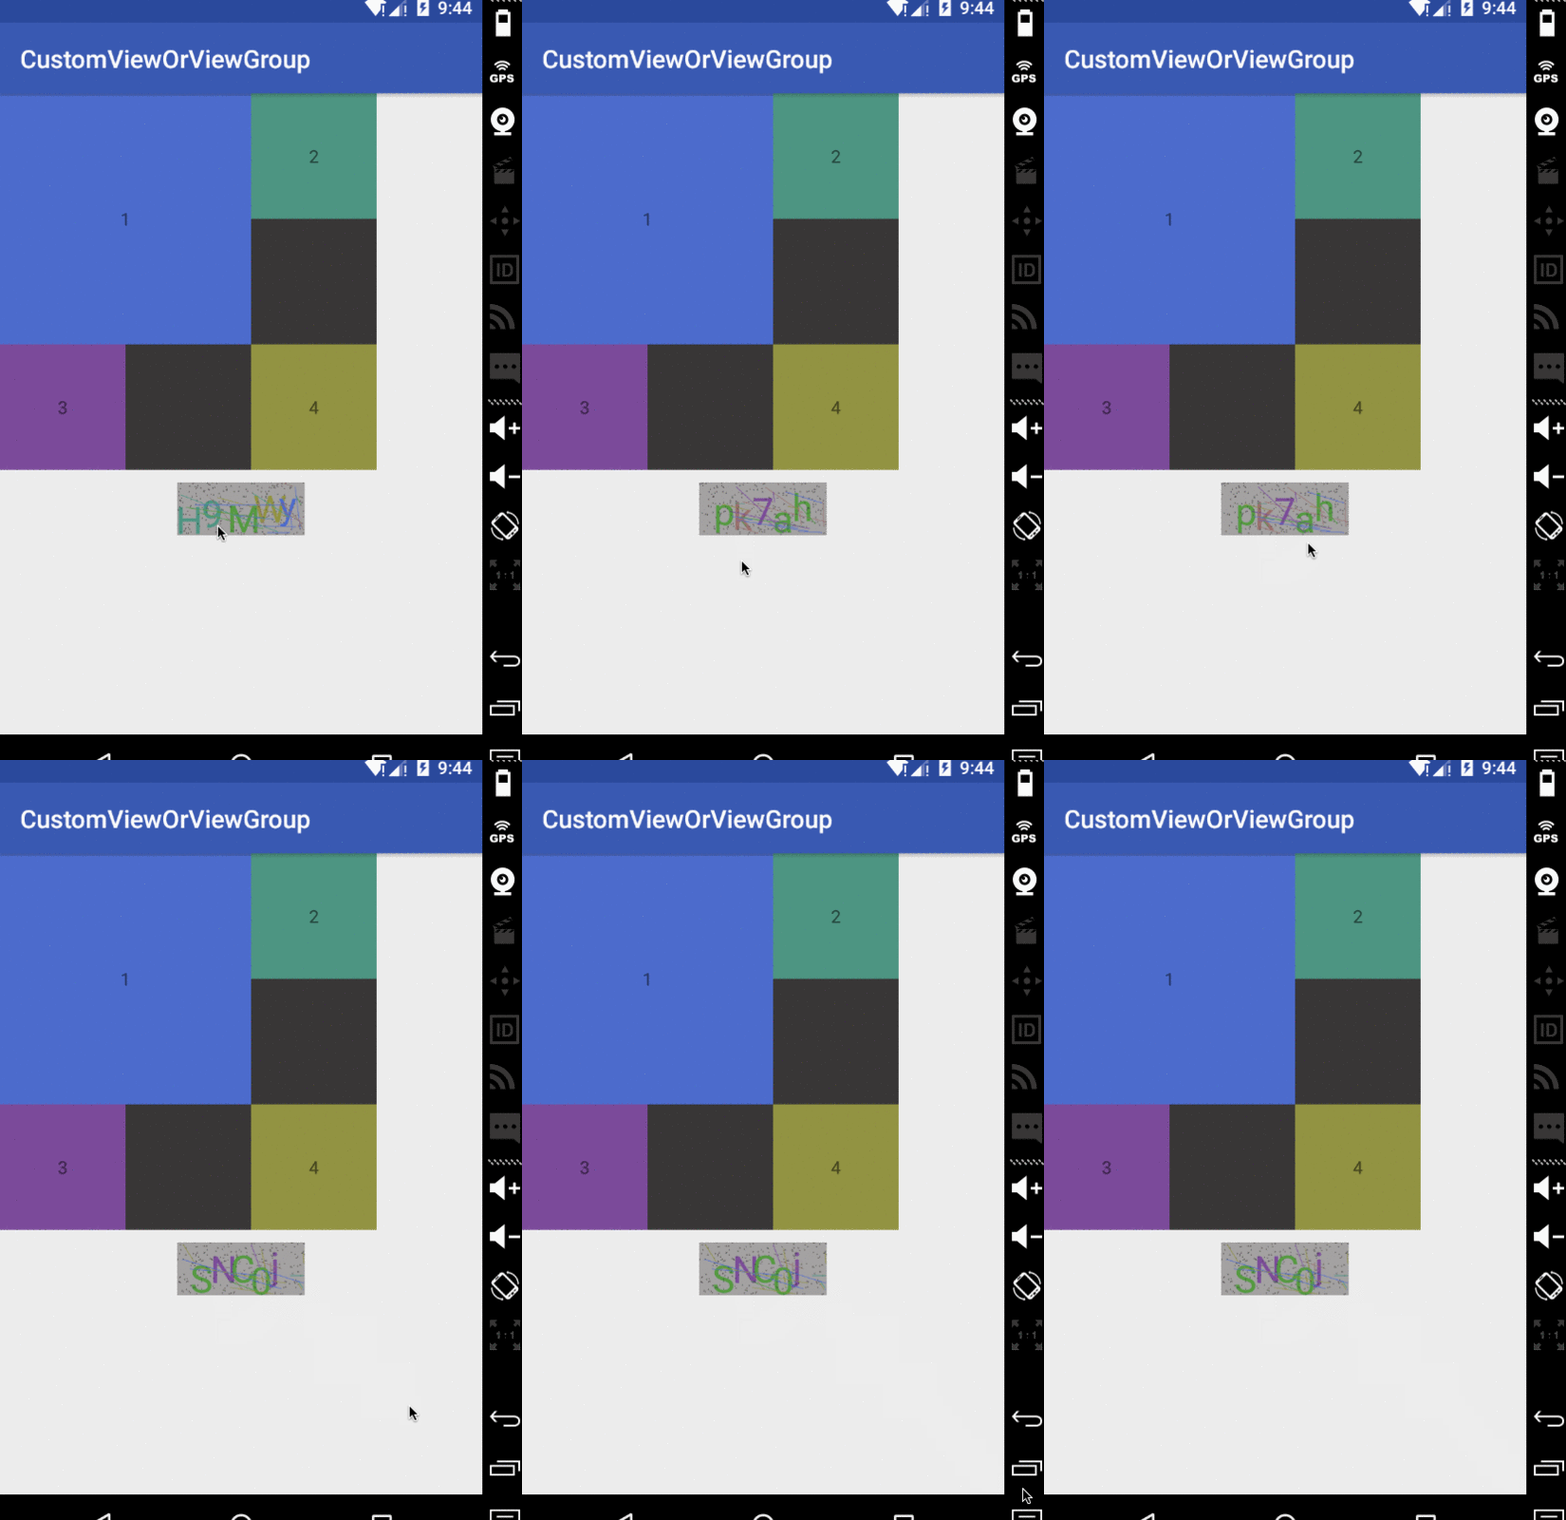
}As for the implementation source code of onMeasure, I will link to it later. If you want to see the rendering, I will also post it later. The same goes for the previous verification code
draw
draw是由dispatchDraw发动的,dispatchDraw是ViewGroup中的方法,在View是空实现。自定义View时不需要去管理该方法。而draw方法只在View中存在,ViewGoup做的只是在dispatchDraw中调用drawChild方法,而drawChild中调用的就是View的draw方法。那么我们来看下draw的源码:
public void draw(Canvas canvas) {
        final int privateFlags = mPrivateFlags;
        final boolean dirtyOpaque = (privateFlags & PFLAG_DIRTY_MASK) == PFLAG_DIRTY_OPAQUE &&
                (mAttachInfo == null || !mAttachInfo.mIgnoreDirtyState);
        mPrivateFlags = (privateFlags & ~PFLAG_DIRTY_MASK) | PFLAG_DRAWN;

        /*
         * Draw traversal performs several drawing steps which must be executed
         * in the appropriate order:
         *
         *      1. Draw the background
         *      2. If necessary, save the canvas' layers to prepare for fading
         *      3. Draw view's content
         *      4. Draw children
         *      5. If necessary, draw the fading edges and restore layers
         *      6. Draw decorations (scrollbars for instance)
         */

        // Step 1, draw the background, if needed
        int saveCount;

        if (!dirtyOpaque) {
            drawBackground(canvas);
        }

        // skip step 2 & 5 if possible (common case)
        final int viewFlags = mViewFlags;
        boolean horizontalEdges = (viewFlags & FADING_EDGE_HORIZONTAL) != 0;
        boolean verticalEdges = (viewFlags & FADING_EDGE_VERTICAL) != 0;
        if (!verticalEdges && !horizontalEdges) {
            // Step 3, draw the content
            if (!dirtyOpaque) onDraw(canvas);

            // Step 4, draw the children
            dispatchDraw(canvas);

            // Overlay is part of the content and draws beneath Foreground
            if (mOverlay != null && !mOverlay.isEmpty()) {
                            mOverlay.getOverlayView().dispatchDraw(canvas);
            }

            // Step 6, draw decorations (foreground, scrollbars)
            onDrawForeground(canvas);

            // we're done...
            return;
        }
        //省略2&5的情况
        ....
}源码已经非常清晰了draw总共分为6步;
绘制背景
如果需要的话,保存layers
绘制自身文本
绘制子视图
如果需要的话,绘制fading edges
绘制scrollbars
其中 第2步与第5步不是必须的。在第3步调用了onDraw方法来绘制自身的内容,在View中是空实现,这就是我们为什么在自定义View时必须要重写该方法。而第4步调用了dispatchDraw对子视图进行绘制。还是以验证码为例:
@Override
    protected void onDraw(Canvas canvas) {
        //绘制背景
        mPaint.setColor(getResources().getColor(R.color.autoCodeBg));
        canvas.drawRect(0, 0, getMeasuredWidth(), getMeasuredHeight(), mPaint);

        mPaint.getTextBounds(autoText, 0, autoText.length(), bounds);
        //绘制文本
        for (int i = 0; i < autoText.length(); i++) {
             mPaint.setColor(getResources().getColor(colorRes[random.nextInt(6)]));
            canvas.drawText(autoText, i, i + 1, getWidth() / 2 - bounds.width() / 2 + i * bounds.width() / autoNum
                    , bounds.height() + random.nextInt(getHeight() - bounds.height())
                    , mPaint);
        }

        //绘制干扰点
        for (int j = 0; j < 250; j++) {
             canvas.drawPoint(random.nextInt(getWidth()), random.nextInt(getHeight()), pointPaint);
        }

        //绘制干扰线
        for (int k = 0; k < 20; k++) {
            int startX = random.nextInt(getWidth());
            int startY = random.nextInt(getHeight());
            int stopX = startX + random.nextInt(getWidth() - startX);
            int stopY = startY + random.nextInt(getHeight() - startY);
             linePaint.setColor(getResources().getColor(colorRes[random.nextInt(6)]));
            canvas.drawLine(startX, startY, stopX, stopY, linePaint);
        }
}图,与源码链接
示例图


