


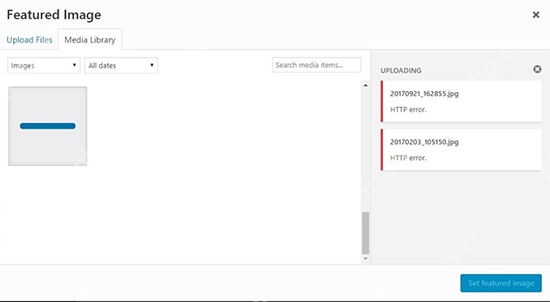
How to fix HTTP image upload errors in WordPress (simple)

Do you need to fix HTTP image upload errors in WordPress?
This error can be particularly frustrating when you create content in WordPress. This usually happens when you upload images or other files to CMS using the built-in WordPress media library.
In this article, we will show you how to easily fix HTTP image upload errors in WordPress.

What is the reason for HTTP errors during WordPress media uploading?
Many things can cause HTTP errors when you try to upload files to a WordPress website using the WordPress media uploader.
Basically, WordPress can't figure out why, which is why it displays a generic "HTTP Error" message.
The frustrating thing about this WordPress HTTP error is that it doesn't give you any clues about what might be causing the error. This means you have to try different solutions to find the cause and fix the error.
That being said, let's see how to troubleshoot and fix HTTP errors during media uploads in WordPress. Feel free to use the link below to jump to a specific method:
- Method 1: Make sure the HTTP error is not temporary
- Method 2: Deactivate all WordPress plugins
- Method 3: Increase WordPress memory limit
- Method 4: Change the image editor library used by WordPress
- Method 5: Use the .htaccess method
- Method 6: Update PHP version
Method 1: Make sure the HTTP error is not temporary
First, you should wait a few minutes before trying to upload the image file to your WordPress website again. This error is sometimes caused by abnormal traffic and insufficient server resources, and most WordPress hosting servers automatically fix these issues.
If this doesn't work, you may want to try one or more of the following:
- Refresh the browser or clear the browser cache.
- Resize the file and rename it, and upload it to the media library again. Check out our list of image optimization plugins to reduce file size.
- Save files in different formats. For example, you can change JPEG to PNG using image editing software. After that, try uploading the file again.
If all these steps still result in an HTTP error, the error is not caused by a temporary failure and you absolutely need immediate attention.
Method 2: Deactivate all WordPress plugins
If you have just recently installed a new WordPress plugin, it may be incompatible with your other plugins and interrupt the image upload process. To see if this is the case, you can disable all WordPress plugins.
If the HTTP error disappears after the WordPress plugin is disabled, then this may be the culprit for the HTTP upload image error. You can install alternative plugins or contact the developer for support.
For more information, check out our guide on how to easily deactivate all WordPress plugins and how to deactivate plugins when your WordPress dashboard is not accessible.
Method 3: Increase WordPress memory limit
WordPress is written in the PHP programming language. Additionally, the amount of memory allocated to different PHP processes is determined by your web hosting server.
If uploading images requires more PHP memory than available memory, you may see HTTP image upload errors in WordPress.
To resolve this issue, you need to increase the memory that PHP can use on the server.
You first need to access the site's files using the FTP client or the File Manager application in the Web Hosting Dashboard. Next, go to the root directory and find the wp-config.php file.

Then you need to edit the wp-config.php file using a text editor and add the following line of code to it:
define( 'WP_MEMORY_LIMIT', '256M');
Depend on
Use it with one click in WordPress
This code increases the WordPress memory limit to 256MB, which is enough to solve any memory limit issues.
Finally, you have to save the file and upload it back to the server.
To learn more, see our step-by-step guide on how to increase PHP memory limits in WordPress.
Method 4: Change the image editor library used by WordPress
WordPress runs on PHP, which uses two modules to process images. These modules are called GD Library and Imagick. WordPress can use one of them, depending on which one is available.
However, Imagick often encounters memory problems, resulting in HTTP errors during image upload. To resolve this issue, you can set the GD library as the default image editor.
You can do this by simply adding this code to the functions.php file of your WordPress theme or using WPCode (recommended):
functionwpb_image_editor_default_to_gd( $editors) { $gd_editor= 'WP_Image_Editor_GD'; $editors= array_diff( $editors, array( $gd_editor) ); array_unshift( $editors, $gd_editor); return$editors;}add_filter( 'wp_image_editors', 'wpb_image_editor_default_to_gd');
Depend on
Use it with one click in WordPress
For more details, you can see our guide on how to add custom code in WordPress.
After adding this code, you can use the Media Uploader to retry uploading the file. If this doesn't solve the problem, then you can delete this code and try the other methods described in this article.
Method 5: Use the .htaccess method
This method allows you to control how Imagick uses server resources. Many shared hosting providers limit Imagick's ability to use multithreading to speed up image processing. However, this causes you to see an HTTP error when uploading the image.
An easy fix is to add the following code to the .htaccess file:
SetEnv MAGICK_THREAD_LIMIT 1
Depend on
Use it with one click in WordPress
This code just limits Imagick to use a single thread to process images.
Method 6: Update PHP version
If your WordPress website is using an outdated version of PHP, an HTTP image upload error may be triggered. This is because newer PHP versions have performance improvements and generally use less memory.
Fortunately, it is easy to check and update the PHP version of the site. For more details, see our beginner's guide to learn how to update your PHP version in WordPress.
We hope this article helps you fix HTTP image upload errors in WordPress. You might also want to check out our final list of our most common WordPress bugs and how to fix them, as well as the best email marketing services we have selected for small businesses by experts.
The above is the detailed content of How to fix HTTP image upload errors in WordPress (simple). For more information, please follow other related articles on the PHP Chinese website!

Hot AI Tools

Undress AI Tool
Undress images for free

Undresser.AI Undress
AI-powered app for creating realistic nude photos

AI Clothes Remover
Online AI tool for removing clothes from photos.

Clothoff.io
AI clothes remover

Video Face Swap
Swap faces in any video effortlessly with our completely free AI face swap tool!

Hot Article
Hot Tools

Notepad++7.3.1
Easy-to-use and free code editor

SublimeText3 Chinese version
Chinese version, very easy to use

Zend Studio 13.0.1
Powerful PHP integrated development environment

Dreamweaver CS6
Visual web development tools

SublimeText3 Mac version
God-level code editing software (SublimeText3)
Hot Topics
 1793
1793
 16
1736
56
1587
29
267
587
16
1736
56
1587
29
267
587

 Binance Exchange Official Website_Binance Official Website Security Portal
Jul 18, 2025 am 06:09 AM
Binance Exchange Official Website_Binance Official Website Security Portal
Jul 18, 2025 am 06:09 AM
Binance is the world's leading digital asset trading platform, providing a variety of services and supporting multilingual and fiat currency recharges; if the official website access is restricted, you can use official acceleration services or mirroring sites; verify the security of the official website, you must confirm that the URL starts with https, avoid suspicious links, and enter through recommended links or search engine advertising logos; to deal with restricted access, you can use Binance's official APP, acceleration solutions in the official announcement, and follow official social media to obtain entrance updates; at the same time, users are reminded not to disclose account information, and must enable two-step verification and other security measures.
 What are the cryptocurrency market websites? Recommended virtual currency market websites
Jul 17, 2025 pm 09:30 PM
What are the cryptocurrency market websites? Recommended virtual currency market websites
Jul 17, 2025 pm 09:30 PM
In the ever-changing virtual currency market, timely and accurate market data is crucial. The free market website provides investors with a convenient way to understand key information such as price fluctuations, trading volume, and market value changes of various digital assets in real time. These platforms usually aggregate data from multiple exchanges, and users can get a comprehensive market overview without switching between exchanges, which greatly reduces the threshold for ordinary investors to obtain information.
 How to identify fake altcoins? Teach you to avoid cryptocurrency fraud
Jul 15, 2025 pm 10:36 PM
How to identify fake altcoins? Teach you to avoid cryptocurrency fraud
Jul 15, 2025 pm 10:36 PM
To identify fake altcoins, you need to start from six aspects. 1. Check and verify the background of the materials and project, including white papers, official websites, code open source addresses and team transparency; 2. Observe the online platform and give priority to mainstream exchanges; 3. Beware of high returns and people-pulling modes to avoid fund traps; 4. Analyze the contract code and token mechanism to check whether there are malicious functions; 5. Review community and media operations to identify false popularity; 6. Follow practical anti-fraud suggestions, such as not believing in recommendations or using professional wallets. The above steps can effectively avoid scams and protect asset security.
 OEX official website entrance OEX (Ouyi) platform official registration entrance
Jul 17, 2025 pm 08:42 PM
OEX official website entrance OEX (Ouyi) platform official registration entrance
Jul 17, 2025 pm 08:42 PM
The OEX official website entrance is the primary channel for users to enter the OEX (OEX) platform. The platform is known for its safety, efficiency and convenience, and provides currency trading, contract trading, financial management services, etc. 1. Visit the official website; 2. Click "Register" to fill in your mobile phone number or email address; 3. Set your password and verify; 4. Log in after successful registration. The platform's advantages include high security, simple operation, rich currency, and global service. It also provides beginner's guidance and teaching modules, suitable for all types of investors.
 Binance Exchange official download link Binance latest version app installation tutorial
Jul 11, 2025 pm 07:45 PM
Binance Exchange official download link Binance latest version app installation tutorial
Jul 11, 2025 pm 07:45 PM
Binance is a world-renowned digital asset trading platform, providing users with secure, stable and convenient cryptocurrency trading services. Users can buy, sell, manage and market the transactions of hundreds of digital currencies such as Bitcoin and Ethereum anytime, anywhere through their official app.
 The latest Android official version of the Italian-Europe OKE Exchange v6.129.0 installation process
Jul 11, 2025 pm 07:12 PM
The latest Android official version of the Italian-Europe OKE Exchange v6.129.0 installation process
Jul 11, 2025 pm 07:12 PM
The Italian-Europe OKE Exchange is a world-renowned digital asset trading platform that provides users with safe and reliable trading services. Its official Android App has comprehensive functions, convenient operation, and supports the transaction and management of a variety of digital assets.
 Binance v2.102.5 version update guide_Binance v2.102.5 newbie update guide
Jul 11, 2025 pm 10:00 PM
Binance v2.102.5 version update guide_Binance v2.102.5 newbie update guide
Jul 11, 2025 pm 10:00 PM
The latest version of Binance is v2.102.5, and the update tutorial is: 1. Click the download link in the web page; 2. Authorize the installation permission of "Allow installation from unknown sources"; 3. Find the downloaded APk and click to install; 4. Click the installed application to open it.
 How to update Binance v2.102.5_One-click update tutorial for Binance v2.102.5 version
Jul 11, 2025 pm 10:03 PM
How to update Binance v2.102.5_One-click update tutorial for Binance v2.102.5 version
Jul 11, 2025 pm 10:03 PM
The latest version of Binance is v2.102.5, and the update tutorial is: 1. Click the download link in the web page; 2. Authorize the installation permission of "Allow installation from unknown sources"; 3. Find the downloaded APk and click to install; 4. Click the installed application to open it.
