


While browsing Windows forums, many users have reported the issue of the drive letter changed by itself. This can not only cause disk confusion but also lead to system boot failures if the C drive is reassigned to D or another letter. If you’re facing this problem, follow this MiniTool guide to find effective fixes.
Drive letters are alphabetical identifiers used by the Windows operating system to recognize storage devices, with each disk partition assigned a unique letter. However, some users have reported that their drive letter changed by itself, especially after a system restart or when reconnecting an external disk.
This unexpected reassignment of the drive letter may lead to broken shortcuts, software errors, or other issues. In more severe cases, many users have found that their C drive has been assigned a different letter, making the system unbootable.
This article provides targeted solutions for both situations. You can follow the fixes based on your specific case.
Sometimes, a drive letter may change automatically due to a one-time glitch caused by a Windows update or other errors. You can fix this by manually reassigning the original drive letter in Disk Management.
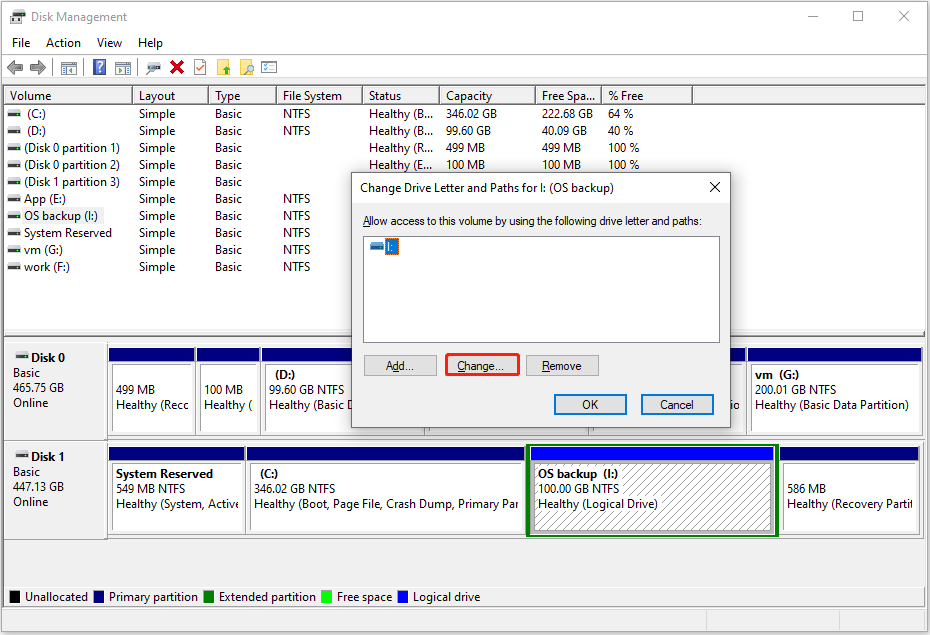
Step 1. Right-click the Start button and choose Disk Management.
Step 2. Right-click the target disk partition and choose Change Drive Letter and Paths.
Step 3. In the new window, click Change. Next, select a drive letter from the drop-down menu and hit OK.
If Disk Management is not saving drive letter changes, you may consider using third-party disk management software to change the drive letter. Among these tools, MiniTool Partition Wizard is highly recommended as it is safe and trusted by many users. It is free to change the drive letter with this tool.
Step 1. Download MiniTool Partition Wizard free and launch it.
Step 2. On the home page of this tool, select the partition in the right panel, scroll down the left menu bar, and click Change Drive Letter. When the new small window pops up, select an available drive letter and click OK.

Step 3. Click Apply in the bottom left corner.
If the drive letter keeps changing, check if there is any external disk connected to your computer. Occasionally, external devices may conflict with existing drives because Windows automatically assigns drive letters to newly connected storage devices.
So, you can unplug unnecessary disks from your computer and check if the problem can be fixed.
If the system fails to boot due to drive letter changes, you can boot into WinRE and use the Command Prompt to reassign the correct drive letter. Here I take ASUS for example.
Step 1. Press and hold the F9/F12 key, then press the Power button.
Step 2. When you see the blue WinRE window, click Troubleshoot > Advanced options > Command Prompt.

Step 3. In the Command Prompt window, type the following command lines one by one, and press Enter after each command.
Step 4. Duplicate the steps to reassign the D drive back to C.
The system partition may have been corrupted due to the drive letter confusion process. In this case, you may need to use BCDBoot to recreate the system partition files.
Step 1. Access the Command Prompt window from WinRE.
Step 2. Execute the following command lines to determine which drive letter contains your Windows partition and system partition.
Step 3. Type bcdboot x:\Windows (x represents the drive letter of your Windows partition) and press Enter to add a boot entry for your Windows partition.
Step 4. Restart your computer and check if the drive letter and system are back to normal.
Some users have reported that the drive letter of their USB drive or other removable disk changes automatically after reconnecting to the computer. This is normal because Windows releases the drive letter once the disk is disconnected, making it available for reassignment. Typically, there is no way to prevent Windows from doing this.
How to fix the problem of “drive letter changed by itself” on Windows? The possible solutions for different scenarios are summarized above. Follow the step-by-step instructions to resolve the issue.
The above is the detailed content of Top Fixes: Drive Letter Changed by Itself & C Drive Becoming D. For more information, please follow other related articles on the PHP Chinese website!
 Learn C# from scratch
 How to solve filezilla garbled characters
 How to enable the same city function on Douyin
 Oracle view table operation history
 Douyin level price list 1-75
 How to sum three-dimensional arrays in php
 Google account registration method
 How to read files and convert them into strings in java
 The role of linux operating system


![[Web front-end] Node.js quick start](https://img.php.cn/upload/course/000/000/067/662b5d34ba7c0227.png)


