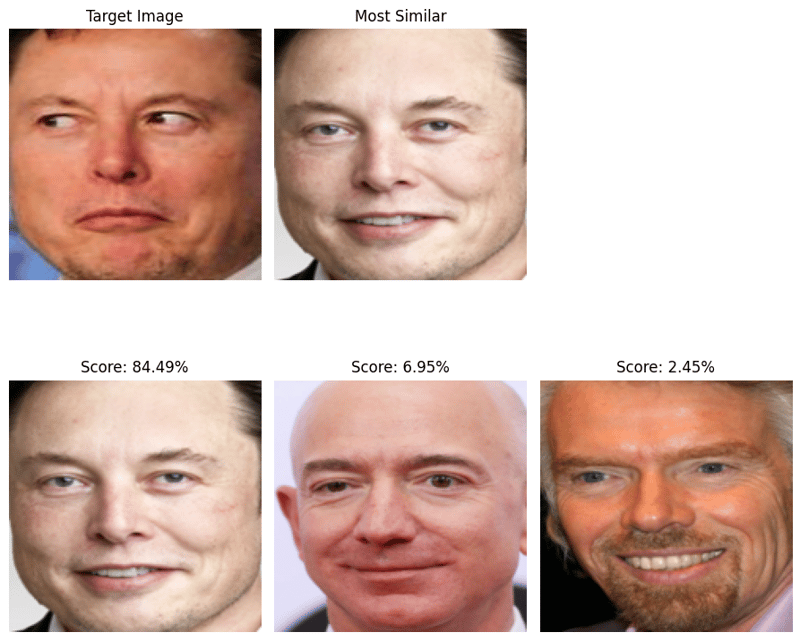
This guide demonstrates a face similarity detection tool using facenet-pytorch. Leveraging the FaceNet model's high-quality face embeddings, the tool compares a target image against multiple candidates to identify the closest match. Let's explore the implementation.
Essential Tools and Libraries
Two core models are employed:
Initialization
import torch
from facenet_pytorch import MTCNN, InceptionResnetV1
from PIL import Image
import requests
from io import BytesIO
import matplotlib.pyplot as plt

# Initialize face detection (MTCNN) and embedding extraction (InceptionResnetV1) modules.
mtcnn = MTCNN(image_size=160, keep_all=True)
resnet = InceptionResnetV1(pretrained='vggface2').eval()
Function Definitions
1. Image Loading and Embedding Extraction:
This function retrieves an image from a URL, detects faces, and calculates the embedding.
def get_embedding_and_face(image_path):
    """Loads an image, detects faces, and returns the embedding and detected face."""
    try:
        response = requests.get(image_path)
        response.raise_for_status()
        content_type = response.headers.get('Content-Type')
        if 'image' not in content_type:
            raise ValueError(f"Invalid image URL: {content_type}")
        image = Image.open(BytesIO(response.content)).convert("RGB")
    except Exception as e:
        print(f"Image loading error from {image_path}: {e}")
        return None, None

    faces, probs = mtcnn(image, return_prob=True)
    if faces is None or len(faces) == 0:
        return None, None

    embedding = resnet(faces[0].unsqueeze(0))
return embedding, faces[0]2. Tensor to Image Conversion:
Prepares a tensor for display.
def tensor_to_image(tensor):
    """Converts a normalized tensor to a displayable image array."""
    image = tensor.permute(1, 2, 0).detach().numpy()
    image = (image - image.min()) / (image.max() - image.min())
    image = (image * 255).astype('uint8')
return image3. Most Similar Face Identification:
Compares the target image's embedding with those of the candidates.
def find_most_similar(target_image_path, candidate_image_paths):
    """Identifies the most similar image to the target from a list of candidates."""
    target_emb, target_face = get_embedding_and_face(target_image_path)
    if target_emb is None:
        raise ValueError("No face detected in the target image.")

    highest_similarity = float('-inf')
    most_similar_face = None
    most_similar_image_path = None

    candidate_faces = []
    similarities = []

    for candidate_image_path in candidate_image_paths:
        candidate_emb, candidate_face = get_embedding_and_face(candidate_image_path)
        if candidate_emb is None:
            similarities.append(None)
            candidate_faces.append(None)
            continue

        similarity = torch.nn.functional.cosine_similarity(target_emb, candidate_emb).item()
        similarities.append(similarity)
        candidate_faces.append(candidate_face)

        if similarity > highest_similarity:
            highest_similarity = similarity
            most_similar_face = candidate_face
            most_similar_image_path = candidate_image_path

    # Visualization
    plt.figure(figsize=(12, 8))

    # Display target image
    plt.subplot(2, len(candidate_image_paths) + 1, 1)
    plt.imshow(tensor_to_image(target_face))
    plt.title("Target Image")
    plt.axis("off")

    # Display most similar image
    if most_similar_face is not None:
        plt.subplot(2, len(candidate_image_paths) + 1, 2)
        plt.imshow(tensor_to_image(most_similar_face))
        plt.title("Most Similar")
        plt.axis("off")

    # Display all candidates with similarity scores
    for idx, (candidate_face, similarity) in enumerate(zip(candidate_faces, similarities)):
        plt.subplot(2, len(candidate_image_paths) + 1, idx + len(candidate_image_paths) + 2)
        if candidate_face is not None:
            plt.imshow(tensor_to_image(candidate_face))
            plt.title(f"Score: {similarity * 100:.2f}%")
        else:
            plt.title("No Face Detected")
        plt.axis("off")

    plt.tight_layout()
    plt.show()

    if most_similar_image_path is None:
        raise ValueError("No faces detected in candidate images.")

return most_similar_image_path, highest_similarityUsage
Image URLs for comparison:
image_url_target = 'https://d1mnxluw9mpf9w.cloudfront.net/media/7588/4x3/1200.jpg'
candidate_image_urls = [
    'https://beyondthesinglestory.wordpress.com/wp-content/uploads/2021/04/elon_musk_royal_society_crop1.jpg',
    'https://cdn.britannica.com/56/199056-050-CCC44482/Jeff-Bezos-2017.jpg',
    'https://cdn.britannica.com/45/188745-050-7B822E21/Richard-Branson-2003.jpg'
]

most_similar_image, similarity_score = find_most_similar(image_url_target, candidate_image_urls)
print(f"Most similar image: {most_similar_image}")
print(f"Similarity score: {similarity_score * 100:.2f}%")Result

Conclusion
This example showcases facenet-pytorch's capabilities for facial recognition. The combination of face detection and embedding generation enables the creation of tools for various applications, such as identity verification or content filtering.
The above is the detailed content of Face Recognition with Python and FaceNet. For more information, please follow other related articles on the PHP Chinese website!
 How to close the window opened by window.open
 what does usb interface mean
 How to shut down your computer quickly
 Main class not found or unable to load
 Data analysis methods
 Vue parent component calls the method of child component
 What is the cmd command to clean up C drive junk?
 How to create a new folder in webstorm


