Have you ever wondered how drones navigate through complex environments? In this blog, we’ll create a simple drone navigation system using Python, Matplotlib, and the A* algorithm. By the end, you’ll have a working system that visualizes a drone solving a maze!
To build our drone navigation system, we need the following:
But first, let’s quickly review some basic AI terms for those who are new.
Our drone will navigate a 2D maze. The maze will consist of:
The drone’s objectives:
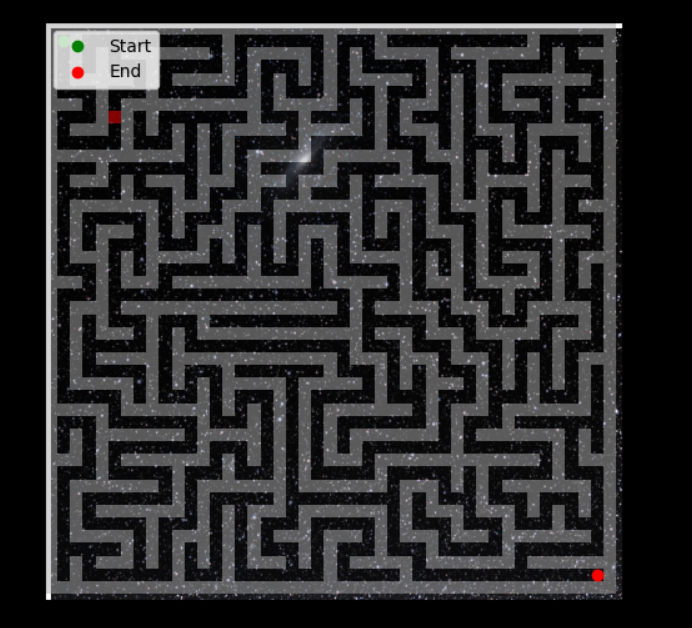
Here’s what the maze looks like:

First, install and import the required libraries:
import matplotlib.pyplot as plt
import numpy as np
import random
import math
from heapq import heappop, heappush
Let’s define the maze size:
python
WIDTH, HEIGHT = 22, 22
In real-world navigation, movement in different directions can have varying costs. For example, moving north might be harder than moving east.
DIRECTIONAL_WEIGHTS = {'N': 1.2, 'S': 1.0, 'E': 1.5, 'W': 1.3}
DIRECTIONS = {'N': (-1, 0), 'S': (1, 0), 'E': (0, 1), 'W': (0, -1)}
We start with a grid filled with walls (1s):
import matplotlib.pyplot as plt
import numpy as np
import random
import math
from heapq import heappop, heappush
The numpy. ones() function is used to create a new array of given shape and type, filled with ones... useful in initializing an array with default values.
Now let's define a function that will "carve" out paths in your maze which is right now initialized with just walls
DIRECTIONAL_WEIGHTS = {'N': 1.2, 'S': 1.0, 'E': 1.5, 'W': 1.3}
DIRECTIONS = {'N': (-1, 0), 'S': (1, 0), 'E': (0, 1), 'W': (0, -1)}
maze = np.ones((2 * WIDTH + 1, 2 * HEIGHT + 1), dtype=int)
Use Matplotlib to display the maze:
def carve(x, y):
    maze[2 * x + 1, 2 * y + 1] = 0  # Mark current cell as a path
    directions = list(DIRECTIONS.items())
    random.shuffle(directions)  # Randomize directions

    for _, (dx, dy) in directions:
        nx, ny = x + dx, y + dy
        if 0 <= nx < WIDTH and 0 <= ny < HEIGHT and maze[2 * nx + 1, 2 * ny + 1] == 1:
            maze[2 * x + 1 + dx, 2 * y + 1 + dy] = 0
            carve(nx, ny)

carve(0, 0)  # Start carving from the top-left corner
The A* algorithm finds the shortest path in a weighted maze using a combination of path cost and heuristic.
We use the Euclidean distance as our heuristic:
start = (1, 1)
end = (2 * WIDTH - 1, 2 * HEIGHT - 1)
maze[start] = 0
maze[end] = 0
fig, ax = plt.subplots(figsize=(8, 6))
ax.imshow(maze, cmap='binary', interpolation='nearest')
ax.set_title("2D Maze")
plt.show()
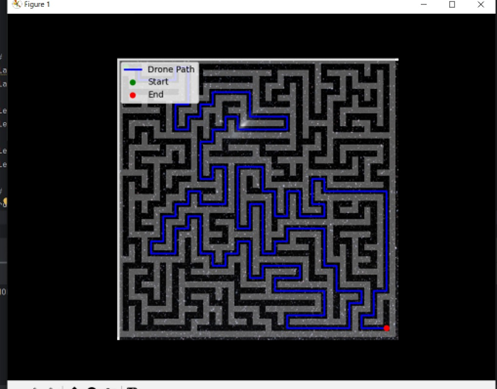
We've got the maze but you can't yet see the drone's path yet.
Lets visualize the drone’s path:
def heuristic(a, b):
    return math.sqrt((a[0] - b[0]) ** 2 + (a[1] - b[1]) ** 2)
Congratulations! ? You’ve built a working drone navigation system that:

Feel free to share your results or ask questions in the comments below.
To infinity and beyond ?
The above is the detailed content of Building a drone navigation system using matplotlib and A* algorithm. For more information, please follow other related articles on the PHP Chinese website!


