


PC Restarts When Playing Games: 11 Best Fixes

Read our disclosure page to find out how can you help MSPoweruser sustain the editorial team Read more

Fix all your driver issues with PC HelpSoft Driver Updater:
Easily update and fix driver issues on your PC in just three steps with PC HelpSoft Driver Updater:
- Download and install PC HelpSoft Driver Updater.
- Scan your PC to find outdated or missing drivers.
- Click on Update Now to quickly install the latest and original drivers.
If your PC restarts when playing games, try these proven troubleshooting ideas right now!
Unexpected restarts are every gamer’s nightmare. Hours of hard-won progress vanish in an instant, leaving frustration and defeat. If you’re a pro streamer, it’s even worse.
Since I’ve faced the same ups and downs, I’ve set out to find the best fixes and list them in an easy-to-follow language. Let’s get into it!
- Basic Checks and Fixes
- The internal components have likely heated up a lot. Let the whole device cool down
- and try to put the PC in an air-conditioned room or well-ventilated area. Remove all detachable accessories, like external game recording devices, removable storage, USB hubs, gaming steering wheels, game controllers
- , etc. Restart the GPU by pressing the Windows Ctrl Shift B
- keys at the same time. Power cycle the PC
If the above tricks don’t help, continue with the more detailed troubleshooting ideas outlined below, starting with the simplest ones.
Restore GPU Console Settings
- Both NVIDIA and AMD Radeon allow you to customize how the GPU resources are used globally and for specific apps. If you’ve personalized those settings, undo that by following these steps:
- Right-click on the Desktop and click on the GPU configuring console tool, like NVIDIA Control Panel
- . Go to the Manage 3D Settings menu under the 3D Settings
- tree. On the right side, go to the Global Settings tab and click on Restore

- Now, go to the Program Settings tab, select the game you played when the PC restarted abruptly, and click Restore.

- Close out the NVIDIA Control Panel tool and reboot your PC.
Increase Virtual Memory
- Right-click on This PC or Computer in the Desktop or Start menu.
- Select Properties to open the About PC window.
- Scroll down to the bottom and click on the Advanced system settings.

- This should open the System Properties dialog box.
- Click on the Settings button in the Performance section.

- The next dialog box that opens is Performance Options.
- Navigate to the Advanced tab.
- Now, click on the Change button in the Virtual memory block.

- You should now see the Virtual Memory dialog box.
- Select the drive where you’ve installed the Windows 10 or 11 OS.
- Click on the Custom size option and enter the following values in the respective fields:
- Initial size (MB): 2,048
- Maximum size (MB): 5,000 or 10,000 (Depends on your SSD or NVMe SSD chip’s total storage capacity and what’s left after installing the Windows OS and other apps.)
- Click on Set, OK, and hit Apply on every dialog box to save the changes.

Update the BIOS
If the BIOS firmware of the motherboard is too old and you’ve installed many modern hardware recently, the mainboard won’t be able to communicate with the newest additions appropriately.
This condition aggravates when you play a resource-hogging PC game and the system restarts to prevent internal damage.
So, you must update the BIOS firmware to its latest edition by following these steps. I’ve done it on a Gigabyte B660M DS3H AX DDR4 motherboard. The steps are similar across manufacturers.
- Visit the mainboard manufacturer’s website to download the latest BIOS firmware.
- For Gigabyte B660M DS3H, here’s the official source.

- Download the latest release. Look at the F-ID, like F30 and date of publication.
- Extract the contents and move them to an empty USB stick.

- Keep the USB stick plugged in.

- Restart the PC.
- Press the Delete button repeatedly.
- You should see the UEFI BIOS interface.
- Go to the System tab.

- Click on the up-arrow pop-up box at the bottom of the screen.
- Select the Q-Flash option.

- Go to the Task tab of Q-Flash.
- Click on the Update BIOS option.

- The system will automatically pick up the updated BIOS firmware in the USB stick.
- Simply click on the file name to initiate the file verification and click on the arrow on the right edge of the screen.
- Click on the prompt to start the updating process and wait until the PC reboots.

Before attempting this method, connect the PC to a stable power source. If the power fails during the BIOS updating process, your mainboard will get bricked.
Disable CPU, GPU, and Memory Overclocking
If you’re overclocking your system to push it beyond its limits, you should stop, especially if the PC restarts when playing games. Here are the steps if you’re using the hardware diagnostic tool MSI Afterburner:
- Open MSI Afterburner.
- Set the configurations for the following components as outlined below:
- Core Clock: 0
- Power Limit [%]: 100
- Memory Clock: 0
- Fan Speed [%]: Auto or 41
- Click on the Save button.

- Reboot the PC.
Reseat All the Removable PC Hardware
It’s time you open the CPU up and reseat the removable hardware by following these steps:
- Shut down the PC and unhook all the cables from it.
- Wear an anti-static wristband and connect its metal clip to another grounded conductor, such as an alloy hook embedded in the wall.
- Alternatively, just touch a grounded metal body and wear an insulated shoe.
- Now, remove the left side cover of the CPU case.
- Use a screwdriver when needed and carefully unplug all the cables inside the PC case.
- Remove the following components from their slots:
- GPU card
- RAM chips
- SSDs
- M.2 NVMe SSD chips
- Now, clean the motherboard with a blower, a clean paintbrush, or a clean cotton cloth.
- Put back all the hardware and cables in their respective slots and ensure they fit snugly.
- Connect all the PC cables, power it up, and play the same PC game that showed the restart issue in the first place.
Download and Install the Latest DirectX Runtime Package
- Visit the DirectX End-User Runtime portal.
- Hit the Download button.
- Double-click on the dxwebsetup.exe file.
- Accept the agreement and click Next.
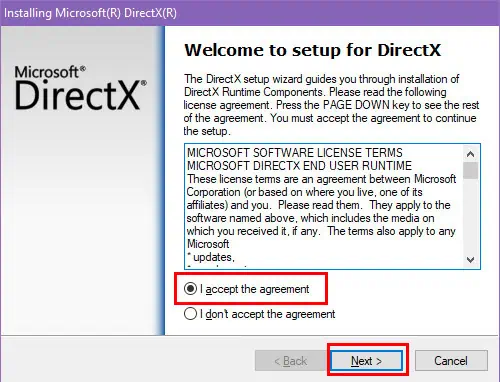
- Uncheck Install the Bing Bar on the following screen and click Next.

- The installer package will start updating the DirectX version.
- Click Finish when done and reboot the PC.

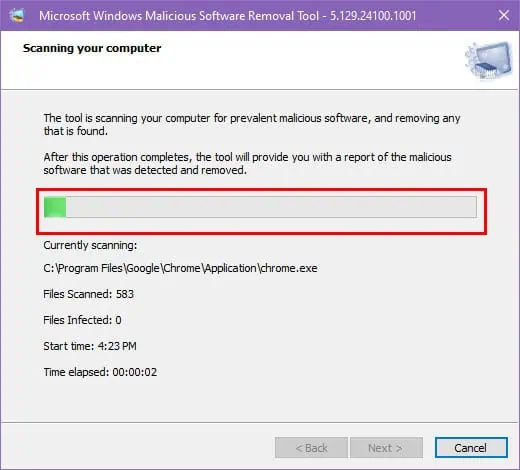
Run the Windows Malicious Software Removal Tool
Certain malware might have infected your device to silently use the resources for crypto mining. When you play a PC game, the system restarts to prevent it from causing further damage.
Here’s how you can detect and remove such programs:
- Download the Windows Malicious Software Removal Tool from Microsoft for free.
- Go to the Downloads folder and double-click on the Windows-KB890830-x64-V5.129.exe file.
- It doesn’t require any installation.
- The app interface will open right away.
- Click Next.

- Select the Full scan option on the next window and hit Next.

- The malware scanning and removal process will begin.
Update all Hardware Drivers
- Open the Device Manager interface by pressing the Windows X keys.
- Extend the tree for the Display adapters, right-click on the GPU, and select Update driver.

- Choose Search automatically… on the next screen.
- Now, repeat the same steps for the rest of the hardware components, like Audio inputs and outputs, Monitors, Wi-Fi Network adapters, etc.
- Restart the PC when it’s done.
You might not be able to update everything easily by following the above steps. You can get the PC HelpSoft Driver Updater for a more convenient, one-click experience.
Update the Windows OS
- Press the Windows I keys together to bring up the Settings app.
- Click on the Update or Update & Security menu.
- Select the Windows Update option on the left.
- Hit the Resume updates, Check for updates, or Download and install updates buttons.

- Once that’s done, come back to the Windows Update window.
- Click on the View update history link.

- Expand the following trees and apply all:
- Driver Updates
- Definition Updates
- Other Updates

- Restart the PC if it doesn’t do that itself.
Increase the Wattage of the PSU
Your power supply unit likely can’t deliver the required power for high-end games, leading to transient spikes during map loads, character rendering, or other high-resource scenarios.
So, get a genuine PSU that delivers 800 watts and more power, especially during those spike moments.
Now you know what to do if your PC restarts when playing games. If this troubleshooting guide helped you or you want to share feedback, comment below.
The above is the detailed content of PC Restarts When Playing Games: 11 Best Fixes. For more information, please follow other related articles on the PHP Chinese website!

Hot AI Tools

Undress AI Tool
Undress images for free

Undresser.AI Undress
AI-powered app for creating realistic nude photos

AI Clothes Remover
Online AI tool for removing clothes from photos.

Clothoff.io
AI clothes remover

Video Face Swap
Swap faces in any video effortlessly with our completely free AI face swap tool!

Hot Article
Hot Tools

Notepad++7.3.1
Easy-to-use and free code editor

SublimeText3 Chinese version
Chinese version, very easy to use

Zend Studio 13.0.1
Powerful PHP integrated development environment

Dreamweaver CS6
Visual web development tools

SublimeText3 Mac version
God-level code editing software (SublimeText3)


 How to Change ChatGPT Personality in Settings (Cynic, Robot, Listener, Nerd)
Aug 08, 2025 am 09:33 AM
How to Change ChatGPT Personality in Settings (Cynic, Robot, Listener, Nerd)
Aug 08, 2025 am 09:33 AM
Visit our disclosure page to learn how you can support MSPoweruser in maintaining the editorial team Read moreWant ChatGPT to reflect your mood or communication style? With the launch of ChatGPT 5, OpenAI introduces five distinct personalities – choo
 How to manage notifications and actions in Windows
Aug 15, 2025 am 11:31 AM
How to manage notifications and actions in Windows
Aug 15, 2025 am 11:31 AM
You can manage notifications and actions in Windows through settings to stay focused and track important reminders. 1. Open "Settings" (Win I), enter "System>Notifications", and you can turn off notifications globally or manage notification permissions one by one, including banners, sounds and lock screen displays. 2. Select "Off", "Priority Only" or "Alarm Only" mode in "Focus Assist", and customize the priority apps and contacts. You can also set the automatic activation time or turn it on when projecting screens or playing games. 3. Open the Operation Center (Windows10) or Notification Center (Windows11) through the taskbar icon or swipe right, and clear all or individual notifications, and edit common shortcut buttons in "Quick Action". 4. Other prompts include closing notifications
 How to fix a '0x800f0954' error when installing optional features in Windows
Aug 05, 2025 am 09:30 AM
How to fix a '0x800f0954' error when installing optional features in Windows
Aug 05, 2025 am 09:30 AM
First, run Windows Update troubleshooter to automatically repair common problems, 1. Run Windows Update troubleshooter; 2. Check network connection and proxy settings to ensure that you can access the Windows Update Server; 3. Use DISM command to repair component storage, and specify the local Windows ISO source if necessary; 4. Manually specify the ISO source path when installing optional functions through PowerShell; 5. Reset Windows Update component services and clear cache; 6. Run sfc/scannow and chkdsk to check system and disk errors; finally ensure that the system is updated to the latest and use official ISO first to solve the problem of missing files, and in most cases, you can successfully repair 0x800f0954 errors
 Windows permanently stops system update
Aug 12, 2025 pm 08:24 PM
Windows permanently stops system update
Aug 12, 2025 pm 08:24 PM
Permanently stop Windows system updates: Use the Group Policy Editor: Double-click "Auto Update" settings and select "Disabled". Using the Registry Editor: Set the data value of "NoAutoUpdate" to "1". Advantages: Completely stop future updates and free up storage space. Disadvantages: Increased security risks, loss of functions, and incompatibility problems. Note: Use only after understanding the risks, you will be responsible for the consequences.
 Fixed: Windows Update Failed to Install
Aug 08, 2025 pm 04:16 PM
Fixed: Windows Update Failed to Install
Aug 08, 2025 pm 04:16 PM
RuntheWindowsUpdateTroubleshooterviaSettings>Update&Security>Troubleshoottoautomaticallyfixcommonissues.2.ResetWindowsUpdatecomponentsbystoppingrelatedservices,renamingtheSoftwareDistributionandCatroot2folders,thenrestartingtheservicestocle
 How to fix mouse lag or stuttering in Windows 11
Aug 13, 2025 am 11:45 AM
How to fix mouse lag or stuttering in Windows 11
Aug 13, 2025 am 11:45 AM
First check the hardware and connection, replace the mouse, use different USB ports, replace the wireless mouse battery, avoid using the USB hub and reduce wireless interference; 2. Update or reinstall the mouse driver, automatically update through the device manager or download the latest driver from the manufacturer's official website, uninstall if necessary and restart the system to reinstall; 3. Adjust the mouse and power settings, turn off the "Improve pointer accuracy" option, and disable all USB root hubs in the device manager to enable the computer to turn off this device to save power; 4. Turn off the high-occupancy applications and services in the background, troubleshoot programs with high resource occupancy through the task manager, manage startup items or perform clean boots to troubleshoot conflicting software; 5. Update the Windows system and BIOS, and install the latest system supplement
 How to restore the original system font in Windows
Aug 04, 2025 am 08:46 AM
How to restore the original system font in Windows
Aug 04, 2025 am 08:46 AM
To restore Windows system fonts, please first check whether you have modified the font using a third-party tool. If so, reset the "Restore Default" option of the tool; if no tool is available, you can manually locate HKEY_LOCAL_MACHINE\SOFTWARE\Microsoft\WindowsNT\CurrentVersion\Fonts through the registry editor to ensure that the font value of SegoeUI is correctly pointed to segoeui.ttf and other files, and back up the registry if necessary; then run the command prompt as an administrator and execute the sfc/scannow command to repair the system files; finally go to Settings → Personalization → Theme, and select Windows to light it by default.
 How to set up multiple monitors on Windows 11
Aug 05, 2025 pm 07:25 PM
How to set up multiple monitors on Windows 11
Aug 05, 2025 pm 07:25 PM
Connectyourmonitorsusingappropriatecablesandpowerthemon.2.OpenDisplaysettingsbyright-clickingthedesktopandselect"Displaysettings"todetectmonitors.3.Arrangedisplayiconstomatchyourphysicalsetup,setaprimarydisplay,andadjustresolutionandscaling
