New features and improvements come with every Windows update as well as unexpected issues. Some Western Digital users report the Windows 11 24H2 BSOD error with WD SSDs on their devices. This MiniTool guide tells you how to get rid of this problem and protect your data after a device crash.
The Windows 11 24H2 update has been gradually phased out for all eligible users. However, some people who install Windows 11 2024 update experience blue screen errors with WD SN770 or SN580 SSD. Why does this issue arise? How to resolve the Windows 11 24H2 BSOD error with WD SSDs? Continue reading to get answers.
WD SSDs cause Windows 11 crashes after 2024 update mainly on WD SN770 and SN580. The BSOD error happens due to improper allocation of the memory of the Host Memory Buffer (HMB). WD SN770 and SN580 use HMB for cache that is going up to 200MB in Windows 11 24H2, which is generally allocated around 64GB. This is the reason for the Windows 11 24H2 update leading to blue screen of death of WD SN770 and SN580.
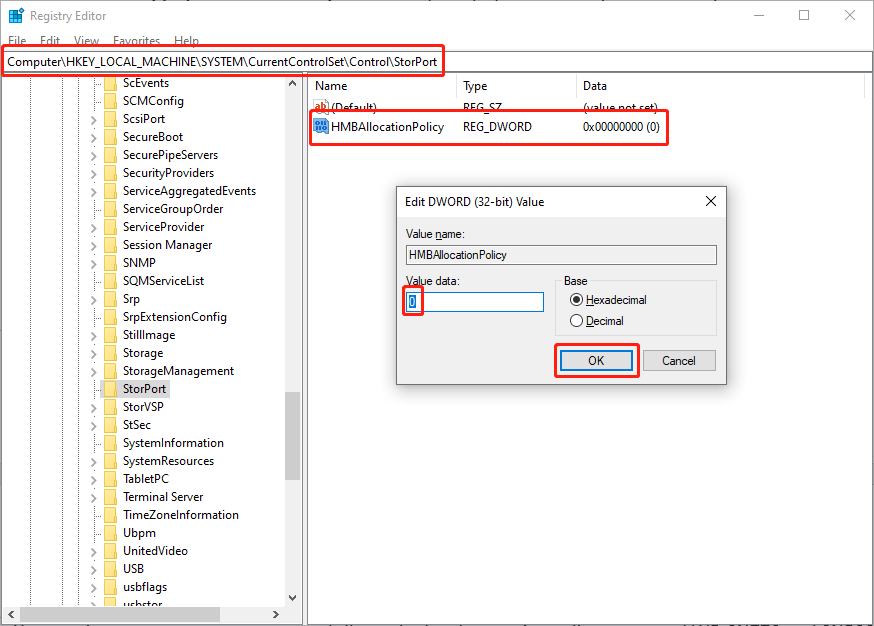
Fortunately, this error can be fixed by modifying the registry keys to change the allocation amount. Here is the step-by-step guide.
Step 1. Press Win R to open the Run window.
Step 2. Type regedit into the dialog and press Enter to open the Windows Registry editor.
Step 3. Copy and paste the path into the address bar to quickly locate the target key:
ComputerHKEY_LOCAL_MACHINESYSTEMCurrentControlSetControlStorPort
Step 4. You can find one key named HMBAllocationPolicy on the right pane. If not, right-click on the blank space on the right pane and choose New > DWORD (32-bit) Value to create a new key and name it HMBAllocationPolicy.
Step 5. Double-click on the HMBAllocationPolicy key and change the Value data to 0.
Step 6. Click OK to save the change.

You need to restart your computer to fully apply the change. According to several WD SN770 and SN580 users, this method does work. Alternatively, you can revert your computer operating system to 23H2 to ensure a stable computer status. Read this post to learn how to undo changes made to your computer.
You are highly advised to check if the Windows 11 24H2 BSOD error has led to data loss on your device. System crashes may lead to file loss and even file corruption.
MiniTool Power Data Recovery specializes in data recovery for unintentional deletion, partition damage, device crashes, and other cases. Furthermore, this read-only software is compatible with diverse data storage devices, including SSDs, USB drives, SD cards, memory sticks, and more. You can get the free edition of this software to scan your computer and recover 1GB of files for free if necessary.
Compared with data recovery, data backup works more efficiently in safeguarding against file loss. You should back up files regularly to different devices or cloud storage. MiniTool ShadowMaker allows you to set individual backup intervals and choose appropriate backup types to avoid duplicate files. Get the trial edition to experience those robust backup features for free within 30 days.
Troubled with Windows 11 24H2 BSOD error with WD SSDs? This post introduces you to a feasible solution and shares with you some useful tools to recover lost files and safeguard files in advance. Hope this post gives you some helpful information.
The above is the detailed content of Windows 11 24H2 BSOD Error with WD SSDs: Fix Guide Here. For more information, please follow other related articles on the PHP Chinese website!


