


Are you ready to build a reactive real-time web application?
tl;dr Don’t have time to read and work through this entire tutorial? You’re in luck! You can find a fully working example onGitHub. Feel free to go there, clone the repository and start exploring.
In this tutorial, we’ll explore the combination of Svelte and Couchbase Capella to create a dynamic and interactive chat application. Svelte, with an impressive 72.8% admiration rate according to the 2024 Stack Overflow Developer Survey, is celebrated for several reasons. It efficiently takes much of the work out of the browser by compiling your components into highly efficient, imperative code that directly manipulates the DOM, eliminating the need for a virtual DOM and leading to faster updates and smaller bundle sizes.
Svelte’s built-in reactivity automatically tracks state changes, ensuring fast and efficient updates without the need for complex state management libraries. This reactivity simplifies the development process and enhances performance. Additionally, Svelte’s component-based architecture makes it easier to build and maintain complex user interfaces, offering a more straightforward and enjoyable development experience. And, when your application needs responsive, adaptive data Couchbase Capella offers a straightforward solution to implement.
Couchbase Capella is not just a NoSQL cloud database platform; it’s an all-in-one data platform offering full-text search, vector search, data caching, analytics, and more. This comprehensive functionality allows you to build robust applications with diverse data requirements. Together, Svelte and Couchbase Capella make possible real-time applications that are blazingly fast and performant.
Okay, enough talk. Let’s get started!
Before diving into the setup, let’s clarify the difference between Svelte and SvelteKit. Svelte is a front-end framework that compiles your code into highly efficient, imperative code that directly manipulates the DOM. This results in faster updates and smaller bundle sizes. On the other hand, SvelteKit is a framework built on top of Svelte, designed for building full-stack web applications. SvelteKit provides additional features such as routing, server-side rendering, and static site generation, making it a powerful tool for developing modern web applications.
In your project, SvelteKit will handle the application structure, routing, and server-side rendering, while Svelte will manage the efficient rendering of UI components.
To start a new project you can initialize it on the command line:
> npm create svelte@latest svelte-couchbase-real-time-chat > cd svelte-couchbase-real-time-chat
You will be prompted with several choices by the CLI tool. Answer with the following responses:
Then, install the dependencies by runningnpm installfrom the command line. After running these commands, you’ll have a new SvelteKit project set up and ready to go!
Next, we’ll install additional dependencies required for our project, including Tailwind CSS for styling, the Couchbase SDK for database interactions, and WebSocket support for real-time communication.
> npm install -D tailwindcss postcss autoprefixer couchbase ws dotenv > npx tailwindcss init -p
What are each of these dependencies doing in your application?
As mentioned above, TailwindCSS introduces classes that you can use to define the styling for your application. This is helpful if you are not a frontend expert, or even if you are, if you wish to shortcut the process of building elegantly designed applications. To use TailwindCSS in your Svelte project, follow these steps:
Update thetailwind.config.cjsfile to specify the content sources. This ensures that Tailwind CSS can remove unused styles from your production build, making it more efficient.
/** @type {import('tailwindcss').Config} */ module.exports = { content: ['./src/**/*.{html,js,svelte,ts}'], theme: { extend: {}, }, plugins: [], }
Create or update thesrc/app.cssfile to include Tailwind CSS directives. These directives load Tailwind’s base, components, and utility styles.
@tailwind base; @tailwind components; @tailwind utilities;
Open or create thesrc/routes/+layout.sveltefile and import the CSS file. This ensures that Tailwind’s styles are available throughout your application.
Now that you’ve completed these steps, TailwindCSS has been successfully initialized in your application! You’re ready to move on to setting up Couchbase Capella and building the backend for your chat application.
It is free to sign up and try Couchbase Capella, and if you have not done so yet, you can do so by navigating to cloud.couchbase.com and creating an account using your GitHub or Google credentials, or by making a new account with an email address and password combination.
Once you have done so, from within your Capella dashboard, you will create your first cluster. For the purposes of this walkthrough, let’s name itSvelteChatApp.
The summary of your new cluster will be presented on the left-hand side of the dashboard. Capella is multi-cloud and can work with AWS, Google Cloud or Azure. For this example, you will deploy to AWS.
After you have created your cluster, you need to create abucket. Abucketin Couchbase is the container where the data is stored. Each item of data, known as a document, is kept in JSON making its syntax familiar to most developers. You can name your bucket whatever you want. However, for the purposes of this walkthrough, let’s name this bucketsvelte_chat_app_messages.
Now that you have created both your database and your bucket, you are ready to create your database access credentials and to fetch your connection URL that you will be using in your Lambda function.
The connection details are essential as you will be using them in your application to establish a connection to your Couchbase data and to interact with the data. Navigate to theConnectsection in the Capella dashboard and take note of theConnection String.
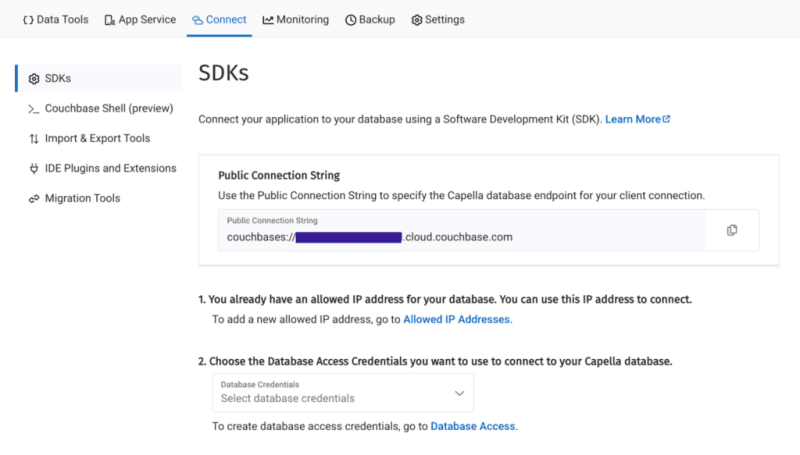
Then, click on theDatabase Accesslink under section two. In that section, you will create credentials – a username and password – that your application will use to authenticate with the database. You can scope the credentials to the specific bucket you created or give it permission for all buckets and databases in your account. You need to make sure it has both read and write access, regardless.
Once you have finished, the last step in this part of the process is to add your new connection string and connection credentials to your application as environment variables.
In a production environment, you will store your credentials and other confidential information for your application in a secure format. Different cloud providers have different paths to store sensitive information, and you should follow the procedure defined by the cloud provider you are using, whether it is AWS, Google Cloud, Azure, Netlify, Vercel or any other. For our purposes, you are adding your credentials to a.envfile in the root folder of your application. Thedotenvpackage reads those credentials from there and loads them into your application.
# .env COUCHBASE_BUCKET=your_bucket_name COUCHBASE_CONNECTION_STRING=your_connection_string COUCHBASE_USER=your_username COUCHBASE_PASSWORD=your_password
That’s it! Your Couchbase cluster is all set up and ready to be used. At this point, you are ready to build the application. Let’s start with the backend server with Nodejs and then move on to the frontend with Svelte.
With our development environment set up, it’s time to build the backend for our real-time chat application. We’ll use Node.js to create the server, connect to Couchbase Capella for data storage, and set up a WebSocket server for real-time communication.
First, we’ll create a file named server.cjs which will serve as the entry point for our backend.
const express = require('express'); const couchbase = require('couchbase'); const { createServer } = require('http'); const { WebSocketServer } = require('ws'); const dotenv = require('dotenv'); dotenv.config(); const app = express(); const server = createServer(app); const wss = new WebSocketServer({ server });
Next, we’ll set up the connection to Couchbase Capella. Ensure your .env file contains the correct connection details. Add the following code toserver.cjsto connect to Couchbase:
let cluster, bucket, collection; async function connectToCouchbase() { try { console.log('Connecting to Couchbase...'); const clusterConnStr = process.env.COUCHBASE_CONNECTION_STRING; const username = process.env.COUCHBASE_USER; const password = process.env.COUCHBASE_PASSWORD; const bucketName = process.env.COUCHBASE_BUCKET; cluster = await couchbase.connect(clusterConnStr, { username: username, password: password, configProfile: 'wanDevelopment', }); bucket = cluster.bucket(bucketName); collection = bucket.defaultCollection(); console.log('Connected to Couchbase successfully.'); } catch (error) { console.error('Error connecting to Couchbase:', error); process.exit(1); } } connectToCouchbase();
This function handles the connection to Couchbase, ensuring that all necessary parameters are properly configured. All that is left for our backend is to create the websocket server to handle the sending and receiving of new chat messages.
The Websocket server functionality is also added to theserver.cjsfile. The server will broadcast all new messages for the frontend of the application to receive, and send all newly created messages to Couchbase for saving in the bucket you created.
wss.on('connection', (ws) => { console.log('New WebSocket connection established.'); ws.on('message', async (message) => { try { const messageString = message.toString(); console.log('Received message:', messageString); // Save message to Couchbase const id = `message::${Date.now()}`; await collection.upsert(id, { text: messageString }); console.log('Message saved to Couchbase:', id); // Broadcast message wss.clients.forEach((client) => { if (client.readyState === WebSocket.OPEN) { client.send(messageString); console.log('Broadcasted message to client:', messageString); } }); } catch (error) { console.error('Error handling message:', error); } }); }); server.listen(3000, () => { console.log('Server started on http://localhost:3000'); });
Note that before sending the message to Couchbase, you first convert the message into aStringas it is received as binary data buffers by default. The conversion toStringformat is achieved by calling thetoString()function on the message. The newly definedmessageStringvariable now contains the data in readable format for both sending to Couchbase and rendering in the application.
That is the entire backend of your new real-time chat application. However, as good as any backend for a web application is, it needs a frontend to render it for the user. Svelte offers us the performance and reactivity to do so with speed and with an excellent developer experience.
With your backend set up, it’s time to build the frontend of our real-time chat application using Svelte. You’ll leverage Svelte’s strengths to create a responsive and dynamic chat interface.
touch src/routes/+page.svelte
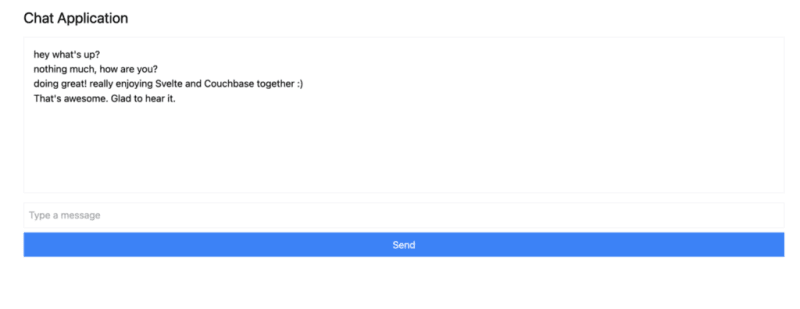
Chat Application
{#each messages as message}{message}{/each}
Thesection of the above code example initializes Websocket and handles the messages, both sending and receiving. TheonMountfunction ensures that the Websocket connection is established when the component is initialized. Svelte’s reactivity automatically updates the DOM whenever themessagesarray changes, ensuring new messages are displayed in real-time. With that your frontend is now complete.
You did it! You have built an entire chat application enabling real-time communication utilizing the performance, flexibility and adaptability of both Svelte and Couchbase to deliver an optimal experience for your users. Yes, this is a fairly simple implementation, however, it provides the skeleton for you to build even more expansive and complex real-time applications. The potential is only limited by your imagination.
Want to give it a go? Let’s start up your application and begin chatting.
To run your application, you will initialize both the backend Node.js server and the SvelteKit frontend. First, let’s start the backend from your terminal:
Then, start the frontend in a new terminal window:
Now, navigate in your browser tohttp://localhost:5173and start chatting!
You can open up multiple browser tabs to simulate multiple users or use a service like ngrok to share the application with your friends and chat in real time with them.
In this tutorial you have learned how quickly you can create a fully responsive application that functions with real time data. Svelte updates the DOM with ease, while Couchbase lets you start creating and storing messages in mere seconds.
There are so many reasons why Svelte is quickly growing in admiration and popularity in the highly competitive web framework space. Couchbase as the data backend paired with Svelte increases the potential for what you can build and achieve by so much more. No need to define complicated schema, no need to add more dependencies later on if you wish to implement data caching or search capabilities, it’s all baked in with Couchbase and comes right out of the box.
The only remaining question is: What will you build next?
Get started for free using Couchbase Capella.
The above is the detailed content of Quick and In Sync with Svelte. For more information, please follow other related articles on the PHP Chinese website!
 Solution to no sound in win7 system
 Usage of base keyword in C#
 What is the article tag used to define?
 How to deal with garbled Chinese characters in Linux
 The difference between tcp and udp
 The main function of the arithmetic unit in a microcomputer is to perform
 How to locate someone else's cell phone location
 Introduction to laravel components


![[Web front-end] Node.js quick start](https://img.php.cn/upload/course/000/000/067/662b5d34ba7c0227.png)


