


The authentication of an application is something very important in the system, but also very sensitive, there are various implementations, security, validation to be considered.
I decided to make a post demonstrating a about Cognito, a very nice tool from AWS that can help you in the authentication and validation of the user for Web and mobile applications that many people do not know.
Cognito is an AWS platform responsible for creating and validating user access data, as well as being able to register users and store their information, in addition to generating OAuth tokens, and Cognito can also provide all user validation.
We can create some user data such as: email, name, phone, birthdate, nickname, gender, website and many others, we can also place custom fields.
Cognito still allows us to work with "federated providers", known as social logins, such as Google, Facebook and GitHub, we are not going to address this post, but it is possible to do it with cognito.
We are going to make some endpoints to show how cognito works, we are going to create a user, confirm email, login, search for a user using the token provided by cognito, update information.
We are going to do something very simple, we are not going to worry about the project father, we want to address only the use of knowledge.
To create the endpoints we are going to use gin.
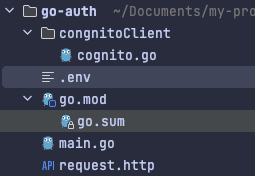
Let's create the following files:
The entrypoint of our application main.go at the root of the project
.env To save cognitive credentials
A paste calledcognitoClientand inside a file called cognito.go
There is a file called request.http, to complete your requests.
The structure will be as follows:
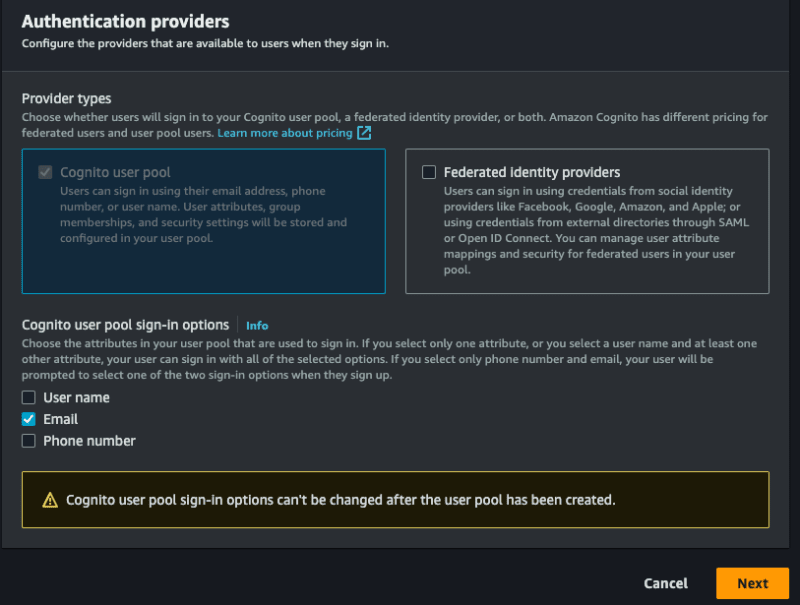
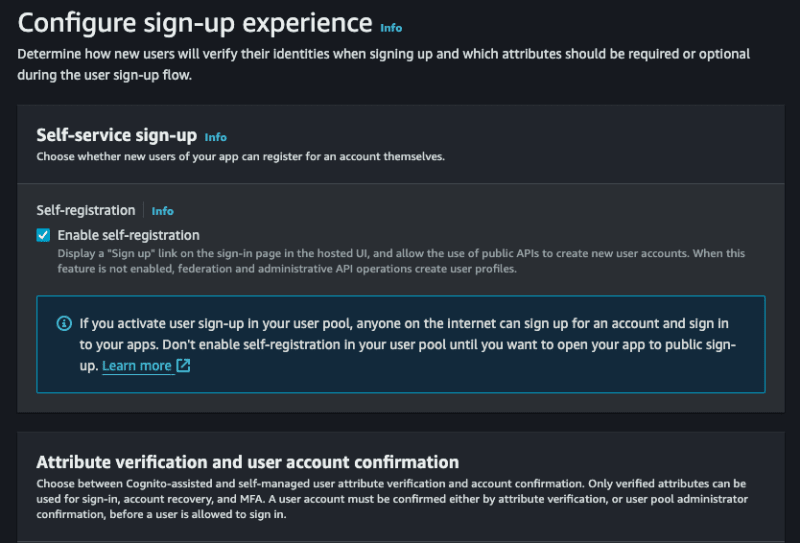
Before starting the code, we will configure the cognito in AWS, to access the panel and search by cognito, after we will create our pool, select the optionAdd user directories to your app.
ForProvider types, select theCognito user pooloption, you can choose to allow login using email, user name and phone, you can only opt for email, select what you prefer, select assim to first stage:
I need to configure some more things, let's go!
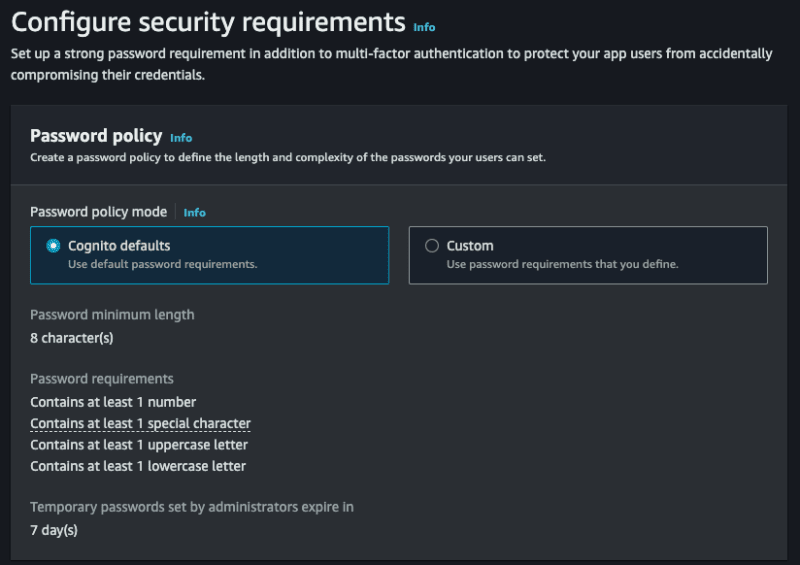
Next step:
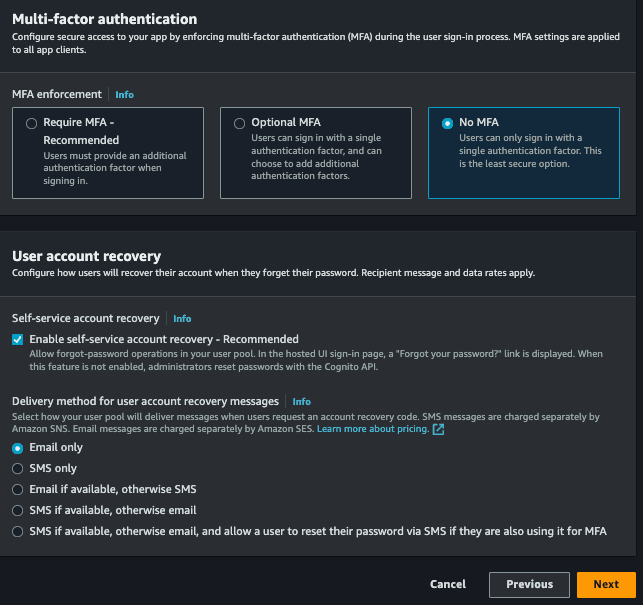
This stage also occurred:
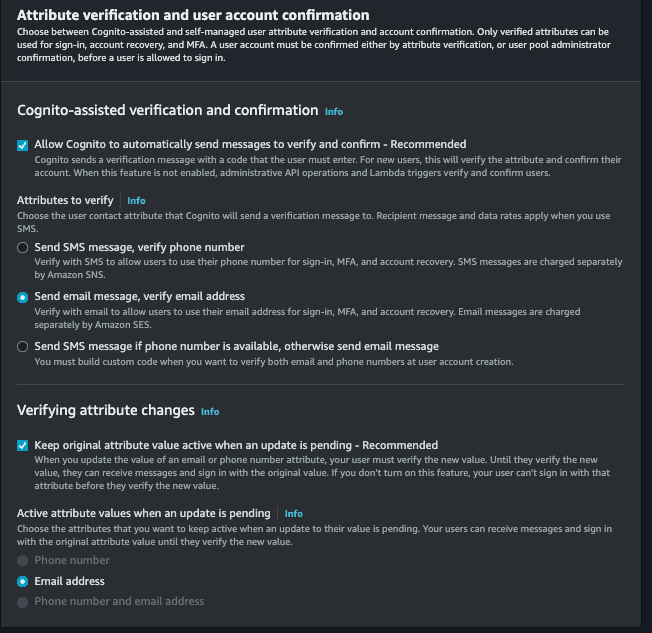
Next, select theSend email with Cognitooption, so we do not need to configure anything to trigger the emails.
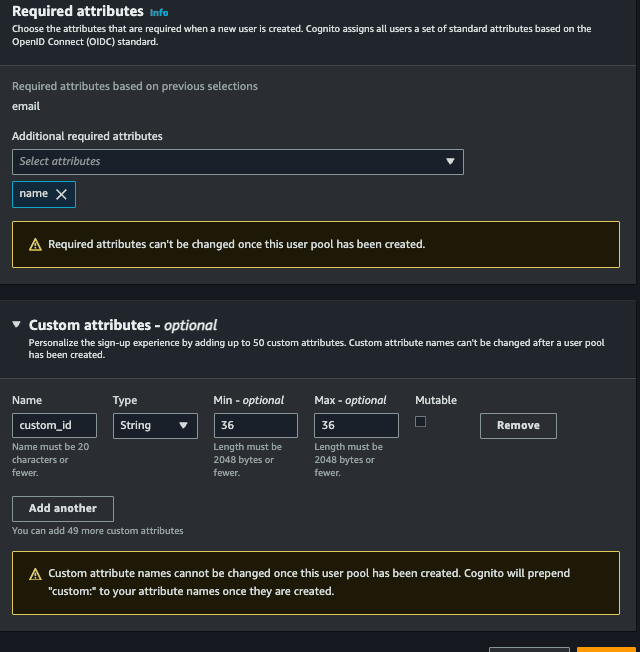
In the next step, inUser pool nameput the name you want inApp client name, also put the name you want and continue.
In the last stage we will not need to alter anything, just finish and create the user pool.
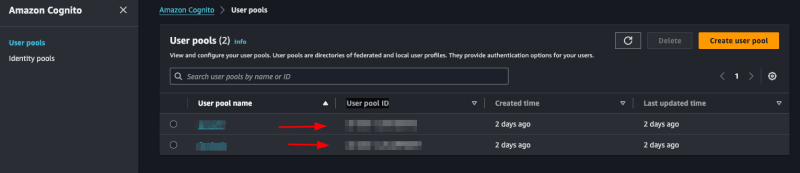
With everything, access or cognito > User pools, select the pool that you just created, this part will list all the users of your application, and it is possible to revoke the user's token, deactivate, verify among other functionalities.
We are going to specify the id of the pool, to be able to use the Go sdk for aws, for access to the created poolApp integration>App client listand see ourClient ID:

Let's save this id in our .env file:
COGNITO_CLIENT_ID=client_id
Remembering that you still need to have the AWS credentials, usually located in the /Users/your-user/.aws directory, if you haven't configured it yet, see here how to do it.
Let's separate the cognito part into another file.
Inside the cognito.go file, we will initialize our cognito and create our interface:
package congnitoClient import ( "github.com/aws/aws-sdk-go/aws" "github.com/aws/aws-sdk-go/aws/session" cognito "github.com/aws/aws-sdk-go/service/cognitoidentityprovider" "github.com/google/uuid" ) type User struct { Name string `json:"name" binding:"required"` Email string `json:"email" binding:"required,email"` Password string `json:"password" binding:"required"` } type CognitoInterface interface { SignUp(user *User) error } type cognitoClient struct { cognitoClient *cognito.CognitoIdentityProvider appClientID string } func NewCognitoClient(appClientId string) CognitoInterface { config := &aws.Config{Region: aws.String("us-east-1")} sess, err := session.NewSession(config) if err != nil { panic(err) } client := cognito.New(sess) return &cognitoClient{ cognitoClient: client, appClientID: appClientId, } } func (c *cognitoClient) SignUp(user *User) error { return nil }
First we create a struct called User, this struct will have the user fields that we need to save in cognito.
Then we create an interface called CognitoInterface, we will have the methods that we will use, first we will only have SignUp which will receive a pointer to the User struct.
Then we will have another struct called cognitoClient that will contain our instance for NewCognitoClient that will be our constructor.
As mentioned, NewCognitoClient will be like our constructor, it is where we will create the session with AWS and return this connection. This connection could be a global variable, in our case we will not do this, it is up to you to check which is the best approach for your use case.
Now let's implement SignUp:
func (c *cognitoClient) SignUp(user *User) error { userCognito := &cognito.SignUpInput{ ClientId: aws.String(c.appClientID), Username: aws.String(user.Email), Password: aws.String(user.Password), UserAttributes: []*cognito.AttributeType{ { Name: aws.String("name"), Value: aws.String(user.Name), }, { Name: aws.String("email"), Value: aws.String(user.Email), }, { Name: aws.String("custom:custom_id"), Value: aws.String(uuid.NewString()), }, }, } _, err := c.cognitoClient.SignUp(userCognito) if err != nil { return err } return nil }
We will use the AttributeType from Cognito to assemble the parameters that we will send to the SignUp of the AWS SDK, note that the custom_id which is our custom field, needs to be placed custom before, without this it will not be accepted, we just created a uuid with the Google package, this field is just to show how to use custom attributes.
The ClientId field refers to the COGNITO_CLIENT_ID of our env, we will pass it on when starting main.go.
This is what we need to save the user, simple isn't it?
Don't forget to start the project with:
go mod init
And install the necessary packages:
go mod tidy
Let's create another function to verify the user's account via email. To verify the account, the user will need to enter the code sent by email. Let's create a new struct and add the new ConfirmAccount method to the interface:
type UserConfirmation struct { Email string `json:"email" binding:"required,email"` Code string `json:"code" binding:"required"` }
type CognitoInterface interface { SignUp(user *User) error ConfirmAccount(user *UserConfirmation) error }
Now let's implement:
func (c *cognitoClient) ConfirmAccount(user *UserConfirmation) error { confirmationInput := &cognito.ConfirmSignUpInput{ Username: aws.String(user.Email), ConfirmationCode: aws.String(user.Code), ClientId: aws.String(c.appClientID), } _, err := c.cognitoClient.ConfirmSignUp(confirmationInput) if err != nil { return err } return nil }
It's very simple, we will use the ConfirmSignUpInput from the cognito package to assemble the parameters, remembering that the Username is the user's email. Finally, we will call ConfirmSignUp passing the confirmationInput.
Remembering that we only returned the error, you could improve and check the types of error messages.
This should be the functionality that will be used the most, let's create a method called SignIn and a struct:
type UserLogin struct { Email string `json:"email" binding:"required,email"` Password string `json:"password" binding:"required"` }
type CognitoInterface interface { SignUp(user *User) error ConfirmAccount(user *UserConfirmation) error SignIn(user *UserLogin) (string, error) }
Our SignIn will receive a UserLogin.
Let's implement:
func (c *cognitoClient) SignIn(user *UserLogin) (string, error) { authInput := &cognito.InitiateAuthInput{ AuthFlow: aws.String("USER_PASSWORD_AUTH"), AuthParameters: aws.StringMap(map[string]string{ "USERNAME": user.Email, "PASSWORD": user.Password, }), ClientId: aws.String(c.appClientID), } result, err := c.cognitoClient.InitiateAuth(authInput) if err != nil { return "", err } return *result.AuthenticationResult.AccessToken, nil }
We will use the InitiateAuth function from the aws cognito package, we need to pass the username (user's email), password and the AuthFlow, this field refers to the type of access that we will allow, in our case USER_PASSWORD_AUTH.
If you receive an error like this:
You trusted all proxies, this is NOT safe. We recommend you to set a value
It will be necessary to enable the ALLOW_USER_PASSWORD_AUTH flow, to configure it access cognito on the aws panel, go to:
User pools>Selecione seu pool>App integration>App client list>Selecione um client, will open this screen:
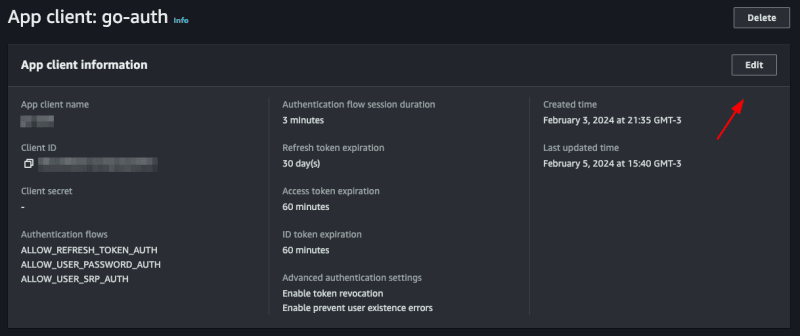
Click oneditand inAuthentication flowsselect the optionALLOW_USER_PASSWORD_AUTHthen save, with this you can now log in with the user's password and email.
Para mostrar como utilizar o token jwt fornecido pelo cognito vamos criar um endpoint que mostra os dados do usuário salvos no cognito apenas com o token.
Let's create another function called GetUserByToken that will receive a token and return a struct of type GetUserOutput that we will get from the cognito package.
type CognitoInterface interface { SignUp(user *User) error ConfirmAccount(user *UserConfirmation) error SignIn(user *UserLogin) (string, error) GetUserByToken(token string) (*cognito.GetUserOutput, error) }
If you click on GetUserOutput you will see what is inside this struct
type GetUserOutput struct { _ struct{} `type:"structure"` MFAOptions []*MFAOptionType `type:"list"` PreferredMfaSetting *string `type:"string"` UserAttributes []*AttributeType `type:"list" required:"true"` UserMFASettingList []*string `type:"list"` Username *string `min:"1" type:"string" required:"true" sensitive:"true"` }
inside the _ struct{} there are custom attributes that we created for our user, in our case the custom_id.
Let's implement:
func (c *cognitoClient) GetUserByToken(token string) (*cognito.GetUserOutput, error) { input := &cognito.GetUserInput{ AccessToken: aws.String(token), } result, err := c.cognitoClient.GetUser(input) if err != nil { return nil, err } return result, nil }
We use GetUser from the cognito package, it only needs an AccessToken which is the token provided by cognito itself.
Finally, we will update the user's password. To do this, we will need the email address and the new password. We already have the UserLogin struct with the fields we need. We will reuse it. If you wish, create a new one just for this function. Let's create the UpdatePassword function:
type CognitoInterface interface { SignUp(user *User) error ConfirmAccount(user *UserConfirmation) error SignIn(user *UserLogin) (string, error) GetUserByToken(token string) (*cognito.GetUserOutput, error) UpdatePassword(user *UserLogin) error }
Let's implement:
func (c *cognitoClient) UpdatePassword(user *UserLogin) error { input := &cognito.AdminSetUserPasswordInput{ UserPoolId: aws.String(os.Getenv("COGNITO_USER_POOL_ID")), Username: aws.String(user.Email), Password: aws.String(user.Password), Permanent: aws.Bool(true), } _, err := c.cognitoClient.AdminSetUserPassword(input) if err != nil { return err } return nil }
We will use the AdminSetUserPassword function from the cognito package, we need to pass the user's email and the new password, in addition we have to pass the UserPoolId, we will put the COGNITO_USER_POOL_ID in the .env file, to search in aws just access your pool and copy the User pool ID
We will also pass Permanent, informing that it is a permanent password, you could pass false, so Cognito would create a temporary password for the user, this will depend on the strategy you will use in your application.
Let's create our main.go, this will be the file where we will start cognito and create our routes.
func main() { err := godotenv.Load() if err != nil { panic(err) } cognitoClient := congnitoClient.NewCognitoClient(os.Getenv("COGNITO_CLIENT_ID")) r := gin.Default() fmt.Println("Server is running on port 8080") err = r.Run(":8080") if err != nil { panic(err) } }
First we will load our envs with the godotenv package, then we start our cognito client, passing the COGNITO_CLIENT_ID, which we got earlier, then we start gin and create a server, that's enough.
Let's create a function inside the main.go file itself, let's call it CreateUser:
func CreateUser(c *gin.Context, cognito congnitoClient.CognitoInterface) error { var user congnitoClient.User if err := c.ShouldBindJSON(&user); err != nil { return errors.New("invalid json") } err := cognito.SignUp(&user) if err != nil { return errors.New("could not create use") } return nil }
Something simple, we just convert what we receive in the body to our struct using gin's ShouldBindJSON, then we call the SignUp that we created in cognito.go.
Now let's create the endpoint inside the main.go function:
r.POST("user", func(context *gin.Context) { err := CreateUser(context, cognitoClient) if err != nil { context.JSON(http.StatusBadRequest, gin.H{"error": err.Error()}) return } context.JSON(http.StatusCreated, gin.H{"message": "user created"}) })
We call the function we just created CreateUser, if there is an error we throw a StatusBadRequest, if it is successful a StatusCreated, let's test.
Let's do a go mod tidy downloading all the packages, then we'll run the application with go run main.go
Now we can create a call in the request.http file and execute:
POST http://localhost:8080/user HTTP/1.1 content-type: application/json { "Name": "John Doe", "email": "wivobi1159@bitofee.com", "password": "Pass@1234" }
If everything is correct we will receive the message:
{ "message": "user created" }
Now entering the Cognito panel on AWS, and accessing the pool then the users, we will have our user there:
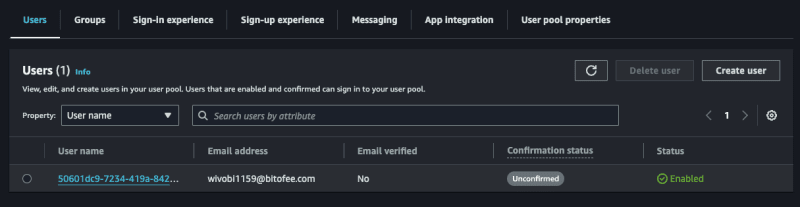
Note that the user we created above is not confirmed, let's confirm it!
Create a function called ConfirmAccount in the main.go file:
func ConfirmAccount(c *gin.Context, cognito congnitoClient.CognitoInterface) error { var user congnitoClient.UserConfirmation if err := c.ShouldBindJSON(&user); err != nil { return errors.New("invalid json") } err := cognito.ConfirmAccount(&user) if err != nil { return errors.New("could not confirm user") } return nil }
Same concept we used before, let's convert the body to the UserConfirmation struct and pass it to ConfirmAccount in cognito.go.
Let's create the endpoint:
r.POST("user/confirmation", func(context *gin.Context) { err := ConfirmAccount(context, cognitoClient) if err != nil { context.JSON(http.StatusBadRequest, gin.H{"error": err.Error()}) return } context.JSON(http.StatusCreated, gin.H{"message": "user confirmed"}) })
It's also simple, we just handle the error and return a message, let's create our call and test it:
POST http://localhost:8080/user/confirmation HTTP/1.1 content-type: application/json { "email": "wivobi1159@bitofee.com", "code": "363284" }
We will receive the message:
{ "message": "user confirmed" }
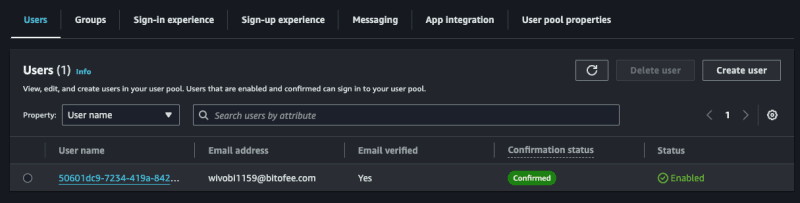
Now accessing Cognito again on the AWS panel, notice that the user is confirmed, remembering that you need to enter a valid email, you can use a temporary email to play around, but it needs to be valid, as Cognito will send the confirmation code and it needs to be a valid code to confirm successfully.
Now let's create our token, to do this in the main.go file create a function called SignIn, this function will return an error and a token.
func SignIn(c *gin.Context, cognito congnitoClient.CognitoInterface) (string, error) { var user congnitoClient.UserLogin if err := c.ShouldBindJSON(&user); err != nil { return "", errors.New("invalid json") } token, err := cognito.SignIn(&user) if err != nil { return "", errors.New("could not sign in") } return token, nil }
Same pattern as the other functions, we convert the body to the UserLogin struct and pass it to SignIn of cognito.go.
Let's create the endpoint:
r.POST("user/login", func(context *gin.Context) { token, err := SignIn(context, cognitoClient) if err != nil { context.JSON(http.StatusBadRequest, gin.H{"error": err.Error()}) return } context.JSON(http.StatusCreated, gin.H{"token": token}) })
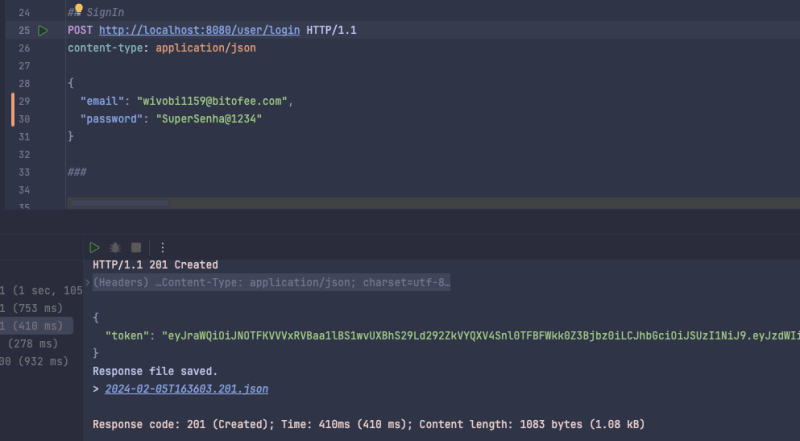
Now we return a token to the user, let's create the call and test:
POST http://localhost:8080/user/login HTTP/1.1 content-type: application/json { "email": "wivobi1159@bitofee.com", "password": "Pass@1234" }
When making the call we will receive our jwt token:
{ "token": "token_here" }
If we get the jwt token we can see what's inside, using the website jwt.io.
Now we will list the user data saved in cognito using only the token, to do this create a function called GetUserByToken in main.go and we will need a struct to represent the response that we will return to the user, we will create it in main as well:
type UserResponse struct { ID string `json:"id"` Name string `json:"name"` Email string `json:"email"` CustomID string `json:"custom_id"` EmailVerified bool `json:"email_verified"` } func main() {}
Now the function:
func GetUserByToken(c *gin.Context, cognito congnitoClient.CognitoInterface) (*UserResponse, error) { token := strings.TrimPrefix(c.GetHeader("Authorization"), "Bearer ") if token == "" { return nil, errors.New("token not found") } cognitoUser, err := cognito.GetUserByToken(token) if err != nil { return nil, errors.New("could not get user") } user := &UserResponse{} for _, attribute := range cognitoUser.UserAttributes { switch *attribute.Name { case "sub": user.ID = *attribute.Value case "name": user.Name = *attribute.Value case "email": user.Email = *attribute.Value case "custom:custom_id": user.CustomID = *attribute.Value case "email_verified": emailVerified, err := strconv.ParseBool(*attribute.Value) if err == nil { user.EmailVerified = emailVerified } } } return user, nil }
This will be the biggest function, we need to map what we receive from Cognito to our UserResponse struct, we do this with a for and a switch, of course we could improve it, but for the sake of example we will keep it like this. Also to map custom attributes we need to put custom before, like custom:custom_id.
We also check if the user passed the token in the header, if not we return an error.
Let's create the endpoint:
r.GET("user", func(context *gin.Context) { user, err := GetUserByToken(context, cognitoClient) if err != nil { if err.Error() == "token not found" { context.JSON(http.StatusUnauthorized, gin.H{"error": "token not found"}) return } context.JSON(http.StatusBadRequest, gin.H{"error": err.Error()}) return } context.JSON(http.StatusOK, gin.H{"user": user}) })
We perform the same validation as the other endpoints, but now we check the error type and if it is of the token not found type we return a StatusUnauthorized.
Let's test:
GET http://localhost:8080/user HTTP/1.1 content-type: application/json Authorization: Bearer token_jwt
Let's receive the user:
{ "user": { "id": "50601dc9-7234-419a-8427-2a4bda92d33f", "name": "John Doe", "email": "wivobi1159@bitofee.com", "custom_id": "cb748d09-40de-457a-af23-ed9483d69f8d", "email_verified": true } }
Finally, let's create the UpdatePassword function that will update the user's password:
func UpdatePassword(c *gin.Context, cognito congnitoClient.CognitoInterface) error { token := strings.TrimPrefix(c.GetHeader("Authorization"), "Bearer ") if token == "" { return errors.New("token not found") } var user congnitoClient.UserLogin if err := c.ShouldBindJSON(&user); err != nil { return errors.New("invalid json") } err := cognito.UpdatePassword(&user) if err != nil { return errors.New("could not update password") } return nil }
We also make it mandatory to inform the token in the header, the rest of the function is what we have already done previously.
Let's create the last endpoint:
r.PATCH("user/password", func(context *gin.Context) { err := UpdatePassword(context, cognitoClient) if err != nil { if err.Error() == "token not found" { context.JSON(http.StatusUnauthorized, gin.H{"error": "token not found"}) return } context.JSON(http.StatusBadRequest, gin.H{"error": err.Error()}) return } context.JSON(http.StatusOK, gin.H{"message": "password updated"}) })
Let's make the call:
PATCH http://localhost:8080/user/password HTTP/1.1 content-type: application/json Authorization: Bearer token_jwt { "email": "wivobi1159@bitofee.com", "password": "NovaSenha2@2222" }
Now when you update your password and try to log in you will receive an error, and if you use the new password, everything will work.
In this post we talk a little about Cognito, one of the many AWS services that many people don't know about but that helps a lot in the evolution of your system.
Cognito's practicality goes beyond what I've discussed. Making a basic login is simple, but Cognito stands out for already providing you with an account verification system "ready", a login option with social networks (which can be quite annoying to implement without Coginito), two-factor authentication, among others, and it also has AWS security to protect user data.
Cognito has more functionality, it's worth seeing all of them in the documentation.
Project repository
See the post on my blog here
Subscribe and receive notification of new posts, participate
The above is the detailed content of Authentication with Golang and AWS Cognito. For more information, please follow other related articles on the PHP Chinese website!
 Usage of background-image
 What should I do if my windows license is about to expire?
 How to read text files in html
 unetbootin usage
 What are the server management software?
 How to start svn service
 The difference between static web pages and dynamic web pages
 What are the Chinese programming languages?


![[Web front-end] Node.js quick start](https://img.php.cn/upload/course/000/000/067/662b5d34ba7c0227.png)


