


The C: drive in a Windows 11 or 10 PC contains the Windows installation files, along with other important files and folders, that all take up space. But if you notice the C: drive on your Windows computer fills up repeatedly, it may be a deeper issue that you should fix.
The C: drive might keep filling up because you store everything there instead of partitioning your physical drive. Try relocating personal folders to another partition or an external drive to free up some space. Additionally, change the default save location for files and folders so that new downloads are automatically saved elsewhere.
Also, check your installed apps and remove anything unnecessary. Even if you didn’t recently install any new apps, your system might contain bloatware or unnecessary software you can remove.
If you need more solutions to free up the C: drive, follow the tips below.
Viruses and other malware are some of the most common perpetrators behind unusual storage use on your hard drive. Thus, the first step you should take after noticing a C: drive storage issue is scanning for infection.
Windows Defender does the job well and provides adequate protection against all types of PC malware. While it has real-time protection, you should perform a full system scan to detect any hidden malware on your computer:

While the scan is in progress, you may notice a slowdown in your computer. It's recommended you postpone any resource-intensive tasks until the scan is over. If you use third-party antivirus software, you can perform a full scan by opening the application's dashboard (usually in the System Tray) and proceeding from there. The exact method differs across different antivirus vendors.
If this ends up being the source of your problem, see the steps you should take upon discovering malware on your computer.
Temporary files, such as thumbnails and previous Windows updates, take up a lot of space on your hard drive. The Disk Cleanup utility in Windows can help you safely delete temporary files, old copies of Windows Update files, Windows upgrade logs, and more:
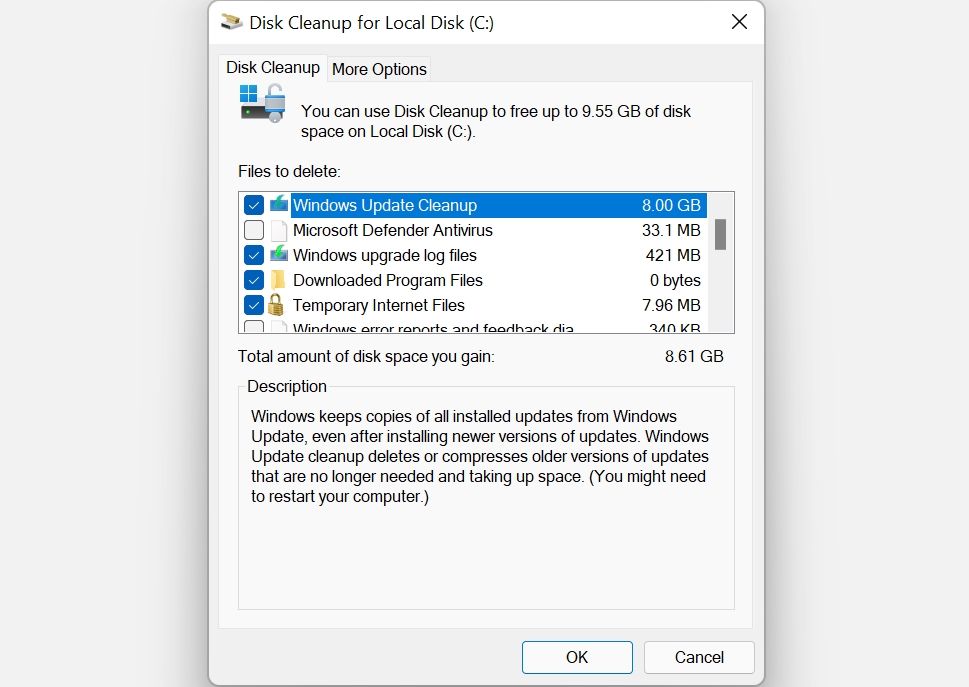
Disk Cleanup is also recommended to manage the massive WinSxs (Windows Side-by-Side) system folder. This Windows component stocks different versions of DLL, EXE, and OCX files. It plays a vital role as it helps update Windows without overwriting or deleting critical files, and in case of a crash, it can help roll back changes. However, WinSxs can balloon up to a size of 5-10GB.
Windows automatically manages the WinSxs folder, but it may be easier to run the Disk Cleanup tool to reduce its size.
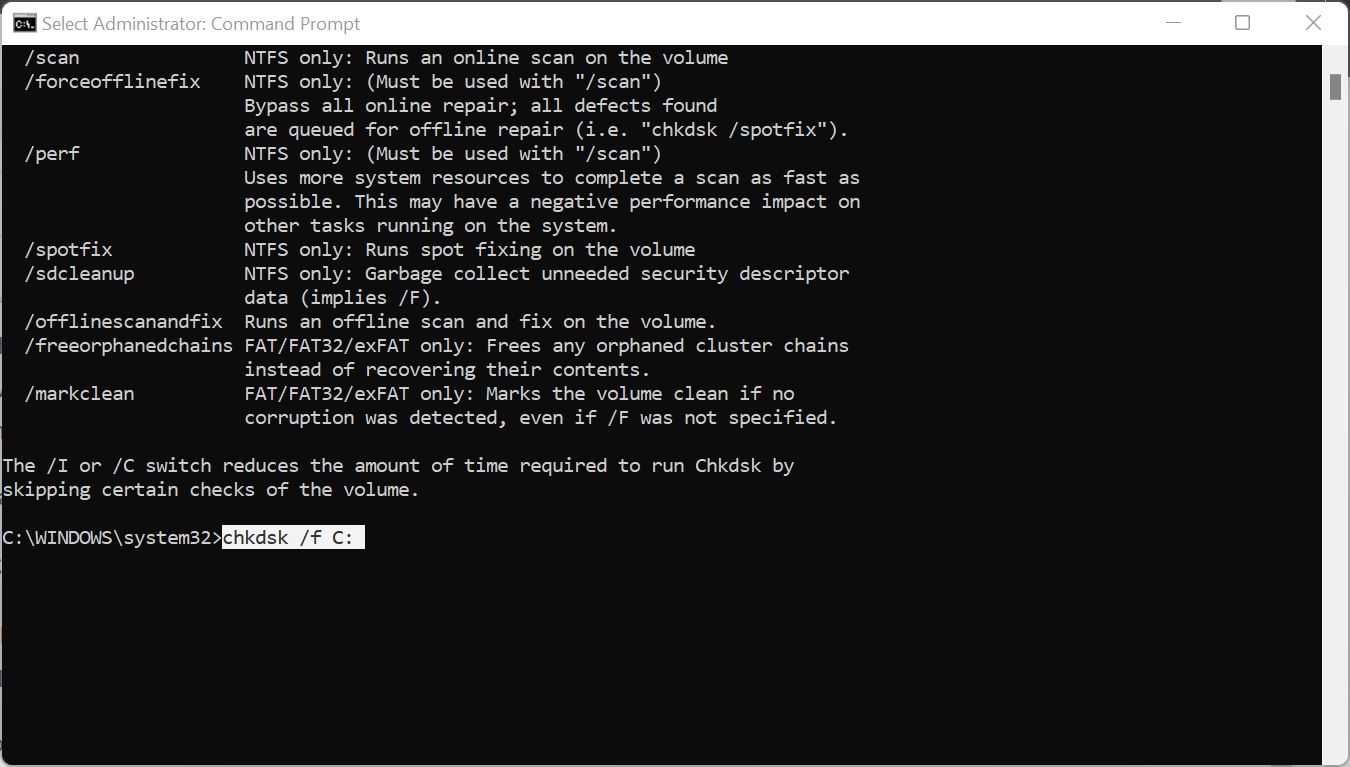
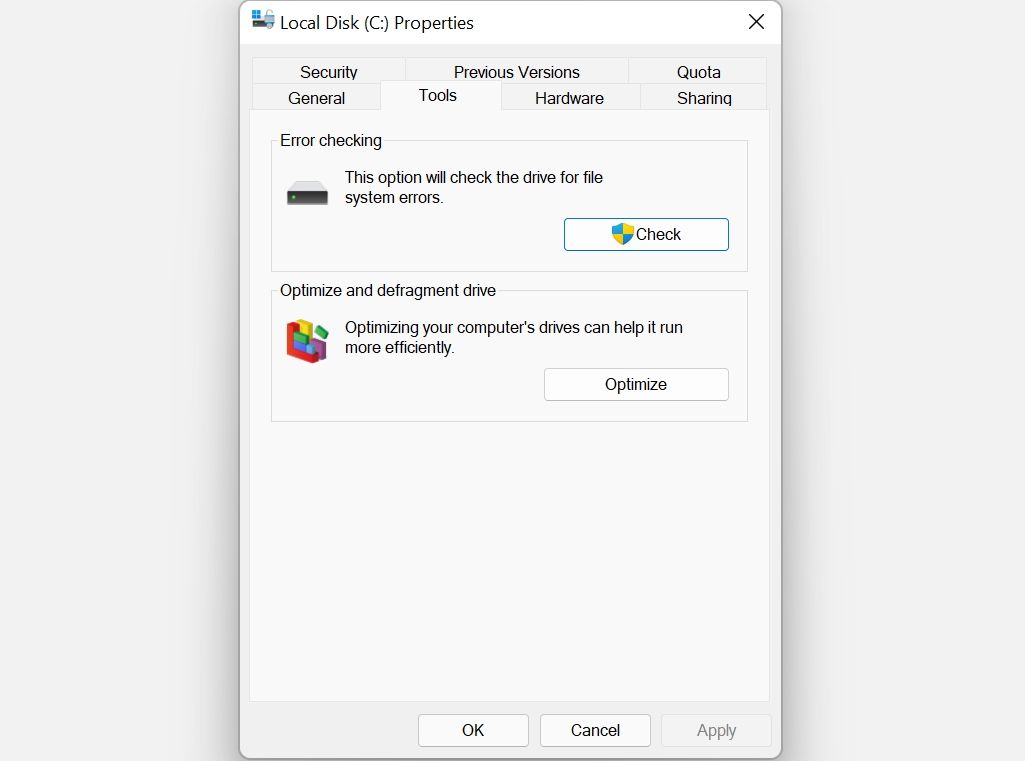
Logical errors on your storage disk can cause all sorts of malfunctions. This includes the incorrect reading of free disk space and storage allocation issues. You can perform a CHKDSK scan using Windows Command Prompt or the Local Disk properties menu to fix this.
CHKDSK is a Windows utility that scans and fixes logical errors on your SSD or hard drive. To use it:
If you prefer to use CHKDSK without the command line, use this method:
System Restore is a critical Windows feature that allows you to restore your computer to a previous state in case of problems. But System Restore Points can take up a lot of space on your PC, depending upon how you've configured the function.
To adjust the space that System Restore points take up, follow these steps:

Alternatively, you can delete unneeded System Restore points to free up additional space on your computer.
If you're sure that the storage issue on your computer is not the result of anything above, it may be worth extending the storage space on the C: partition. Of course, this is only possible if you have multiple partitions on your drive, or unallocated space is available.
All these operations can be performed using Disk Management:

When your computer enters hibernation mode, it saves energy by shutting your system off completely, while enabling you to pick up your work from where you left off. While this may be convenient, hibernation files can fill up your C: drive.
To turn off hibernation, launch Command Prompt with administrative rights (right-click the Start button for a shortcut) and run this command:
powercfg.exe /hibernate offAs your computer will no longer hibernate, be sure to save all your work before leaving your desk.
If you need more help keeping the C: drive clutter-free, you can use a third-party app to clean your disk. Besides freeing up space on your C: drive, these tools could improve your computer’s overall performance.
The above is the detailed content of 6 Fixes if the C: Drive Keeps Filling Up for No Reason on Windows. For more information, please follow other related articles on the PHP Chinese website!


![[Web front-end] Node.js quick start](https://img.php.cn/upload/course/000/000/067/662b5d34ba7c0227.png)


