


How to remove autocomplete email addresses in Gmail

Gmail is the most popular web-based email server from Google, and it comes with many great features that are helpful when browsing, editing, and sending emails. One such feature is the autocomplete list, which allows users to view a list of email addresses saved as contacts before finishing entering the full address.
This feature is really useful but sometimes it may not be a good approach as there may be some email addresses that are no longer valid or may have been deleted by the user. For example, someone who leaves an organization no longer has access to a company email address. But there is a way to remove those email addresses that are highlighted in Gmail's autocomplete list.
If you also want to remove email addresses from Gmail autocomplete list, this article will provide you with better and clearer guidance.
How to Remove Email Addresses from Gmail Autocomplete
Step 1: First, click here to open your Gmail account.
Step 2: The Gmail webpage will open in a new tab.
Step 3: If your Google Account credentials are not saved in your browser, sign in with your Google Account.
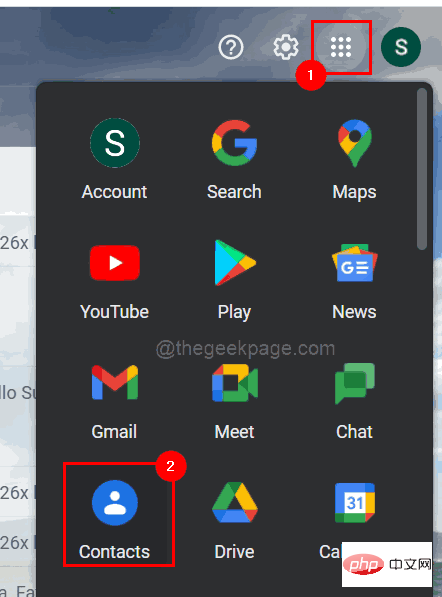
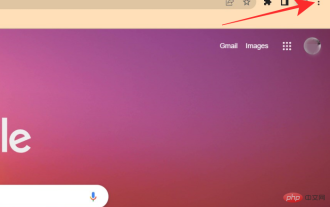
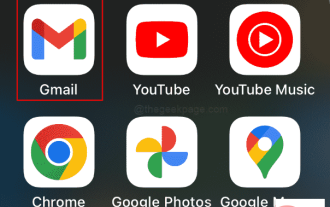
Step 4: Once you are logged in with your Google account, click on the Google app icon (9-dot cube shape).
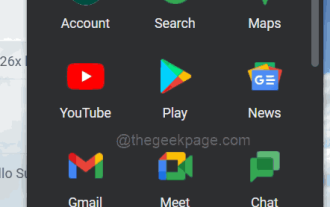
Step 5: This will display all Google apps in the drop-down section.
Step 6: Find the Google app named Contacts and click on it.
Step 7: The Google Contacts page will now open in a new tab.
Step 8: Search for the email address you want to delete by typing it in the search bar as shown below.
Step 9: Now select the email address from the suggestions by clicking on it as shown in the screenshot below.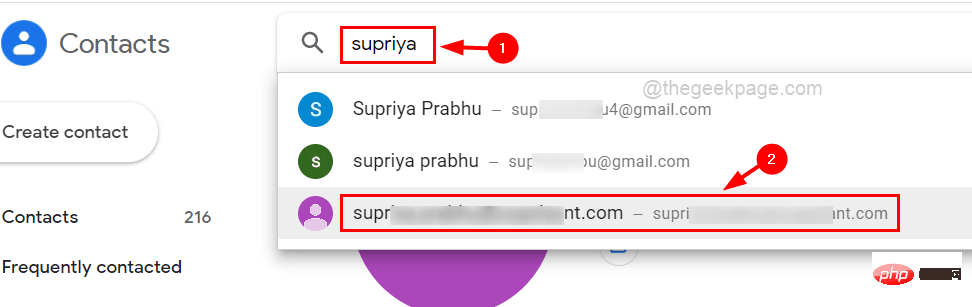
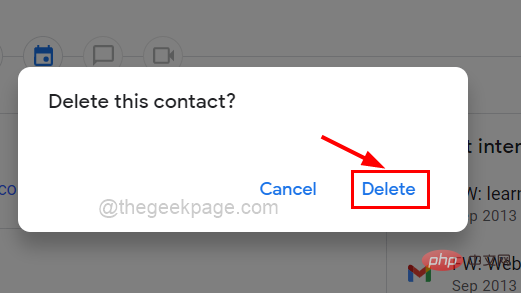
three vertical dots (more options icon) on the right side as shown in the image below Show.
Step 11: Please click it to see the options. Step 12: SelectDelete from the list.

Delete from the prompt titled "Delete this contact?" ".
The above is the detailed content of How to remove autocomplete email addresses in Gmail. For more information, please follow other related articles on the PHP Chinese website!

Hot AI Tools

Undress AI Tool
Undress images for free

Undresser.AI Undress
AI-powered app for creating realistic nude photos

AI Clothes Remover
Online AI tool for removing clothes from photos.

ArtGPT
AI image generator for creative art from text prompts.

Stock Market GPT
AI powered investment research for smarter decisions

Hot Article
Hot Tools

Notepad++7.3.1
Easy-to-use and free code editor

SublimeText3 Chinese version
Chinese version, very easy to use

Zend Studio 13.0.1
Powerful PHP integrated development environment

Dreamweaver CS6
Visual web development tools

SublimeText3 Mac version
God-level code editing software (SublimeText3)


 How to add a hyperlink to text or image in Gmail
May 06, 2023 pm 06:07 PM
How to add a hyperlink to text or image in Gmail
May 06, 2023 pm 06:07 PM
No matter how many instant messaging apps have come and gone, email always has a completely different feel to it. Mailing is truly synonymous with Gmail. Not to mention a professional front desk, Gmail is unavoidable, just unavoidable! Since Gmail is used so frequently, no matter what, you have to know how to make your Gmail experience the smoothest and most efficient. You will most likely need to add a lot of web links in the body of your email, and it will definitely look unwieldy if you have so many links. But links are definitely necessary, even if long links will definitely make your email look ugly. So is there a way out? What about hyperlinks? How do you hide a link in text or an image? Sound cool? Oh yes, Gmail is
 How do I recover my Steam account (no username or password required)?
Apr 25, 2023 pm 07:13 PM
How do I recover my Steam account (no username or password required)?
Apr 25, 2023 pm 07:13 PM
During this time, you download many games to your Steam account, and one day when you log into Steam to play one of the games, you find that you have forgotten your username or password. Games downloaded through your account are at risk. No need to worry, you can follow the steps below to recover your Steam account and get back to your favorite games. Steps to recover your Steam account: 1- Go to the Steam login page https://store.steampowered.com/login from your desktop browser. 2-Click Forgot your password? Or the Support tab on the Steam login page. 3- Selecting the Support tab will take you to Steam Support
 How to remove Boomerang from Gmail on PC or mobile
Apr 14, 2023 pm 10:46 PM
How to remove Boomerang from Gmail on PC or mobile
Apr 14, 2023 pm 10:46 PM
How to Remove Boomerang from Gmail Find below our step-by-step guide to remove Boomerang from your Gmail account on your PC or mobile phone. To remove Boomerang from Gmail on PC, open Google Chrome browser on your computer. In Google Chrome, click the three-dot icon in the upper right corner of the screen. Select More Tools from the drop-down menu. Click Extensions from the next drop-down menu. On the Extensions screen, look for
 What to do if gmail is blocked
Dec 07, 2023 am 10:27 AM
What to do if gmail is blocked
Dec 07, 2023 am 10:27 AM
Solution: 1. Check whether the account violates Gmail's usage policies. You need to comply with these policies and wait for a period of time to restore the account; 2. Contact the Gmail customer service team for help, through the official Gmail website or the help and support page in the application Find the customer service contact information; 3. Check whether the account has been accessed without authorization or has been hacked. You need to change the password immediately and enable two-factor authentication to protect the account security; 4. Stop sending large amounts of emails and wait for a period of time to restore the account.
 How to set up Windows 11 without a Microsoft account
Apr 15, 2023 am 10:07 AM
How to set up Windows 11 without a Microsoft account
Apr 15, 2023 am 10:07 AM
All of the options below to set up Windows 11 with a local account allow users to bypass Microsoft account creation or sign-in during the out-of-box experience. This is a wizard that guides the user through the final steps of setup after the operating system files have been copied to disk. Most PCs that come pre-installed with Windows 11 start at this stage. The first few steps of the out-of-box experience are always the same. Here they come: Step 1: Select a country or region. Step 2: Confirm or select the keyboard layout or input method. Step 3: Check for updates runs automatically Step 4: Name the device. This step is optional. Step 5: Choose whether the device is for personal use or should it be set up for work or school use. The next screen prompts the user to use
 Google Gemini now in the Gmail app: Smart email search via AI on Android devices
Aug 31, 2024 am 09:54 AM
Google Gemini now in the Gmail app: Smart email search via AI on Android devices
Aug 31, 2024 am 09:54 AM
Google is expanding its Gmail app at Android with an AI-powered Q&A function which was already available in the web version of Gmail and is powered by Google's Gemini AI assistant. Users can now search their inbox more efficiently by asking speci
 How to remove autocomplete email addresses in Gmail
Apr 21, 2023 am 10:46 AM
How to remove autocomplete email addresses in Gmail
Apr 21, 2023 am 10:46 AM
Gmail is the most popular web-based email server from Google, and it comes with many powerful features that are helpful when browsing, editing, and sending emails. One such feature is the autocomplete list, which allows users to view a list of email addresses saved as contacts before finishing entering the full address. This feature is really useful but sometimes it may not be a good approach as there may be some email addresses that are no longer valid or may have been deleted by the user. For example, someone who leaves an organization no longer has access to a company email address. But there is a way to remove those email addresses that are highlighted in Gmail's autocomplete list. If you also want to remove emails from Gmail autocomplete list
 How to use Gmail on iPhone to find and recover archived emails
Apr 26, 2023 am 10:52 AM
How to use Gmail on iPhone to find and recover archived emails
Apr 26, 2023 am 10:52 AM
On your iPhone, are you trying to find old emails archived in Gmail but are unable to do so? You are not alone, so don't worry. Many people face difficulties finding and recovering old emails on their mobile devices. In this blog post, we will walk you through the process of finding and recovering archived emails in Gmail on iPhone. We'll also provide tips and tricks to help you keep your inbox organized and find important emails more easily in the future. So whether you're trying to retrieve important business emails or sentimental messages from loved ones, you'll learn how to easily access and recover archived emails. Archive your emails in Gmail Step 1: On iP