


How to make a poster in a PPT?

Set the slide size to a poster dimension like A1, A0, or custom (e.g., 24 x 36 in) via Design > Slide Size > Custom Slide Size, ensuring correct orientation and selecting “Ensure Fit.” 2. Organize content with a clear layout including a large title (72–120 pt), author details, sections (Introduction, Methods, etc.), visuals, and contact info, using text boxes, shapes, gridlines, and readable fonts (headings 44–60 pt, body 24–36 pt) on a high-contrast background. 3. Insert high-resolution images (≥150 dpi), use simple color schemes (2–3 colors), apply formatting via “Format Picture,” and maintain white space to avoid clutter. 4. Save as PPTX for editing and export as high-quality PDF (File > Export > Create PDF) with “Use Full Page Printing” enabled, confirming required format with print shop if needed, and test print a small version first to verify quality.

Making a poster in PowerPoint (PPT) is simple and effective, especially if you're already familiar with the software. While tools like Adobe Illustrator or Canva are designed for large-format posters, PowerPoint works well for academic, school, or event posters—especially when printing on large paper or presenting digitally.
Here’s how to make a poster in PowerPoint:
1. Set the Right Poster Size
The first step is to change the slide dimensions to match your desired poster size. Standard letter size (8.5 x 11 in) won’t work for most posters.
- Open PowerPoint.
- Go to Design > Slide Size > Custom Slide Size.
- Choose a common poster size like:
- A1 (23.4 x 33.1 in or 594 x 841 mm)
- A0 (33.1 x 46.8 in or 841 x 1189 mm)
- Or enter a custom size (e.g., 24 x 36 inches)
- Set orientation: Landscape or Portrait, depending on your layout.
- Click OK, and choose “Ensure Fit” when prompted.
Tip: If your version of PowerPoint limits size, design at a smaller scale (e.g., half size) and scale up later for printing.
2. Design Your Content Layout
Start with a clear structure. Most posters include:
- Title (large, bold, at the top)
- Author(s) and affiliation(s)
- Sections: Introduction, Methods, Results, Conclusion, References, Contact Info
- Visuals: Charts, images, diagrams
- Optional: Logo, QR code, or institution branding
Use text boxes and shapes to organize content into columns or panels. Gridlines (View > Gridlines) help align elements.
- Use large fonts: Title 72–120 pt, headings 44–60 pt, body text 24–36 pt.
- Keep text concise—posters should be readable from 3–6 feet away.
- Use high-contrast colors (e.g., dark text on light background).
3. Add Visuals and Formatting
- Insert images via Insert > Pictures. Make sure they’re high-resolution (at least 150 dpi at full poster size).
- Use shapes and lines to separate sections or create borders.
- Apply a simple, professional color scheme (2–3 main colors).
- Avoid clutter—leave white space to improve readability.
Pro tip: Right-click on images and select “Format Picture” to remove backgrounds, add borders, or apply effects.
4. Save and Export for Printing
Once your poster is ready:
- Save as PPTX to keep it editable.
- For sharing or printing, go to File > Export > Create PDF.
- Choose “Standard (publishing online)” or “Press Quality” for high resolution.
- Make sure “Use Full Page Printing” is checked.
- If printing at a professional shop, confirm the file format they need (PDF is usually best).
Note: Some print shops accept PPT files, but always check first.
Basically, you're using PowerPoint like a simple design tool. The key is setting the right dimensions, keeping text large and clear, and organizing content logically. It’s not as advanced as dedicated design software, but it’s accessible and gets the job done—especially for students or researchers.
Just remember: less text, more visuals, and test print a small version first if possible.
The above is the detailed content of How to make a poster in a PPT?. For more information, please follow other related articles on the PHP Chinese website!

Hot AI Tools

Undress AI Tool
Undress images for free

Undresser.AI Undress
AI-powered app for creating realistic nude photos

AI Clothes Remover
Online AI tool for removing clothes from photos.

ArtGPT
AI image generator for creative art from text prompts.

Stock Market GPT
AI powered investment research for smarter decisions

Hot Article
Hot Tools

Notepad++7.3.1
Easy-to-use and free code editor

SublimeText3 Chinese version
Chinese version, very easy to use

Zend Studio 13.0.1
Powerful PHP integrated development environment

Dreamweaver CS6
Visual web development tools

SublimeText3 Mac version
God-level code editing software (SublimeText3)

![Fix Scroll Bar Missing Error in Excel [Troubleshooting Guide]](https://img.php.cn/upload/article/001/242/473/175816188366414.png?x-oss-process=image/resize,m_fill,h_207,w_330) Fix Scroll Bar Missing Error in Excel [Troubleshooting Guide]
Sep 18, 2025 am 10:18 AM
Fix Scroll Bar Missing Error in Excel [Troubleshooting Guide]
Sep 18, 2025 am 10:18 AM
The scroll bar plays a crucial role in navigating through vast amounts of data efficiently, and its sudden disappearance can disrupt your workflow. In this troubleshooting guide, we'll show you how to bring back the scroll bar in Excel and regain s
 Why is my PPT file so large? A guide to diagnosing and fixing large PPT file sizes.
Sep 17, 2025 am 02:11 AM
Why is my PPT file so large? A guide to diagnosing and fixing large PPT file sizes.
Sep 17, 2025 am 02:11 AM
IfyourPowerPointfileisslowtoopenorsend,reduceitssizeby:1.Compressinghigh-resolutionimages.2.Replacingembeddedaudio/videowithlinkedfiles.3.Deletinghiddenorduplicateslides.4.CleaninguptheSlideMaster.5.SavinginoptimizedPPTXformat.
 How to create a fillable form with checkboxes in Word
Sep 16, 2025 am 04:29 AM
How to create a fillable form with checkboxes in Word
Sep 16, 2025 am 04:29 AM
EnabletheDevelopertabviaFile>Options>CustomizeRibbonbycheckingDeveloper.2.InsertaCheckboxContentControlfromtheControlsgroupontheDevelopertabwhereneeded.3.Addmultiplecheckboxesbyrepeatingtheinsertionprocessandaligningthemneatlywithtextortables.4
 How To Open Unknown File Extensions in Windows
Sep 19, 2025 am 09:33 AM
How To Open Unknown File Extensions in Windows
Sep 19, 2025 am 09:33 AM
Have you ever stumbled upon a file with a strange or unfamiliar extension? If yes, you're probably familiar with the annoyance of not knowing which program can open it. The good news is, there are effective ways to determine the correct software and
 How to Save Your Document to OneDrive in Microsoft Word
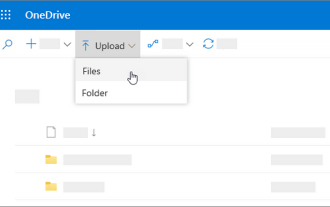
Sep 21, 2025 am 11:36 AM
How to Save Your Document to OneDrive in Microsoft Word
Sep 21, 2025 am 11:36 AM
If you're working in Word and would like to save your document directly to OneDrive, the process is straightforward. Just follow these easy steps:Click on ‘File’Choose ‘Save As’Pick ‘OneDrive’ as your save locationSelect the appropriate folder—use On
 How to save a PPT as a PDF?
Sep 21, 2025 am 01:18 AM
How to save a PPT as a PDF?
Sep 21, 2025 am 01:18 AM
Open the PPT file to be converted; 2. Click "File" to enter the background; 3. Select "Save As" and specify the save location; 4. Select "PDF" in "Save Type" to select quality and options; 5. Click "Save" to complete the conversion, and the PDF will retain the original layout and be suitable for sharing or printing.
 How to insert a Word document into a PPT?
Sep 21, 2025 am 01:39 AM
How to insert a Word document into a PPT?
Sep 21, 2025 am 01:39 AM
ToinsertaWorddocumentintoPowerPoint,embeditasanobjectbygoingtoInsert→Object→Createfromfile,thenbrowseandselectthefile,optionallycheckingDisplayasiconorLinktofiletomaintainupdates;2.Forquickcontenttransfer,copytextfromWordandpasteintoPowerPointusingKe
 How to Update Microsoft Mouse Driver in Windows
Sep 20, 2025 am 09:09 AM
How to Update Microsoft Mouse Driver in Windows
Sep 20, 2025 am 09:09 AM
Keeping your drivers up to date is essential, especially for peripherals like your mouse. Having the latest driver for your Microsoft mouse can help with compatibility and stability, allowing you to get the most out of your hardware whether you're
