


How to fix HTTP image upload errors in WordPress (simple)

Do you need to fix HTTP image upload errors in WordPress?
This error can be particularly frustrating when you create content in WordPress. This usually happens when you upload images or other files to CMS using the built-in WordPress media library.
In this article, we will show you how to easily fix HTTP image upload errors in WordPress.

What is the reason for HTTP errors during WordPress media uploading?
Many things can cause HTTP errors when you try to upload files to a WordPress website using the WordPress media uploader.
Basically, WordPress can't figure out why, which is why it displays a generic "HTTP Error" message.
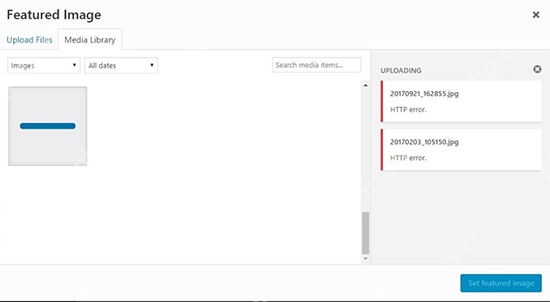
The frustrating thing about this WordPress HTTP error is that it doesn't give you any clues about what might be causing the error. This means you have to try different solutions to find the cause and fix the error.
That being said, let's see how to troubleshoot and fix HTTP errors during media uploads in WordPress. Feel free to use the link below to jump to a specific method:
- Method 1: Make sure the HTTP error is not temporary
- Method 2: Deactivate all WordPress plugins
- Method 3: Increase WordPress memory limit
- Method 4: Change the image editor library used by WordPress
- Method 5: Use the .htaccess method
- Method 6: Update PHP version
Method 1: Make sure the HTTP error is not temporary
First, you should wait a few minutes before trying to upload the image file to your WordPress website again. This error is sometimes caused by abnormal traffic and insufficient server resources, and most WordPress hosting servers automatically fix these issues.
If this doesn't work, you may want to try one or more of the following:
- Refresh the browser or clear the browser cache.
- Resize the file and rename it, and upload it to the media library again. Check out our list of image optimization plugins to reduce file size.
- Save files in different formats. For example, you can change JPEG to PNG using image editing software. After that, try uploading the file again.
If all these steps still result in an HTTP error, the error is not caused by a temporary failure and you absolutely need immediate attention.
Method 2: Deactivate all WordPress plugins
If you have just recently installed a new WordPress plugin, it may be incompatible with your other plugins and interrupt the image upload process. To see if this is the case, you can disable all WordPress plugins.
If the HTTP error disappears after the WordPress plugin is disabled, then this may be the culprit for the HTTP upload image error. You can install alternative plugins or contact the developer for support.
For more information, check out our guide on how to easily deactivate all WordPress plugins and how to deactivate plugins when your WordPress dashboard is not accessible.
Method 3: Increase WordPress memory limit
WordPress is written in the PHP programming language. Additionally, the amount of memory allocated to different PHP processes is determined by your web hosting server.
If uploading images requires more PHP memory than available memory, you may see HTTP image upload errors in WordPress.
To resolve this issue, you need to increase the memory that PHP can use on the server.
You first need to access the site's files using the FTP client or the File Manager application in the Web Hosting Dashboard. Next, go to the root directory and find the wp-config.php file.

Then you need to edit the wp-config.php file using a text editor and add the following line of code to it:
define( 'WP_MEMORY_LIMIT', '256M');
Depend on
Use it with one click in WordPress
This code increases the WordPress memory limit to 256MB, which is enough to solve any memory limit issues.
Finally, you have to save the file and upload it back to the server.
To learn more, see our step-by-step guide on how to increase PHP memory limits in WordPress.
Method 4: Change the image editor library used by WordPress
WordPress runs on PHP, which uses two modules to process images. These modules are called GD Library and Imagick. WordPress can use one of them, depending on which one is available.
However, Imagick often encounters memory problems, resulting in HTTP errors during image upload. To resolve this issue, you can set the GD library as the default image editor.
You can do this by simply adding this code to the functions.php file of your WordPress theme or using WPCode (recommended):
functionwpb_image_editor_default_to_gd( $editors) { $gd_editor= 'WP_Image_Editor_GD'; $editors= array_diff( $editors, array( $gd_editor) ); array_unshift( $editors, $gd_editor); return$editors;}add_filter( 'wp_image_editors', 'wpb_image_editor_default_to_gd');
Depend on
Use it with one click in WordPress
For more details, you can see our guide on how to add custom code in WordPress.
After adding this code, you can use the Media Uploader to retry uploading the file. If this doesn't solve the problem, then you can delete this code and try the other methods described in this article.
Method 5: Use the .htaccess method
This method allows you to control how Imagick uses server resources. Many shared hosting providers limit Imagick's ability to use multithreading to speed up image processing. However, this causes you to see an HTTP error when uploading the image.
An easy fix is to add the following code to the .htaccess file:
SetEnv MAGICK_THREAD_LIMIT 1
Depend on
Use it with one click in WordPress
This code just limits Imagick to use a single thread to process images.
Method 6: Update PHP version
If your WordPress website is using an outdated version of PHP, an HTTP image upload error may be triggered. This is because newer PHP versions have performance improvements and generally use less memory.
Fortunately, it is easy to check and update the PHP version of the site. For more details, see our beginner's guide to learn how to update your PHP version in WordPress.
We hope this article helps you fix HTTP image upload errors in WordPress. You might also want to check out our final list of our most common WordPress bugs and how to fix them, as well as the best email marketing services we have selected for small businesses by experts.
The above is the detailed content of How to fix HTTP image upload errors in WordPress (simple). For more information, please follow other related articles on the PHP Chinese website!

Hot AI Tools

Undress AI Tool
Undress images for free

Undresser.AI Undress
AI-powered app for creating realistic nude photos

AI Clothes Remover
Online AI tool for removing clothes from photos.

ArtGPT
AI image generator for creative art from text prompts.

Stock Market GPT
AI powered investment research for smarter decisions

Hot Article
Hot Tools

Notepad++7.3.1
Easy-to-use and free code editor

SublimeText3 Chinese version
Chinese version, very easy to use

Zend Studio 13.0.1
Powerful PHP integrated development environment

Dreamweaver CS6
Visual web development tools

SublimeText3 Mac version
God-level code editing software (SublimeText3)

 How to clear data from a single website by Google Chrome_Chrome clears cookies and cache methods for specific sites
Sep 26, 2025 pm 01:03 PM
How to clear data from a single website by Google Chrome_Chrome clears cookies and cache methods for specific sites
Sep 26, 2025 pm 01:03 PM
Data from specific websites in Google Chrome can be accurately cleared through site settings. First, visit the target website, click the lock icon in the address bar to enter "Website Settings", and select "Clear Data" to delete its cookies and cache; if you cannot access the website, you can enter Chrome Settings → Privacy and Security → Site Settings → View all site data, and manually delete it after searching for the domain name; you can also directly locate and clear specific site data by entering the shortcut of chrome://settings/siteData?searchTerms= to achieve efficient and accurate management.
 Ten years of hard work to make domestic systems run smoothly Windows applications
Sep 26, 2025 pm 01:24 PM
Ten years of hard work to make domestic systems run smoothly Windows applications
Sep 26, 2025 pm 01:24 PM
In the previous article "After going around, I began to study Windows systems again", it analyzed that Microsoft has been deeply engaged in Windows for many years and has long built a solid moat that cannot be broken. Even under the tide of domestic substitution, we still cannot do without Windows applications. In order to make Windows applications run on domestic systems, there are many solutions, and the most common solution is Wine. What is WineWine is an open source project that re-implements some of the features of Microsoft's Windows operating system on top of various Unix variants. Wine is mainly aimed at Linux and macOS, but can also run on FreeBSD, NetBSD, and So
 How to check whether the password is leaked by Chrome browser_Introduction to the password security check function of Chrome browser
Sep 26, 2025 pm 12:51 PM
How to check whether the password is leaked by Chrome browser_Introduction to the password security check function of Chrome browser
Sep 26, 2025 pm 12:51 PM
Chrome provides built-in security checking, which automatically compares saved passwords with known leaked databases. Users can perform security checks through the "Security" option in the settings. If a leaked password is found, a red warning will be displayed and they can be directly redirected to the password-changing page. Additionally, when viewing a specific account manually in the Password Manager, a risky password will mark an exclamation mark. In order to achieve continuous protection, it is recommended to enable "Password Breach Notification". When a new leak occurs, the system will actively push an alarm to remind users to modify their passwords in time and enable two-factor verification to ensure the security of their account.
 How to cancel popular sites appear in the address bar of Edge browser under Win10
Sep 26, 2025 pm 01:30 PM
How to cancel popular sites appear in the address bar of Edge browser under Win10
Sep 26, 2025 pm 01:30 PM
Recently, when using Windows 10 system, I found that when using the Edge browser to click on the address bar, the troublesome "popular sites" always pop up. To solve this problem, this article will introduce you to how to remove popular sites in the Edge browser address bar in Windows 10. Next are the specific operation steps. Operation steps: Start Edge browser, find the relevant options in the settings interface (as shown in the figure below), and change its default open page to "Blank Page". How to turn off Win10Edge Click the address bar to display popular sites. If the option of blank pages is not provided in the system, you need to reset the Edge browser. You can see this option after resetting it. The specific reset steps are as follows:
 How to clear automatically filled form data in Wukong Browser_Wukong Browser's method of clearing automatic filling form data in Wukong Browser
Sep 26, 2025 pm 01:00 PM
How to clear automatically filled form data in Wukong Browser_Wukong Browser's method of clearing automatic filling form data in Wukong Browser
Sep 26, 2025 pm 01:00 PM
You can manage form records in Wukong browser by setting clear form data, manually deleting specific entries, or disabling the autofill feature to ensure privacy and accuracy.
 How to enable reading mode by 360 browser_360 browser immersive reading mode activation tutorial
Sep 28, 2025 am 10:21 AM
How to enable reading mode by 360 browser_360 browser immersive reading mode activation tutorial
Sep 28, 2025 am 10:21 AM
360 Browser can enable reading mode through address bar icons, F9 shortcut keys or menu options, automatically extract articles and optimize typesetting, providing an immersive reading experience without interference.
 How to prohibit website access to microphone by Chrome browser_Chrome browser microphone permission management settings
Sep 26, 2025 pm 12:48 PM
How to prohibit website access to microphone by Chrome browser_Chrome browser microphone permission management settings
Sep 26, 2025 pm 12:48 PM
First, turn off the global permissions of Chrome microphone, then set up a block list for specific websites, clear existing authorization records, and disable Chrome microphone access at the system level to enhance privacy protection.
 How to export history records by Wukong Browser_Wukong Browser Browser History Export and Backup Method
Sep 26, 2025 pm 12:54 PM
How to export history records by Wukong Browser_Wukong Browser Browser History Export and Backup Method
Sep 26, 2025 pm 12:54 PM
You can back up Wukong browser history by manually recording, extracting databases or automated scripts. First, you can enter the history page to copy or take photos and save them manually; secondly, if the device is rooted, you can access the /data/data/com.wukong.browser/databases/ path with the file manager, export the history.db database and parse it into CSV with the SQLite tool; finally, for rootless devices, you can use Auto.js and other tools to write scripts, call the accessibility service to automatically slide the historical page and take screenshots to archive, and realize semi-automated backup.
