Obwohl Objekte in der objektiven Welt dreidimensional sind, sind die Bilder, die wir erhalten, zweidimensional, aber wir können die dreidimensionalen Informationen des Ziels anhand dieser zweidimensionalen Objekte wahrnehmen. dimensionale Bilder. Die dreidimensionale Rekonstruktionstechnologie verarbeitet Bilder auf eine bestimmte Weise, um dreidimensionale Informationen zu erhalten, die von Computern erkannt werden können, und analysiert so das Ziel. Die monokulare 3D-Rekonstruktion simuliert binokulares Sehen basierend auf der Bewegung einer einzelnen Kamera, um dreidimensionale visuelle Informationen von Objekten im Raum zu erhalten, wobei sich monokular auf eine einzelne Kamera bezieht.
Im Prozess der monokularen 3D-Rekonstruktion von Objekten ist die relevante Betriebsumgebung wie folgt:
matplotlib 3.3.4
numpy 1.19.5
opencv-contrib-python 3.4.2.16
opencv- Python 3.4.2.16
Pillow 8.2.0
Python 3.6.2
Die Rekonstruktion umfasst hauptsächlich die folgenden Schritte:
(1) Kamerakalibrierung
(2) Bildmerkmalsextraktion und -abgleich
(3) Dreidimensional Rekonstruktion
Als nächstes werfen wir einen detaillierten Blick auf die spezifische Umsetzung jedes Schritts:
In unserem täglichen Leben gibt es viele Kameras, wie z. B. Kameras auf Mobiltelefonen, Digitalkameras, Funktionsmodulkameras, usw. Die Parameter jeder Kamera sind unterschiedlich, d. h. die Auflösung, der Modus usw. der von der Kamera aufgenommenen Fotos. Unter der Annahme, dass wir bei der dreidimensionalen Rekonstruktion eines Objekts die Matrixparameter unserer Kamera nicht im Voraus kennen, sollten wir die Matrixparameter der Kamera berechnen. Dieser Schritt wird als Kamerakalibrierung bezeichnet. Ich werde die relevanten Prinzipien der Kamerakalibrierung nicht vorstellen. Viele Leute im Internet haben es ausführlich erklärt. Die spezifische Implementierung der Kalibrierung ist wie folgt:
def camera_calibration(ImagePath):
    # 循环中断
    criteria = (cv2.TERM_CRITERIA_EPS + cv2.TERM_CRITERIA_MAX_ITER, 30, 0.001)
    # 棋盘格尺寸(棋盘格的交叉点的个数)
    row = 11
    column = 8

    objpoint = np.zeros((row * column, 3), np.float32)
    objpoint[:, :2] = np.mgrid[0:row, 0:column].T.reshape(-1, 2)

    objpoints = []  # 3d point in real world space
    imgpoints = []  # 2d points in image plane.

    batch_images = glob.glob(ImagePath + '/*.jpg')
    for i, fname in enumerate(batch_images):
        img = cv2.imread(batch_images[i])
        imgGray = cv2.cvtColor(img, cv2.COLOR_BGR2GRAY)
        # find chess board corners
        ret, corners = cv2.findChessboardCorners(imgGray, (row, column), None)
        # if found, add object points, image points (after refining them)
        if ret:
            objpoints.append(objpoint)
            corners2 = cv2.cornerSubPix(imgGray, corners, (11, 11), (-1, -1), criteria)
            imgpoints.append(corners2)
            # Draw and display the corners
            img = cv2.drawChessboardCorners(img, (row, column), corners2, ret)
            cv2.imwrite('Checkerboard_Image/Temp_JPG/Temp_' + str(i) + '.jpg', img)

    print("成功提取:", len(batch_images), "张图片角点!")
ret, mtx, dist, rvecs, tvecs = cv2.calibrateCamera(objpoints, imgpoints, imgGray.shape[::-1], None, None)Unter diesen ist die von der Funktion cv2.kalibrateCamera erhaltene mtx-Matrix die K-Matrix.
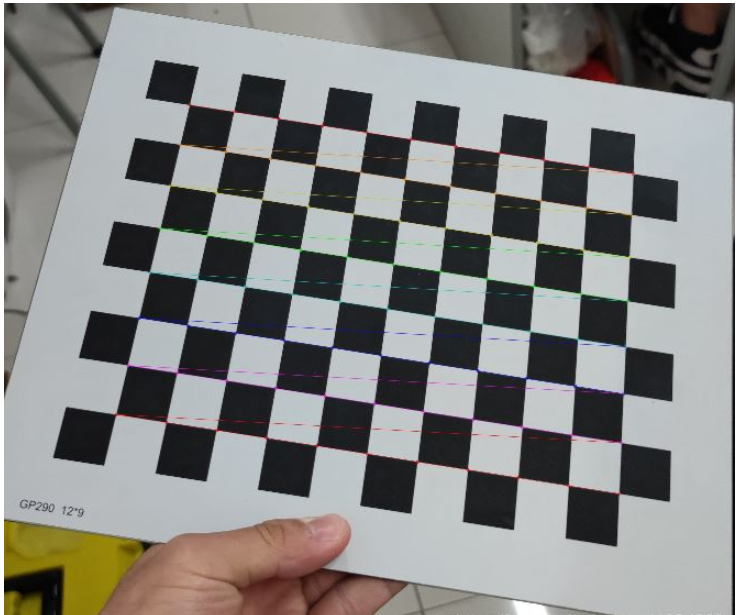
Nachdem wir die entsprechenden Parameter geändert und die Kalibrierung abgeschlossen haben, können wir das Eckpunktbild des Schachbretts ausgeben, um zu sehen, ob die Eckpunkte des Schachbretts erfolgreich extrahiert wurden. Das ausgegebene Eckpunktbild sieht wie folgt aus:

Abbildung 1: Schachbrett-Eckpunktextraktion
Im gesamten dreidimensionalen Rekonstruktionsprozess ist dieser Schritt der kritischste und komplexeste Schritt. Die Qualität der Bildmerkmalsextraktion bestimmt Ihre endgültige Rekonstruktion Wirkung.
Unter den Bildmerkmalspunkt-Extraktionsalgorithmen gibt es drei häufig verwendete Algorithmen: SIFT-Algorithmus, SURF-Algorithmus und ORB-Algorithmus. Durch umfassende Analyse und Vergleich verwenden wir in diesem Schritt den SURF-Algorithmus, um die Merkmalspunkte des Bildes zu extrahieren. Wenn Sie daran interessiert sind, die Feature-Point-Extraktionseffekte der drei Algorithmen zu vergleichen, können Sie online suchen und einen Blick darauf werfen. Ich werde sie hier nicht einzeln vergleichen. Die spezifische Implementierung ist wie folgt: Die von
def epipolar_geometric(Images_Path, K):
    IMG = glob.glob(Images_Path)
    img1, img2 = cv2.imread(IMG[0]), cv2.imread(IMG[1])
    img1_gray = cv2.cvtColor(img1, cv2.COLOR_BGR2GRAY)
    img2_gray = cv2.cvtColor(img2, cv2.COLOR_BGR2GRAY)

    # Initiate SURF detector
    SURF = cv2.xfeatures2d_SURF.create()

    # compute keypoint & descriptions
    keypoint1, descriptor1 = SURF.detectAndCompute(img1_gray, None)
    keypoint2, descriptor2 = SURF.detectAndCompute(img2_gray, None)
    print("角点数量:", len(keypoint1), len(keypoint2))

    # Find point matches
    bf = cv2.BFMatcher(cv2.NORM_L2, crossCheck=True)
    matches = bf.match(descriptor1, descriptor2)
    print("匹配点数量:", len(matches))

    src_pts = np.asarray([keypoint1[m.queryIdx].pt for m in matches])
    dst_pts = np.asarray([keypoint2[m.trainIdx].pt for m in matches])
    # plot
    knn_image = cv2.drawMatches(img1_gray, keypoint1, img2_gray, keypoint2, matches[:-1], None, flags=2)
    image_ = Image.fromarray(np.uint8(knn_image))
    image_.save("MatchesImage.jpg")

    # Constrain matches to fit homography
    retval, mask = cv2.findHomography(src_pts, dst_pts, cv2.RANSAC, 100.0)

    # We select only inlier points
    points1 = src_pts[mask.ravel() == 1]
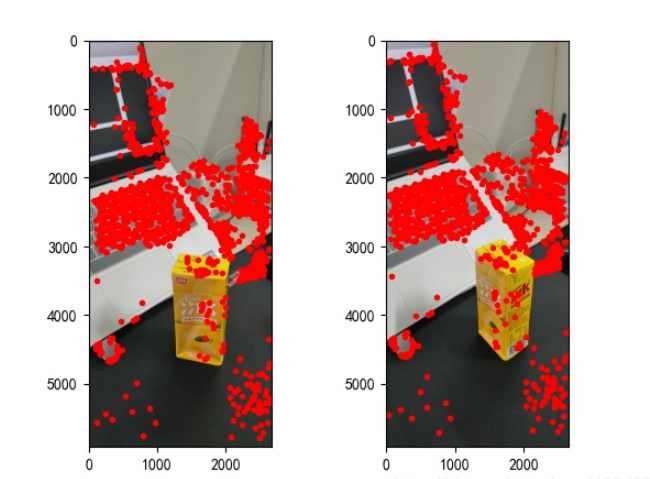
points2 = dst_pts[mask.ravel() == 1]gefundenen Merkmalspunkte sind wie folgt:

Abbildung 2: Merkmalspunktextraktion
Nachdem wir die Merkmalspunkte des Bildes gefunden haben und zueinander passen, können wir mit der dreidimensionalen Rekonstruktion beginnen. Die spezifische Implementierung ist wie folgt:
points1 = cart2hom(points1.T)
points2 = cart2hom(points2.T)
# plot
fig, ax = plt.subplots(1, 2)
ax[0].autoscale_view('tight')
ax[0].imshow(cv2.cvtColor(img1, cv2.COLOR_BGR2RGB))
ax[0].plot(points1[0], points1[1], 'r.')
ax[1].autoscale_view('tight')
ax[1].imshow(cv2.cvtColor(img2, cv2.COLOR_BGR2RGB))
ax[1].plot(points2[0], points2[1], 'r.')
plt.savefig('MatchesPoints.jpg')
fig.show()
#

points1n = np.dot(np.linalg.inv(K), points1)
points2n = np.dot(np.linalg.inv(K), points2)
E = compute_essential_normalized(points1n, points2n)
print('Computed essential matrix:', (-E / E[0][1]))

P1 = np.array([[1, 0, 0, 0], [0, 1, 0, 0], [0, 0, 1, 0]])
P2s = compute_P_from_essential(E)

ind = -1
for i, P2 in enumerate(P2s):
    # Find the correct camera parameters
    d1 = reconstruct_one_point(points1n[:, 0], points2n[:, 0], P1, P2)
    # Convert P2 from camera view to world view
    P2_homogenous = np.linalg.inv(np.vstack([P2, [0, 0, 0, 1]]))
    d2 = np.dot(P2_homogenous[:3, :4], d1)
    if d1[2] > 0 and d2[2] > 0:
        ind = i

P2 = np.linalg.inv(np.vstack([P2s[ind], [0, 0, 0, 1]]))[:3, :4]
Points3D = linear_triangulation(points1n, points2n, P1, P2)

fig = plt.figure()
fig.suptitle('3D reconstructed', fontsize=16)
ax = fig.gca(projection='3d')
ax.plot(Points3D[0], Points3D[1], Points3D[2], 'b.')
ax.set_xlabel('x axis')
ax.set_ylabel('y axis')
ax.set_zlabel('z axis')
ax.view_init(elev=135, azim=90)
plt.savefig('Reconstruction.jpg')
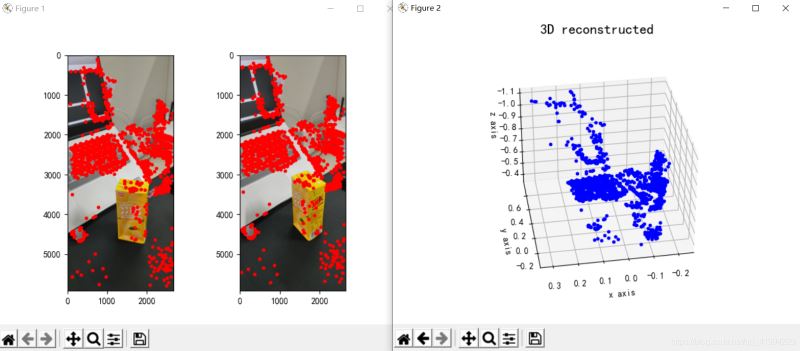
plt.show()Der Rekonstruktionseffekt ist wie folgt (der Effekt ist durchschnittlich):

Abbildung 3: Dreidimensionale Rekonstruktion
Aus den Rekonstruktionsergebnissen geht hervor, dass der monokulare dreidimensionale Rekonstruktionseffekt durchschnittlich mit diesen Faktoren zusammenhängt:
(1) Bildaufnahmeformat. Wenn Sie eine monokulare 3D-Rekonstruktionsaufgabe durchführen, ist es am besten, die Kamera beim Aufnehmen parallel zu bewegen und von vorne zu fotografieren, d (2) Störungen durch die Umgebung beim Fotografieren. Es ist am besten, einen einzelnen Aufnahmeort zu wählen, um Störungen durch irrelevante Objekte zu reduzieren.
(3) Problem mit der Aufnahmelichtquelle. Der gewählte Fotostandort muss eine angemessene Helligkeit gewährleisten (Sie müssen die spezifische Situation testen, um festzustellen, ob Ihre Lichtquelle dem Standard entspricht). Wenn Sie die Kamera bewegen, müssen Sie außerdem sicherstellen, dass die Lichtquelle zwischen dem vorherigen Moment und diesem konsistent ist Moment.
Tatsächlich ist die Leistung der monokularen 3D-Rekonstruktion normalerweise schlecht. Selbst wenn alle Bedingungen optimal sind, ist der resultierende Rekonstruktionseffekt nicht sehr gut. Oder wir können die binokulare 3D-Rekonstruktion in Betracht ziehen. Der Effekt der binokularen 3D-Rekonstruktion ist definitiv besser als der Effekt der monokularen, und die Implementierung ist nur ein wenig mühsam, haha. Tatsächlich ist die Bedienung nicht kompliziert. Der schwierigste Teil ist das Aufnehmen und Kalibrieren der beiden Kameras.
4. Code
import cv2
import json
import numpy as np
import glob
from PIL import Image
import matplotlib.pyplot as plt
plt.rcParams['font.sans-serif'] = ['SimHei']
plt.rcParams['axes.unicode_minus'] = False


def cart2hom(arr):
    """ Convert catesian to homogenous points by appending a row of 1s
    :param arr: array of shape (num_dimension x num_points)
    :returns: array of shape ((num_dimension+1) x num_points)
    """
    if arr.ndim == 1:
        return np.hstack([arr, 1])
    return np.asarray(np.vstack([arr, np.ones(arr.shape[1])]))


def compute_P_from_essential(E):
    """ Compute the second camera matrix (assuming P1 = [I 0])
        from an essential matrix. E = [t]R
    :returns: list of 4 possible camera matrices.
    """
    U, S, V = np.linalg.svd(E)

    # Ensure rotation matrix are right-handed with positive determinant
    if np.linalg.det(np.dot(U, V)) < 0:
        V = -V

    # create 4 possible camera matrices (Hartley p 258)
    W = np.array([[0, -1, 0], [1, 0, 0], [0, 0, 1]])
    P2s = [np.vstack((np.dot(U, np.dot(W, V)).T, U[:, 2])).T,
           np.vstack((np.dot(U, np.dot(W, V)).T, -U[:, 2])).T,
           np.vstack((np.dot(U, np.dot(W.T, V)).T, U[:, 2])).T,
           np.vstack((np.dot(U, np.dot(W.T, V)).T, -U[:, 2])).T]

    return P2s


def correspondence_matrix(p1, p2):
    p1x, p1y = p1[:2]
    p2x, p2y = p2[:2]

    return np.array([
        p1x * p2x, p1x * p2y, p1x,
        p1y * p2x, p1y * p2y, p1y,
        p2x, p2y, np.ones(len(p1x))
    ]).T

    return np.array([
        p2x * p1x, p2x * p1y, p2x,
        p2y * p1x, p2y * p1y, p2y,
        p1x, p1y, np.ones(len(p1x))
    ]).T


def scale_and_translate_points(points):
    """ Scale and translate image points so that centroid of the points
        are at the origin and avg distance to the origin is equal to sqrt(2).
    :param points: array of homogenous point (3 x n)
    :returns: array of same input shape and its normalization matrix
    """
    x = points[0]
    y = points[1]
    center = points.mean(axis=1)  # mean of each row
    cx = x - center[0]  # center the points
    cy = y - center[1]
    dist = np.sqrt(np.power(cx, 2) + np.power(cy, 2))
    scale = np.sqrt(2) / dist.mean()
    norm3d = np.array([
        [scale, 0, -scale * center[0]],
        [0, scale, -scale * center[1]],
        [0, 0, 1]
    ])

    return np.dot(norm3d, points), norm3d


def compute_image_to_image_matrix(x1, x2, compute_essential=False):
    """ Compute the fundamental or essential matrix from corresponding points
        (x1, x2 3*n arrays) using the 8 point algorithm.
        Each row in the A matrix below is constructed as
        [x'*x, x'*y, x', y'*x, y'*y, y', x, y, 1]
    """
    A = correspondence_matrix(x1, x2)
    # compute linear least square solution
    U, S, V = np.linalg.svd(A)
    F = V[-1].reshape(3, 3)

    # constrain F. Make rank 2 by zeroing out last singular value
    U, S, V = np.linalg.svd(F)
    S[-1] = 0
    if compute_essential:
        S = [1, 1, 0]  # Force rank 2 and equal eigenvalues
    F = np.dot(U, np.dot(np.diag(S), V))

    return F


def compute_normalized_image_to_image_matrix(p1, p2, compute_essential=False):
    """ Computes the fundamental or essential matrix from corresponding points
        using the normalized 8 point algorithm.
    :input p1, p2: corresponding points with shape 3 x n
    :returns: fundamental or essential matrix with shape 3 x 3
    """
    n = p1.shape[1]
    if p2.shape[1] != n:
        raise ValueError('Number of points do not match.')

    # preprocess image coordinates
    p1n, T1 = scale_and_translate_points(p1)
    p2n, T2 = scale_and_translate_points(p2)

    # compute F or E with the coordinates
    F = compute_image_to_image_matrix(p1n, p2n, compute_essential)

    # reverse preprocessing of coordinates
    # We know that P1' E P2 = 0
    F = np.dot(T1.T, np.dot(F, T2))

    return F / F[2, 2]


def compute_fundamental_normalized(p1, p2):
    return compute_normalized_image_to_image_matrix(p1, p2)


def compute_essential_normalized(p1, p2):
    return compute_normalized_image_to_image_matrix(p1, p2, compute_essential=True)


def skew(x):
    """ Create a skew symmetric matrix *A* from a 3d vector *x*.
        Property: np.cross(A, v) == np.dot(x, v)
    :param x: 3d vector
    :returns: 3 x 3 skew symmetric matrix from *x*
    """
    return np.array([
        [0, -x[2], x[1]],
        [x[2], 0, -x[0]],
        [-x[1], x[0], 0]
    ])


def reconstruct_one_point(pt1, pt2, m1, m2):
    """
        pt1 and m1 * X are parallel and cross product = 0
        pt1 x m1 * X  =  pt2 x m2 * X  =  0
    """
    A = np.vstack([
        np.dot(skew(pt1), m1),
        np.dot(skew(pt2), m2)
    ])
    U, S, V = np.linalg.svd(A)
    P = np.ravel(V[-1, :4])

    return P / P[3]


def linear_triangulation(p1, p2, m1, m2):
    """
    Linear triangulation (Hartley ch 12.2 pg 312) to find the 3D point X
    where p1 = m1 * X and p2 = m2 * X. Solve AX = 0.
    :param p1, p2: 2D points in homo. or catesian coordinates. Shape (3 x n)
    :param m1, m2: Camera matrices associated with p1 and p2. Shape (3 x 4)
    :returns: 4 x n homogenous 3d triangulated points
    """
    num_points = p1.shape[1]
    res = np.ones((4, num_points))

    for i in range(num_points):
        A = np.asarray([
            (p1[0, i] * m1[2, :] - m1[0, :]),
            (p1[1, i] * m1[2, :] - m1[1, :]),
            (p2[0, i] * m2[2, :] - m2[0, :]),
            (p2[1, i] * m2[2, :] - m2[1, :])
        ])

        _, _, V = np.linalg.svd(A)
        X = V[-1, :4]
        res[:, i] = X / X[3]

    return res


def writetofile(dict, path):
    for index, item in enumerate(dict):
        dict[item] = np.array(dict[item])
        dict[item] = dict[item].tolist()
    js = json.dumps(dict)
    with open(path, 'w') as f:
        f.write(js)
        print("参数已成功保存到文件")


def readfromfile(path):
    with open(path, 'r') as f:
        js = f.read()
        mydict = json.loads(js)
    print("参数读取成功")
    return mydict


def camera_calibration(SaveParamPath, ImagePath):
    # 循环中断
    criteria = (cv2.TERM_CRITERIA_EPS + cv2.TERM_CRITERIA_MAX_ITER, 30, 0.001)
    # 棋盘格尺寸
    row = 11
    column = 8
    objpoint = np.zeros((row * column, 3), np.float32)
    objpoint[:, :2] = np.mgrid[0:row, 0:column].T.reshape(-1, 2)

    objpoints = []  # 3d point in real world space
    imgpoints = []  # 2d points in image plane.
    batch_images = glob.glob(ImagePath + '/*.jpg')
    for i, fname in enumerate(batch_images):
        img = cv2.imread(batch_images[i])
        imgGray = cv2.cvtColor(img, cv2.COLOR_BGR2GRAY)
        # find chess board corners
        ret, corners = cv2.findChessboardCorners(imgGray, (row, column), None)
        # if found, add object points, image points (after refining them)
        if ret:
            objpoints.append(objpoint)
            corners2 = cv2.cornerSubPix(imgGray, corners, (11, 11), (-1, -1), criteria)
            imgpoints.append(corners2)
            # Draw and display the corners
            img = cv2.drawChessboardCorners(img, (row, column), corners2, ret)
            cv2.imwrite('Checkerboard_Image/Temp_JPG/Temp_' + str(i) + '.jpg', img)
    print("成功提取:", len(batch_images), "张图片角点!")
    ret, mtx, dist, rvecs, tvecs = cv2.calibrateCamera(objpoints, imgpoints, imgGray.shape[::-1], None, None)
    dict = {'ret': ret, 'mtx': mtx, 'dist': dist, 'rvecs': rvecs, 'tvecs': tvecs}
    writetofile(dict, SaveParamPath)

    meanError = 0
    for i in range(len(objpoints)):
        imgpoints2, _ = cv2.projectPoints(objpoints[i], rvecs[i], tvecs[i], mtx, dist)
        error = cv2.norm(imgpoints[i], imgpoints2, cv2.NORM_L2) / len(imgpoints2)
        meanError += error
    print("total error: ", meanError / len(objpoints))


def epipolar_geometric(Images_Path, K):
    IMG = glob.glob(Images_Path)
    img1, img2 = cv2.imread(IMG[0]), cv2.imread(IMG[1])
    img1_gray = cv2.cvtColor(img1, cv2.COLOR_BGR2GRAY)
    img2_gray = cv2.cvtColor(img2, cv2.COLOR_BGR2GRAY)

    # Initiate SURF detector
    SURF = cv2.xfeatures2d_SURF.create()

    # compute keypoint & descriptions
    keypoint1, descriptor1 = SURF.detectAndCompute(img1_gray, None)
    keypoint2, descriptor2 = SURF.detectAndCompute(img2_gray, None)
    print("角点数量:", len(keypoint1), len(keypoint2))

    # Find point matches
    bf = cv2.BFMatcher(cv2.NORM_L2, crossCheck=True)
    matches = bf.match(descriptor1, descriptor2)
    print("匹配点数量:", len(matches))

    src_pts = np.asarray([keypoint1[m.queryIdx].pt for m in matches])
    dst_pts = np.asarray([keypoint2[m.trainIdx].pt for m in matches])
    # plot
    knn_image = cv2.drawMatches(img1_gray, keypoint1, img2_gray, keypoint2, matches[:-1], None, flags=2)
    image_ = Image.fromarray(np.uint8(knn_image))
    image_.save("MatchesImage.jpg")

    # Constrain matches to fit homography
    retval, mask = cv2.findHomography(src_pts, dst_pts, cv2.RANSAC, 100.0)

    # We select only inlier points
    points1 = src_pts[mask.ravel() == 1]
    points2 = dst_pts[mask.ravel() == 1]

    points1 = cart2hom(points1.T)
    points2 = cart2hom(points2.T)
    # plot
    fig, ax = plt.subplots(1, 2)
    ax[0].autoscale_view('tight')
    ax[0].imshow(cv2.cvtColor(img1, cv2.COLOR_BGR2RGB))
    ax[0].plot(points1[0], points1[1], 'r.')
    ax[1].autoscale_view('tight')
    ax[1].imshow(cv2.cvtColor(img2, cv2.COLOR_BGR2RGB))
    ax[1].plot(points2[0], points2[1], 'r.')
    plt.savefig('MatchesPoints.jpg')
    fig.show()
    #

    points1n = np.dot(np.linalg.inv(K), points1)
    points2n = np.dot(np.linalg.inv(K), points2)
    E = compute_essential_normalized(points1n, points2n)
    print('Computed essential matrix:', (-E / E[0][1]))

    P1 = np.array([[1, 0, 0, 0], [0, 1, 0, 0], [0, 0, 1, 0]])
    P2s = compute_P_from_essential(E)

    ind = -1
    for i, P2 in enumerate(P2s):
        # Find the correct camera parameters
        d1 = reconstruct_one_point(points1n[:, 0], points2n[:, 0], P1, P2)
        # Convert P2 from camera view to world view
        P2_homogenous = np.linalg.inv(np.vstack([P2, [0, 0, 0, 1]]))
        d2 = np.dot(P2_homogenous[:3, :4], d1)
        if d1[2] > 0 and d2[2] > 0:
            ind = i

    P2 = np.linalg.inv(np.vstack([P2s[ind], [0, 0, 0, 1]]))[:3, :4]
    Points3D = linear_triangulation(points1n, points2n, P1, P2)

    return Points3D


def main():
    CameraParam_Path = 'CameraParam.txt'
    CheckerboardImage_Path = 'Checkerboard_Image'
    Images_Path = 'SubstitutionCalibration_Image/*.jpg'

    # 计算相机参数
    camera_calibration(CameraParam_Path, CheckerboardImage_Path)
    # 读取相机参数
    config = readfromfile(CameraParam_Path)
    K = np.array(config['mtx'])
    # 计算3D点
    Points3D = epipolar_geometric(Images_Path, K)
    # 重建3D点
    fig = plt.figure()
    fig.suptitle('3D reconstructed', fontsize=16)
    ax = fig.gca(projection='3d')
    ax.plot(Points3D[0], Points3D[1], Points3D[2], 'b.')
    ax.set_xlabel('x axis')
    ax.set_ylabel('y axis')
    ax.set_zlabel('z axis')
    ax.view_init(elev=135, azim=90)
    plt.savefig('Reconstruction.jpg')
    plt.show()


if __name__ == '__main__':
main()Das obige ist der detaillierte Inhalt vonSo realisieren Sie eine monokulare 3D-Rekonstruktion basierend auf Python. Für weitere Informationen folgen Sie bitte anderen verwandten Artikeln auf der PHP chinesischen Website!


