Verzeichnis
1. Grundidee
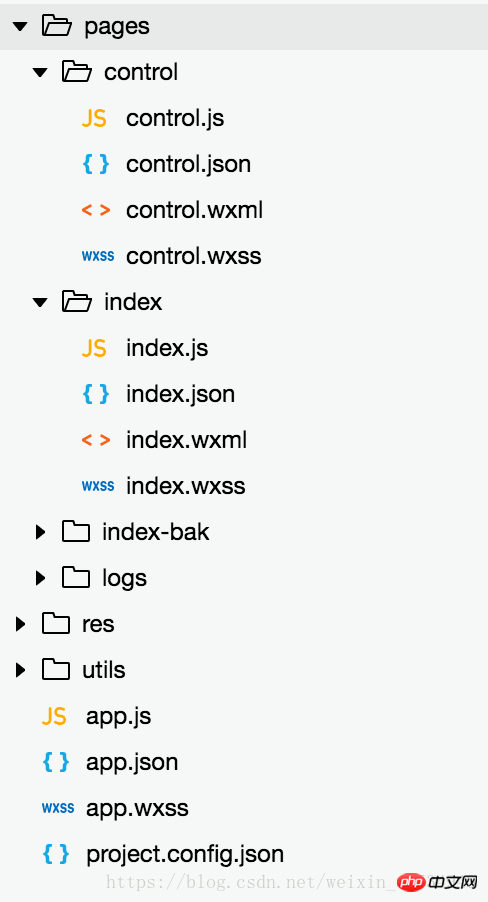
2. Die Codestruktur ist wie folgt:
3 >
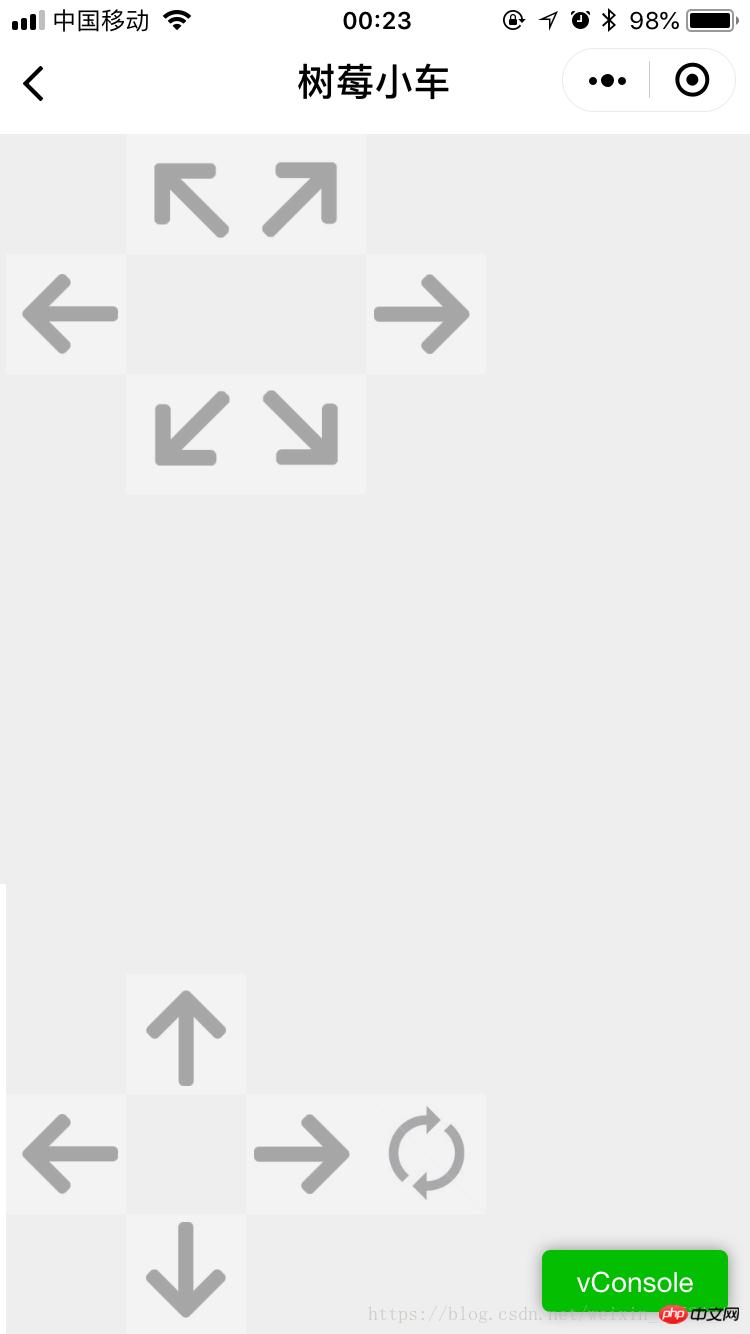
4. Kontrollverzeichnis 5. Globale Projektsteuerung Hauptsächlich die Entwicklung des WeChat-Applets praktiziert. Hier ist eine kurze Aufzeichnung der wichtigsten Codeausschnitte. Wir haben auch viele Fallstricke durchgemacht, zum Beispiel: Das WeChat-Applet unterstützt nicht den Vollbildmodus und das WeChat-Applet kann nicht horizontal angezeigt werden. Deshalb wurden im Entwicklungsprozess auch einige außergewöhnliche Mittel eingesetzt. Man kann sagen, dass dies nur eine sehr einfache Demo ist, daher habe ich für viele Dinge darin fest codierte Werte verwendet, z. B. für die Kameraüberwachungs-IP und die Positionierung von Seitenelementen. Vor allem die Benutzeroberfläche. Ich habe das Experiment nur auf dem iPhone 6 durchgeführt. Wenn ich also zu anderen Telefonen wechsle, ändert sich die Benutzeroberfläche. 1. Grundidee


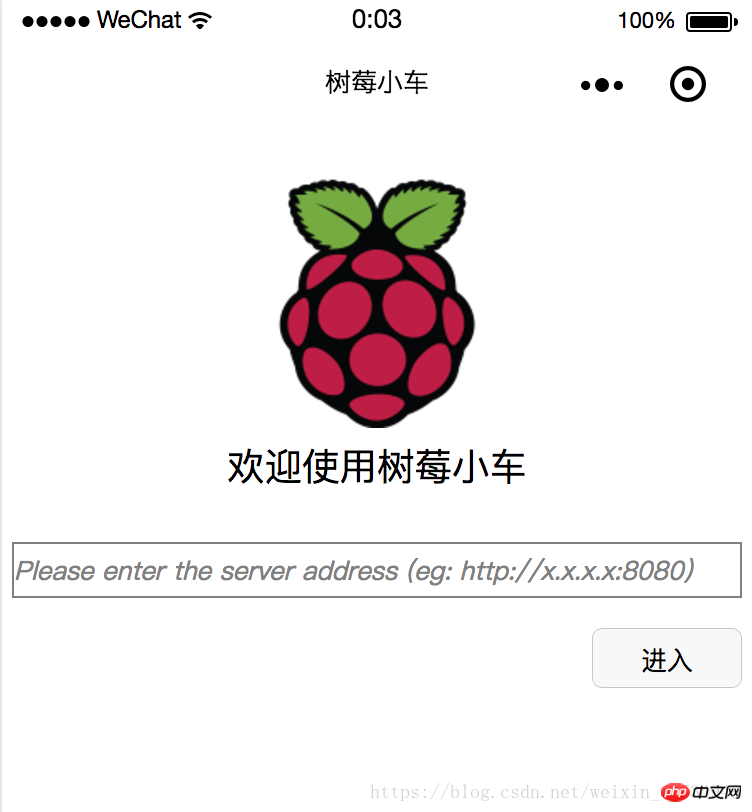
//index.js
//获取应用实例
const app = getApp()

Page({
  data: {
    logo: "/res/rasp-logo.png",
    welcome: "欢迎使用树莓小车",
    enterBtn: "进入",
    PromoteMsg: "Please enter the server address (eg: http://x.x.x.x:8080)",
    reqURL: ""
  },
  // 从输入框中获取用户输入的服务器地址信息
  getURL: function (e) {
    this.setData({
      reqURL: e.detail.value
    })
  },
  enterClicked: function (e) {
    /*
     * 当按下进入按钮,需要做以下事情:
     * 1. 首先判断用户是否已经在输入框中输入完整的服务器地址
     * 2. 发起一个到服务器的GET请求,并分析服务器的响应结果
     * 3. 跳转到小车控制界面
    */
    console.log(this.data.reqURL)

    if (this.data.reqURL == '') {
      wx.showModal({
        title: '提示',
        content: '请先输入正确的服务器地址!',
      })
      return
    }

    // 发起到服务器的GET请求
    wx.request({
      url: this.data.reqURL,
      success: function (res) {
        // 在这里获取POST请求地址,以及视频流地址,然后赋值给全局变量,供control页面调用
        console.log(res.data.match(/url = \"(\S*)\"/)[1])
        console.log(res.data.match(/src=\"(\S*)\"/)[1])
        app.globalData.postURL = res.data.match(/url = \"(\S*)\"/)[1]
        app.globalData.cameraURL = res.data.match(/src=\"(\S*)\"/)[1]

        // 跳转到control页面
        wx.navigateTo({
          url: '/pages/control/control',
        })
      },
      fail: function(res) {
        wx.showModal({
          title: '提示',
          content: '请检查输入的服务器地址!',
        })
      }
    })
  }
})<!--index.wxml-->
<view>
<view class="welcome">
<view class="logo">
<image style="width: 250rpx; height: 250rpx" src="{{logo}}"></image>
</view>
<view>
<text class="words">{{welcome}}</text>
</view>
</view>
<input class="requestURL" type="text" placeholder="{{PromoteMsg}}" focus='1' cursor='10' confirm-type="done" bindinput='getURL'></input>
<button class='enter' bindtap='enterClicked'>{{enterBtn}}</button>
</view>/**index.wxss**/
.welcome{
display: flex;
margin-top: 50rpx;
flex-direction: column;
align-items: center;
justify-content: space-between;
}
.requestURL{
margin: 50rpx 10rpx 30rpx 10rpx;
border: 1px solid gray;
font-style: italic;
font-size: small
}
.enter{
margin-right: 10rpx;
width: 150rpx;
height: 60rpx;
font-size: small
}// pages/control/control.js
const app = getApp()
Page({
/**
* 页面的初始数据
*/
data: {
// Car control images
"forwardBtn": "/res/forward.png",
"leftBtn": "/res/left.png",
"rightBtn": "/res/right.png",
"backLeftBtn": "/res/back-left.png",
"backRightBtn": "/res/back-right.png",
"backBtn": "/res/backward.png",
// Camera control images
"upBtn": "/res/forward.png",
"camLeftBtn": "/res/camLeft.png",
"camRightBtn": "/res/camRight.png",
"downBtn": "/res/backward.png",
"resetBtn": "/res/reset.png"
},
carMove: function(event) {
wx.request({
url: this.data.postURL,
data: event.currentTarget.dataset.direction,
method: "POST",
success: function(res){
},
fail: function(res){
}
})
},
carStop: function(event) {
wx.request({
url: this.data.postURL,
data: "S",
method: "POST",
success: function (res) {
},
fail: function (res) {
}
})
},
camMove: function(event) {
wx.request({
url: this.data.postURL,
data: event.currentTarget.dataset.direction,
method: "POST",
success: function (res) {
},
fail: function (res) {
}
})
},
/**
* 生命周期函数--监听页面加载
*/
onLoad: function (options) {
//this.data.cameraURL = app.globalData.cameraURL
this.setData({
cameraURL: app.globalData.cameraURL,
postURL: app.globalData.postURL
})
console.log(this.data.cameraURL)
console.log("post url in control page: " + app.globalData.postURL)
},
/**
* 生命周期函数--监听页面初次渲染完成
*/
onReady: function () {
},
/**
* 生命周期函数--监听页面显示
*/
onShow: function () {
//console.log(wx.getSystemInfoSync().windowWidth)
//console.log(wx.getSystemInfoSync().windowHeight)
},
/**
* 生命周期函数--监听页面隐藏
*/
onHide: function () {
},
/**
* 生命周期函数--监听页面卸载
*/
onUnload: function () {
},
/**
* 页面相关事件处理函数--监听用户下拉动作
*/
onPullDownRefresh: function () {
},
/**
* 页面上拉触底事件的处理函数
*/
onReachBottom: function () {
},
/**
* 用户点击右上角分享
*/
onShareAppMessage: function () {
}
}){
"navigationBarBackgroundColor": "#ffffff",
"navigationBarTextStyle": "black",
"navigationBarTitleText": "树莓小车",
"backgroundColor": "#eeeeee",
"backgroundTextStyle": "light",
"enablePullDownRefresh": false,
"navigationStyle": "custom",
"disableScroll": true
}<!--pages/control/control.wxml-->
<view class='control'>
<!-- This image shows the camera view -->
<image class='cameraView' src='http://192.168.1.104:8080/?action=stream' style="z-index:1"></image>
<!-- The following six images control the car move -->
<image class='button' id='forward' src='{{forwardBtn}}' style="position:absolute;z-index:2" bindtouchstart='carMove' data-direction='F' bindtouchend='carStop'></image>
<image class='button' id='left' src='{{leftBtn}}' style="position:absolute;z-index:2" bindtouchstart='carMove' data-direction='L' bindtouchend='carStop'></image>
<image class='button' id='right' src='{{rightBtn}}' style="position:absolute;z-index:2" bindtouchstart='carMove' data-direction='R' bindtouchend='carStop'></image>
<image class='button' id='backLeft' src='{{backLeftBtn}}' style="position:absolute;z-index:2" bindtouchstart='carMove' data-direction='BL' bindtouchend='carStop'></image>
<image class='button' id='backRight' src='{{backRightBtn}}' style="position:absolute;z-index:2" bindtouchstart='carMove' data-direction='BR' bindtouchend='carStop'></image>
<image class='button' id='back' src='{{backBtn}}' style="position:absolute;z-index:2" bindtouchstart='carMove' data-direction='B' bindtouchend='carStop'></image>
<!-- The following images control the camera move -->
<image class='button' id='up' src='{{upBtn}}' style="position:absolute;z-index:2" bindtouchstart='camMove' data-direction='VU'></image>
<image class='button' id='camLeft' src='{{camLeftBtn}}' style="position:absolute;z-index:2" bindtouchstart='camMove' data-direction='HL'></image>
<image class='button' id='camRight' src='{{camRightBtn}}' style="position:absolute;z-index:2" bindtouchstart='camMove' data-direction='HR'></image>
<image class='button' id='down' src='{{downBtn}}' style="position:absolute;z-index:2" bindtouchstart='camMove' data-direction='VD'></image>
<image class='button' id='reset' src='{{resetBtn}}' style="position:absolute;z-index:2" bindtouchstart='camMove' data-direction='RESET'></image>
</view>/* pages/control/control.wxss */
.control {
width: 100%;
height: 100%;
transform: rotate(90deg);
background-color: #eee;
justify-content: center;
}
.cameraView {
margin-left: 0px;
width: 603px;
height: 375px;
background-color: #eee;
justify-content: center;
}
.button {
height: 60px;
width: 60px;
opacity: 0.3;
}
#forward {
left: 60px;
top: 135px;
}
#left {
left: 0px;
top: 195px;
}
#right {
left: 120px;
top: 195px;
}
#backLeft {
left: 0px;
top: 255px;
}
#backRight {
left: 120px;
top: 255px;
}
#back {
left: 60px;
top: 315px;
}
#up {
left: 480px;
top: 195px;
}
#camLeft {
left: 420px;
top: 255px;
}
#camRight {
left: 540px;
top: 255px;
}
#down {
left: 480px;
top: 315px;
}
#reset{
left: 480px;
top: 135px
}//app.js
App({
onLaunch: function () {
// 展示本地存储能力
var logs = wx.getStorageSync('logs') || []
logs.unshift(Date.now())
wx.setStorageSync('logs', logs)
// 登录
wx.login({
success: res => {
// 发送 res.code 到后台换取 openId, sessionKey, unionId
}
})
// 获取用户信息
wx.getSetting({
success: res => {
if (res.authSetting['scope.userInfo']) {
// 已经授权,可以直接调用 getUserInfo 获取头像昵称,不会弹框
wx.getUserInfo({
success: res => {
// 可以将 res 发送给后台解码出 unionId
this.globalData.userInfo = res.userInfo
// 由于 getUserInfo 是网络请求,可能会在 Page.onLoad 之后才返回
// 所以此处加入 callback 以防止这种情况
if (this.userInfoReadyCallback) {
this.userInfoReadyCallback(res)
}
}
})
}
}
})
},
globalData: {
userInfo: null,
postURL: null,
cameraURL: null
}
}){
"pages": [
"pages/index/index",
"pages/control/control"
],
"window": {
"backgroundTextStyle": "light",
"navigationBarBackgroundColor": "#fff",
"navigationBarTitleText": "树莓小车",
"navigationBarTextStyle": "black",
"showStatusBar": false
}
}Mit Raspberry Pai wird ein Konversationsroboter implementiert_PHP-Tutorial
Das obige ist der detaillierte Inhalt vonWeChat-Applet – Codefluss für die Raspberry Pi-Autosteuerung. Für weitere Informationen folgen Sie bitte anderen verwandten Artikeln auf der PHP chinesischen Website!
 Was ist Ethereum?
 Was ist der Baidu-Index?
 Was soll ich tun, wenn mein Laufwerk C rot wird?
 Was sind die GSM-Verschlüsselungsalgorithmen?
 js regulärer Ausdruck
 Welche Methoden gibt es zum Neustarten von Anwendungen in Android?
 Lösung für die Erlaubnis verweigert
 So erstellen Sie einen WeChat-Klon auf einem Huawei-Mobiltelefon


