CSS3-Animation
Es gibt drei Attribute im Zusammenhang mit Animationen in CSS3-Attributen: Transformation, Übergang, Animation; wir haben das gemeinsame Studium von Transformation und Übergang abgeschlossen. Lassen Sie uns einige grundlegende Animationseffekte auf Elemente implementieren, denke ich Es hat gereicht, um alle für eine Weile zu begeistern. Heute nutzen wir diese Begeisterung, um das dritte Animationsattribut weiter zu erlernen. Aus der wörtlichen Bedeutung von Animation wissen wir, dass es „Animation“ bedeutet. Die Animation in CSS3 unterscheidet sich jedoch von der Canvas-Zeichnungsanimation in HTML5. Die Animation wird nur auf DOM-Elemente angewendet, die bereits auf der Seite vorhanden sind, und sie unterscheidet sich von den von Flash, JavaScript und jQuery erzeugten Animationseffekten, da wir CSS3 verwenden Komplexe js- und jquery-Codes beim Erstellen von Animationen mit Animation (was für Leute wie mich, die js nicht verstehen, sehr erfreulich ist. Wir können Animation verwenden, um das zu erstellen, was wir wollen, aber Sie sind etwas rau. Wenn Sie bessere Animationen erstellen möchten, sollten Sie meiner Meinung nach Flash oder JS verwenden. Obwohl die von Animation erstellte Animation einfach und grob ist, denke ich, dass sie unsere Begeisterung, sie zu lernen, dennoch nicht schmälern kann.
Bevor wir mit der Einführung von Animation beginnen, müssen wir zunächst etwas Besonderes verstehen, nämlich „Keyframes“. Wir nennen es „Keyframes“. Freunde, die Flash gespielt haben, sind mit dieser Sache möglicherweise nicht vertraut . Nicht unbekannt. Werfen wir einen Blick darauf, was diese „Keyframes“ sind. Als wir zuvor den Übergang verwendet haben, um einen einfachen Übergangseffekt zu erstellen, haben wir Anfangsattribute und Endattribute, eine Startaktionszeit und eine Fortsetzungsaktionszeit sowie die Transformationsrate der Aktion einbezogen. Tatsächlich sind diese Werte alle Wenn wir möchten, ist die Steuerung detaillierter, z. B. welche Aktionen möchte ich im ersten Zeitraum ausführen und welche Aktionen möchte ich im zweiten Zeitraum ausführen (auf Flash umstellen bedeutet, welche Aktionen). Ich möchte im ersten Frame ausführen und welche Aktionen möchte ich im zweiten Frame ausführen? (Welche Aktion) ist für uns schwierig, dies zu erreichen. Zu diesem Zeitpunkt benötigen wir auch einen solchen „Schlüsselrahmen“. Kontrolle. Dann verwendet CSS3 Animation das Attribut „keyframes“, um diesen Effekt zu erzielen. Werfen wir zunächst einen Blick auf Keyframes:
Keyframes haben ihre eigenen Syntaxregeln. Ihre Benennung beginnt mit „@keyframes“, gefolgt vom „Namen der Animation“ plus einem Paar geschweifter Klammern. , in Klammern stehen einige Stilregeln für verschiedene Zeiträume, ähnlich wie bei unserem CSS-Stilschreiben. Für eine Stilregel in „@keyframes“, die aus mehreren Prozentsätzen besteht, beispielsweise zwischen „0 %“ und „100 %“, können wir in dieser Regel mehrere Prozentsätze erstellen und jedem Prozentsatz ein Element mit Animationseffekten zuweisen mit unterschiedlichen Attributen hinzugefügt werden, sodass die Elemente einen sich ständig ändernden Effekt erzielen können, z. B. Verschieben, Elementfarbe, Position, Größe, Form usw. ändern. Eines ist jedoch zu beachten: Wir können „fromt“ und „to“ verwenden " stellt dar, wo eine Animation beginnt und endet. Mit anderen Worten, „von“ entspricht „0 %“ und „bis“ entspricht „100 %“. Es ist erwähnenswert, dass „0 %“ unter diesen nicht weggelassen werden darf Das Prozentzeichen muss wie bei anderen Attributwerten hier hinzugefügt werden. Andernfalls sind unsere Keyframes ungültig und haben keine Wirkung. Denn die Einheit Keyframes akzeptiert nur Prozentwerte.
Keyframes können in beliebiger Reihenfolge angegeben werden, um die Schlüsselpositionen der Animationsanimationsänderung zu bestimmen. Die spezifischen Grammatikregeln lauten wie folgt:
keyframes-rule: '@keyframes' IDENT '{' keyframes-blocks '}';
 keyframes-blocks: [ keyframe-selectors block ]* ;
keyframe-selectors: [ 'from' | 'to' | PERCENTAGE ] [ ',' [ 'from' | 'to' | PERCENTAGE ] ]*;Ich habe die obige Grammatik kombiniert
 @keyframes IDENT {     from {       Properties:Properties value;
     }
     Percentage {       Properties:Properties value;
     }
     to {       Properties:Properties value;
     }
   }
   或者全部写成百分比的形式:   @keyframes IDENT {
      0% {         Properties:Properties value;
      }
      Percentage {         Properties:Properties value;
      }
      100% {         Properties:Properties value;
      }
}Wobei IDENT ein Animationsname ist, können Sie ihn natürlich beiläufig auswählen Semantisch Ein bisschen besser: „Prozentsatz“ ist ein Prozentwert. Eigenschaften sind CSS-Eigenschaftsnamen, wie z. B. „links“ und „Hintergrund“ usw das entsprechende Der Attributwert des Attributs. Es ist erwähnenswert, dass unser Von und Bis jeweils 0 % und 100 % entsprechen. Wir haben dies bereits erwähnt. Bisher unterstützen nur Browser mit Webkit-Kern Animationsanimationen, daher muss ich oben das Präfix -webkit hinzufügen. Es wird gesagt, dass Firefox5 die Animationsanimationseigenschaft von CSS3 unterstützen kann. Sehen wir uns ein Beispiel von der W3Coffiziellen Website
an@-webkit-keyframes 'wobble' {
0% { margin-left: 100px;
background: green;
}
40% { margin-left: 150px;
background: orange;
}
60% { margin-left: 75px;
background: blue;
}
100% { margin-left: 100px;
background: red;
}
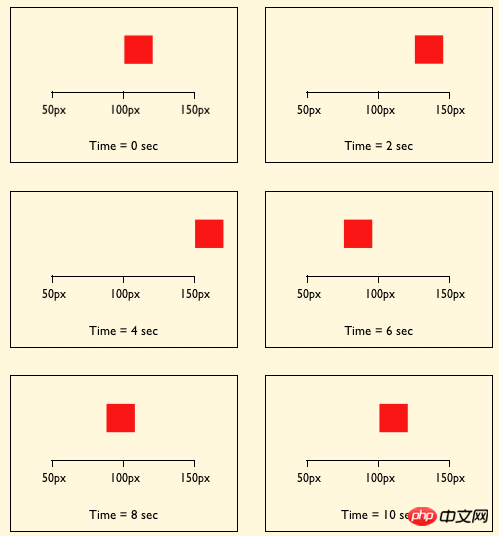
}这里我们定义了一个叫“wobble”的动画,他的动画是从0%开始到100%时结束,从中还经历了一个40%和60%两个过程,上面代码具体意思是:wobble动画在0%时元素定位到left为100px的位置背景色为green,然后40%时元素过渡到left为150px的位置并且背景色为orange,60%时元素过渡到left为75px的位置,背景色为blue,最后100%结束动画的位置元素又回到起点left为100px处,背景色变成red。假设置我们只给这个动画有10s的执行时间,那么他每一段执行的状态如下图所示:

Keyframes定义好了以后,我们需要怎么去调用刚才定义好的动画“wobble”
CSS3的animation类似于transition属性,他们都是随着时间改变元素的属性值。他们主要区别是transition需要触发一个事件(hover事件或click事件等)才会随时间改变其css属性;而animation在不需要触发任何事件的情况下也可以显式的随着时间变化来改变元素css的属性值,从而达到一种动画的效果。这样我们就可以直接在一个元素中调用animation的动画属性,基于这一点,css3的animation就需要明确的动画属性值,这也就是回到我们上面所说的,我们需要keyframes来定义不同时间的css属性值,达到元素在不同时间段变化的效果。
下面我们来看看怎么给一个元素调用animation属性
 .demo1 {     width: 50px;
     height: 50px;
     margin-left: 100px;
     background: blue;
     -webkit-animation-name:'wobble';/*动画属性名,也就是我们前面keyframes定义的动画名*/
     -webkit-animation-duration: 10s;/*动画持续时间*/
     -webkit-animation-timing-function: ease-in-out; /*动画频率,和transition-timing-function是一样的*/
     -webkit-animation-delay: 2s;/*动画延迟时间*/
     -webkit-animation-iteration-count: 10;/*定义循环资料,infinite为无限次*/
     -webkit-animation-direction: alternate;/*定义动画方式*/
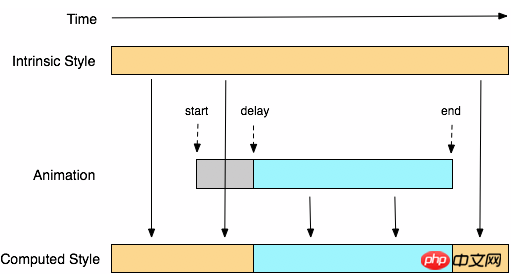
}CSS Animation动画效果将会影响元素相对应的css值,在整个动画过程中,元素的变化属性值完全是由animation来控制,动画后面的会覆盖前面的属性值。如上面例子:因为我们这个demo只是在不同的时间段改变了demo1的背景色和左边距,其默认值是:margin-left:100px;background: blue;但当我们在执行动画0%时,margin-left:100px,background:green;当执行到40%时,属性变成了:margin-left:150px;background:orange;当执行到60%时margin-left:75px;background:blue;当动画 执行到100%时:margin-left:100px;background: red;此时动画将完成,那么margin-left和background两个属性值将是以100%时的为主,他不会产生叠加效果,只是一次一次覆盖前一次出将的css属性。就如我们平时的css一样,最后出现的权根是最大的。当动画结束后,样式回到默认效果。
我们可以看一张来自w3c官网有关于css3的animation对属性变化的过程示意图

从上面的Demo中我们可以看出animation和transition一样有自己相对应的属性,那么在animation主要有以下几种:animation-name;animation-duration;animation-timing-function;animation-delay;animation-iteration-count;animation-direction;animation-play-state。下面我们分别来看看这几个属性的使用
一、animation-name:
语法:
animation-name: none | IDENT[,none | IDENT]*;
取值说明:
animation-name:是用来定义一个动画的名称,其主要有两个值:IDENT是由Keyframes创建的动画名,换句话说此处的IDENT要和Keyframes中的IDENT一致,如果不一致,将不能实现任何动画效果;none为默认值,当值为none时,将没有任何动画效果。另外我们这个属性跟前面所讲的transition一样,我们可以同时附几个animation给一个元素,我们只需要用逗号“,”隔开。
二、animation-duration:
语法:
animation-duration: <time>[,<time>]*
取值说明:
animation-duration是用来指定元素播放动画所持续的时间长,取值:
三、animation-timing-function:
语法:
animation-timing-function:ease | linear | ease-in | ease-out | ease-in-out | cubic-bezier(<number>, <number>, <number>, <number>) [, ease | linear | ease-in | ease-out | ease-in-out | cubic-bezier(<number>, <number>, <number>, <number>)]*
取值说明:
animation-timing-function:是指元素根据时间的推进来改变属性值的变换速率,说得简单点就是动画的播放方式。他和transition中的transition-timing-function一样,具有以下六种变换方式:ease;ease-in;ease-in-out;linear;cubic-bezier。具体的使用方法大家可以点这里,查看其中transition-timing-function的使用方法。
四、animation-delay:
语法:
animation-delay: <time>[,<time>]*
取值说明:
animation-delay:是用来指定元素动画开始时间。取值为
五、animation-iteration-count
语法:
animation-iteration-count:infinite | <number> [, infinite | <number>]*
取值说明:
animation-iteration-count是用来指定元素播放动画的循环次数,其可以取值
六、animation-direction
语法:
animation-direction: normal | alternate [, normal | alternate]*
取值说明:
animation-direction是用来指定元素动画播放的方向,其只有两个值,默认值为normal,如果设置为normal时,动画的每次循环都是向前播放;另一个值是alternate,他的作用是,动画播放在第偶数次向前播放,第奇数次向反方向播放。
七、animation-play-state
语法:
animation-play-state:running | paused [, running | paused]*
取值说明:
animation-play-state主要是用来控制元素动画的播放状态。其主要有两个值,running和paused其中running为默认值。他们的作用就类似于我们的音乐播放器一样,可以通过paused将正在播放的动画停下了,也可以通过running将暂停的动画重新播放,我们这里的重新播放不一定是从元素动画的开始播放,而是从你暂停的那个位置开始播放。另外如果暂时了动画的播放,元素的样式将回到最原始设置状态。这个属性目前很少内核支持,所以只是稍微提一下。
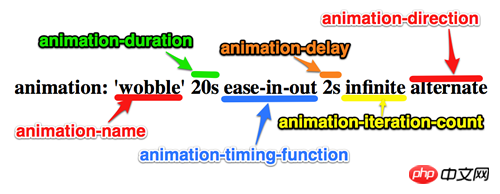
上面我们分别介绍了animation中的各个属性的语法和取值,那么我们综合上面的内容可以给animation属性一个速记法:
animation:[<animation-name> || <animation-duration> || <animation-timing-function> || <animation-delay> || <animation-iteration-count> || <animation-direction>] [, [<animation-name> || <animation-duration> || <animation-timing-function> || <animation-delay> || <animation-iteration-count> || <animation-direction>] ]*
如下图所示

兼容的浏览器
前面我也简单的提过,CSS3的animation到目前为止只支持webkit内核的浏览器,因为最早提出这个属性的就是safari公司,据说Firefox5.0+将支持Animation。如图所示
那么到此为止,我们主要一起学习了有关animation的理论知识,下面我们一起来看两个实例制作过程,来加强对animation的实践能力
DEMO一:发光变色的button
我们这个demo主要是通过在keyframes中改变元素的background;color;box-shadow三个属性,来达到一种发光变色的button效果,我们来看看其实现代码
HTML Code:
<a href="" class="btn">发光的button</a>
CSS Code
/*给这个按钮创建一个动名名称:buttonLight,然后在每个时间段设置不同的background,color来达到变色效果,改变box-shadow来达到发光效果*/
 @-webkit-keyframes 'buttonLight' {     from {       background: rgba(96, 203, 27,0.5);
       -webkit-box-shadow: 0 0 5px rgba(255, 255, 255, 0.3) inset, 0 0 3px rgba(220, 120, 200, 0.5);
       color: red;
     }
     25% {       background: rgba(196, 203, 27,0.8);
       -webkit-box-shadow: 0 0 10px rgba(255, 155, 255, 0.5) inset, 0 0 8px rgba(120, 120, 200, 0.8);
       color: blue;
    }
    50% {      background: rgba(196, 203, 127,1);
      -webkit-box-shadow: 0 0 5px rgba(155, 255, 255, 0.3) inset, 0 0 3px rgba(220, 120, 100, 1);
      color: orange;
    }
    75% {      background: rgba(196, 203, 27,0.8);
      -webkit-box-shadow: 0 0 10px rgba(255, 155, 255, 0.5) inset, 0 0 8px rgba(120, 120, 200, 0.8);
      color: black;
    }
   to {     background: rgba(96, 203, 27,0.5);
     -webkit-box-shadow: 0 0 5px rgba(255, 255, 255, 0.3) inset, 0 0 3px rgba(220, 120, 200, 0.5);
     color: green;
    }
  }  a.btn {    /*按钮的基本属性*/
    background: #60cb1b;
    font-size: 16px;
    padding: 10px 15px;
    color: #fff;
    text-align: center;
    text-decoration: none;
    font-weight: bold;
    text-shadow: 0 -1px 1px rgba(0,0,0,0.3);
    -moz-border-radius: 5px;
    -webkit-border-radius: 5px;
    border-radius: 5px;
    -moz-box-shadow: 0 0 5px rgba(255, 255, 255, 0.6) inset, 0 0 3px rgba(220, 120, 200, 0.8);
    -webkit-box-shadow: 0 0 5px rgba(255, 255, 255, 0.6) inset, 0 0 3px rgba(220, 120, 200, 0.8);
    box-shadow: 0 0 5px rgba(255, 255, 255, 0.6) inset, 0 0 3px rgba(220, 120, 200, 0.8);
    /*调用animation属性,从而让按钮在载入页面时就具有动画效果*/
    -webkit-animation-name: "buttonLight"; /*动画名称,需要跟@keyframes定义的名称一致*/
    -webkit-animation-duration: 5s;/*动画持续的时间长*/
    -webkit-animation-iteration-count: infinite;/*动画循环播放的次数*/
}效果:
效果一
变化中效果二 
为了更好的看出这个demo的效果,你可以把上面的代码复制到你本过的页面上,并使用safari和chrome,你会觉得很有意思,整个按钮好像在不停的呼吸一样。
Demo二:方形旋转变成圆型
我们这个demo是通过transform的rotate和border-radius不同值,把一个方型图片随着时间的推移,慢慢的转换成了个圆型效果,下面我们来看看其具体实现的效果
HTML Code:
  <a href="#" class="box"></a>
   <span class="click-btn">Click</span>
CSS Code:
/*定义方型转化为圆型的动画round*/
 @-webkit-keyframes 'round' {     from{       -webkit-transform: rotate(36deg);
       -webkit-border-radius: 2px;
     }
  10%{      -webkit-transform: rotate(72deg);
      -webkit-border-radius: 4px;
     }
  20% {      -webkit-transform: rotate(108deg);
      -webkit-border-radius: 6px;
    }
  30% {      -webkit-transform: rotate(144deg);
      -webkit-border-radius: 9px;
    }
  40%{     -webkit-transform: rotate(180deg);
     -webkit-border-radius: 12px;
  }
  50%{     -webkit-transform: rotate(216deg);
     -webkit-border-radius: 14px;
  }
  60% {     -webkit-transform: rotate(252deg);
     -webkit-border-radius: 16px;
  }
  70% {     -webkit-transform: rotate(288deg);
     -webkit-border-radius: 19px;
  }
  80%{     -webkit-transform: rotate(324deg);
     -webkit-border-radius: 22px;
  }
  to {     -webkit-transform: rotate(360deg);
     -webkit-border-radius: 25px;
  }}   /*给方型box一个初步样式*/
   a.box {      display: block;
      width: 50px;
      height: 50px;
      background: red;
      margin-bottom: 20px;
   }
   /*圆型box的样式,并在这里应用animation*/
   a.round {      -webkit-border-radius: 25px;
      -moz-border-radius: 25px;
      border-radius: 25px;
      background: green;
      -webkit-animation-name: 'round'; /*动画名称*/
      -webkit-animation-duration: 60s;/*播放一次所持续时间*/
      -webkit-animation-timing-function: ease;/*动画播放频率*/
      -webkit-animation-iteration-count: infinite;/*动画播放次涒为无限次*/
    }

   /*click button效果*/
   .click-btn {       background: rgba(125,220,80,0.8);
       -moz-border-radius: 5px;
      -webkit-border-radius: 5px;
       border-radius: 5px;
       -webkit-box-shadow: inset 0 0 8px rgba(255,255,255,0.8),0 0 10px rgba(10,255,120,0.3);
       -moz-box-shadow: inset 0 0 8px rgba(255,255,255,0.8),0 0 10px rgba(10,255,120,0.3);
       box-shadow: inset 0 0 8px rgba(255,255,255,0.8),0 0 10px rgba(10,255,120,0.3);
       padding: 5px 10px;
       color: #369;
       font-size: 16px;
       font-weight: bold;
       text-align: center;
       text-shadow: 0 -1px 0 rgba(0,0,0,0.5);
       cursor: pointer;
}jQuery Code:
 <script type="text/javascript">
      $(document).ready(function(){
         $(".click-btn").click(function(){
             $(this).siblings().addClass("round");
          });
}); </script>我们载入时box是没有任何动画效果的,当我们点击了click button看给原box上加上一个round的class名,从而触发了一个round的动作。请看效果:
未点击按钮时效果(未触发动画效果)

点击click按钮开始播放动画

【相关推荐】
1. CSS3免费视频教程
4. 详解关于css3的新特性
5. 推荐十个CSS3动画实例
Das obige ist der detaillierte Inhalt vonAusführliche Erklärung der Animation für das CSS3-Lernen. Für weitere Informationen folgen Sie bitte anderen verwandten Artikeln auf der PHP chinesischen Website!


