对于复杂的操作情况,比如:添加一行之后,在这一行上还要进行相关的操作会显得有些吃力;本人比较喜欢表现层使用模板、标记填充数据的做法,于是自己做手做了个小组件,与大家一起分享。
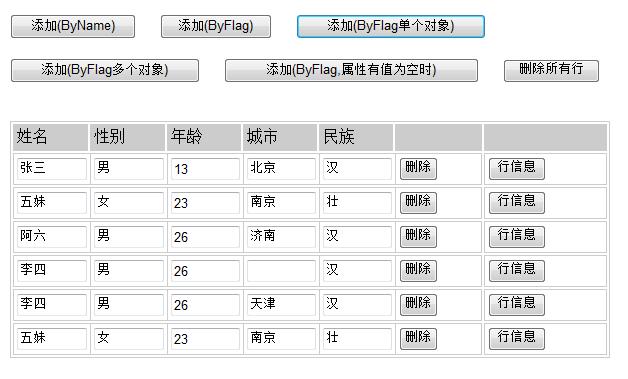
组件运行截图:


设计思路:
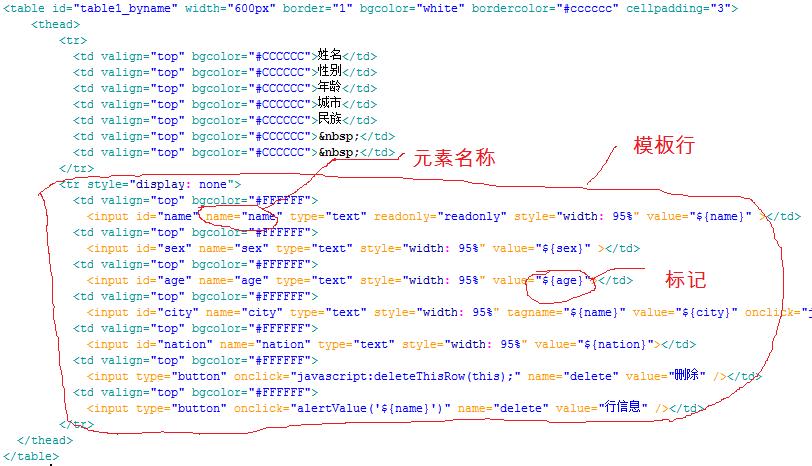
在Table的thead中加入一行隐藏的行,当要添加一行时,复制一次隐藏的行,再将实例数据填充到这一行中相应的位置,填充完毕之后,再将这一行加到表格中去,整个操作完成。
模板:隐藏的行即相当于模板,当需要时复制一次模板。
标记:将模板行复制出来后,该如何填充数据?
网上比较多的组件的做法是,传递进来两个数组,一组是元素名称列表,一组是对应的值列表,然后对复制出来的行进行一个查找,发现其中的元素的名称在元素名称列表中的,让其value=对应的值。这样做可以满足一般的需求,因为Table里面一般放置文本框,将值放到其中即完成任务。对于复杂的情况,要求将数据填充到其它的位置,这种方法就力不从心了。
我的做法是将复制进来的模板行看做一段String,在这段String中查找标记,再将数据填充到相应的标记中去,这样的话,无论你哪个地方要填充数据,只要放一个标记就可以了,比上面的做法要灵活很多。
代码实现(关键点讲解)
我定义的标志为${属性},传递过去的数据为一个entity,当在String中发现${city},则表示将entity.city的内容替换${city},当entity.city为NULL时,用 替换${city}( 网页中的空格)。
动态添加行方法
function addInstanceRow(tableId,names,values,functionName){
var tableObj=getTargetControl(tableId);
var tbodyOnlineEdit=getTableTbody(tableObj);
var theadOnlineEdit=tableObj.getElementsByTagName("THEAD")[0];
var elm=theadOnlineEdit.rows[theadOnlineEdit.rows.length-1].cloneNode(true);
elm.style.display="";
if(typeof(names)!="undefined"){
if(typeof(functionName)=="undefined") functionName="setObjValueByName";
if(typeof(values)!="undefined"&&values!=null){
var entity=ArrayToObj(names,values);
setInputValue(elm,entity,functionName);
}
else
setInputValue(elm,names,functionName);
}
tbodyOnlineEdit.appendChild(elm);
}
if(typeof(names)!="undefined"){
if(typeof(functionName)=="undefined") functionName="setObjValueByName";
if(typeof(values)!="undefined"&&values!=null){
var entity=ArrayToObj(names,values);
setInputValue(elm,entity,functionName);
}
else
setInputValue(elm,names,functionName);
}
4,将填充好数据的行添加到表格中去
tbodyOnlineEdit.appendChild(elm);
难点、易出问题点说明
1, 获取Tbody,ie与firefox有区别,ie在默认的情况下是为table加上tbody的,而firefox则没有,所以要进行相应的判断
//得到table中的tbody控件,注意兼容firefox
function getTableTbody(tableObj){
var tbodyOnlineEdit=tableObj.getElementsByTagName("TBODY")[0];
if(typeof(tbodyOnlineEdit)=="undefined"||tbodyOnlineEdit==null){
tbodyOnlineEdit=document.createElement("tbody");
tableObj.appendChild(tbodyOnlineEdit);
}
return tbodyOnlineEdit;
}
2, 进行填充时,实现了两种情况,一种用根据元素的name,别一种则是根据标记填充
Code
// 动态添加表格行
// functionname为“setObjValueByName”为根据元素name,
//要求names为元素名称,value为相对应的值
//
//functionname为“”为标记填充
//要求names为一个对象,value为null
function addInstanceRow(tableId,names,values,functionName)
3, 进行标志的填充时,使用正则表达式进行标记的查找,找到标记后到entity中取相应的属性的值,取出属性的值之后,要用 替换字符串中的空格,不然显示时会有问题,当属性值为空时用 替换标记符号,代码在以下函数中。
Code
//根据标志设置添加值
function setObjValueByFlag(obj,entity){
var objTemp=obj.parentNode;
var arrMatches=objTemp.innerHTML.match(/\${\w+}/g);
if(typeof(arrMatches)=="undefined"||arrMatches==null||typeof(arrMatches.length)=="undefined"||arrMatches.length==null)
return;
var tempValue="";
var propertyValue="";
for(var i=0;i
propertyValue=getEntityPropertyValue(entity,tempValue);
if(propertyValue!=null){
if(typeof(propertyValue)=="string"){
if(propertyValue!="")
propertyValue=propertyValue.replace(/\s/g," ");
else
propertyValue=" ";
}
objTemp.innerHTML=objTemp.innerHTML.replace(arrMatches[i],propertyValue);
}
else{
objTemp.innerHTML=objTemp.innerHTML.replace(arrMatches[i]," ");
}
}
}
4, 对于填充标志的做法,刚开始的思路是,直接将模板行中的tr下的内容当成文本进行标志的替换,但是显示时没有内容,于是只能逐个把td中的内容对标志进行替换,发现显示时是正确的,这个地方使我有点困惑。很明显前者的做法效率更高,却莫名其妙地显不出来,只能退而求其次了。
函数调用说明
Code
//见上面说明,这是添加行最基本的对外函数
function addInstanceRow(tableId,names,values,functionName)
//添加实体列表添加表格中,有几个entity则添加几行
//tableId 要动态添加行的Table的ID值
//entityList 对象数组 Array类型,
function addRowByEntityList(tableId,entityList)
//将一个实体添加到一行
function addRowByEntity(tableId,entity)
//删除触发事件控件所在的行
function deleteThisRow(targetControl)
//删除表格下的所有行
function deleteAllRow(tableId)
在IE6,7,firefox2,3测试没问题,有问题留言或邮件badwps@163.com,谢谢
打包下载


