Dieser Artikel wurde ursprünglich im Shipyard Blog veröffentlicht.
Während Sie Ihre Django- und PostgreSQL-App entwickeln, denken Sie wahrscheinlich über ein paar Kästchen nach, die Sie überprüfen möchten:
Mit Docker und Docker Compose können Sie Ihre App für jede Phase des Entwicklungslebenszyklus vorbereiten, von der lokalen bis zur Produktion. In diesem Beitrag behandeln wir einige Grundlagen zum Anpassen einer Docker- und Compose-Datei für eine Django-App mit einer Postgres-Datenbank.
TLDR: Shipyard unterhält eine Django/Postgres-Starteranwendung, die für die Erstellung und Ausführung mit Docker und Docker Compose eingerichtet ist. Fork es hier. Sie können es als Projektvorlage oder als Referenz für Ihre bestehende App verwenden.
Django ist ein Open-Source-Webframework auf Python-Basis. Es wird hauptsächlich als Backend für Web-Apps verwendet. Django folgt der Philosophie „Batterien inklusive“ – es wird komplett mit Routing-Unterstützung, einem Login-Framework, einem Webserver, Datenbank-Tools und vielem mehr geliefert. Django wird oft mit Flask verglichen und schneidet in fast allen Bereichen besser ab.
Sie verwenden Django-Apps jeden Tag. Spotify, Doordash, Instagram, Eventbrite und Pinterest haben Django alle im Programm – was Bände darüber spricht, wie erweiterbar und skalierbar es sein kann.
Das Ausführen einer Django-App mit Docker-Containern eröffnet mehrere neue Anwendungsfälle. Es stellt auf Anhieb eine Verbesserung Ihrer lokalen Entwicklungsabläufe dar – die Einrichtung wird übersichtlicher und unkomplizierter.
Wenn Sie Ihr Projekt in der Cloud hosten möchten, benötigen Sie es normalerweise in einem Container. Das Tolle an Docker-Containern ist, dass sie in jeder Entwicklungsphase verwendet werden können, von der lokalen bis zur Produktion. Sie können Ihr Docker-Image auch verteilen, damit andere es ohne Installation oder Erstellung sofort ausführen können.
Wenn Sie Ihrem Projekt zumindest eine Docker-Datei hinzufügen, können Sie sicherstellen, dass es jedes Malauf jedem System identisch erstellt und ausgeführt wird.
Unsere Python-App benötigt einen Paketmanager, um ihre Abhängigkeiten zu verfolgen, zu versionieren und zu installieren. Dies hilft uns, Abhängigkeitsinitialisierungen/-aktualisierungen zu verwalten, anstatt sie einzeln auszuführen, und Paketversionen maschinenübergreifend beizubehalten.
Sowohl Pip als auch Poetry sind beliebte Abhängigkeitsmanager für Python, obwohl noch einige andere im Umlauf sind (z. B. uv, Conda, Rye).
Pip ist unglaublich unkompliziert. Benutzer können ihre Pakete in einer Datei „requirements.txt“ mit ihren jeweiligen Versionen auflisten und pip install ausführen, um sie einzurichten. Benutzer können vorhandene Abhängigkeiten und ihre Versionen erfassen, indem sie pip freeze > ausführen. „requirements.txt“ im Stammverzeichnis eines Projekts.
Poetry ist ein hochleistungsfähiger Paketmanager für Apps jeder Größenordnung, der jedoch etwas weniger einfach zu konfigurieren ist als Pip (er verwendet eine TOML-Datei mit Tabellen, Metadaten und Skripten). Poetry verwendet außerdem eine Sperrdatei (poetry.lock), um Abhängigkeiten in ihren aktuellen Versionen (und ihren Abhängigkeiten nach Version) zu „sperren“. Wenn Ihr Projekt zu einem bestimmten Zeitpunkt auf einer bestimmten Maschine läuft, bleibt dieser Zustand auf diese Weise erhalten. Beim Ausführen von „poetry init“ werden Benutzer mit einer Reihe von Optionen zum Generieren einer pyproject.toml-Datei aufgefordert.
Um Ihre Django-App zu dockerisieren, folgen Sie der klassischen Dockerfile-Struktur (legen Sie das Basis-Image fest, legen Sie das Arbeitsverzeichnis fest usw.) und ändern Sie sie dann mit den projektspezifischen Installationsanweisungen, die Sie wahrscheinlich in der README-Datei finden.
Wir können ein leichtes Python-Image auswählen, das als Basis für diese Docker-Datei dient. Um Versionen nach Tag zu durchsuchen, schauen Sie sich die Python-Seite auf Docker Hub an. Ich habe mich hier für Alpine entschieden, weil es unser Image klein hält:
FROM python:3.8.8-alpine3.13
Hier definieren wir das Arbeitsverzeichnis innerhalb des Docker-Containers. Alle im Folgenden genannten Pfade beziehen sich darauf.
WORKDIR /srv
Es gibt ein paar Bibliotheken, die wir hinzufügen müssen, bevor wir Poetry konfigurieren können:
RUN apk add --update --no-cache \
  gcc \
  libc-dev \
  libffi-dev \
  openssl-dev \
  bash \
  git \
  libtool \
  m4 \
  g++ \
  autoconf \
  automake \
  build-base \
  postgresql-dev
Als nächstes stellen wir sicher, dass wir die neueste Version von Pip verwenden, und verwenden diese dann, um Poetry in unserem Container zu installieren:
RUN pip install --upgrade pip
RUN pip install poetry
This app’s dependencies are defined in our pyproject.toml and poetry.lock files. Let’s bring them over to the container’s working directory, and then install from their declarations:
ADD pyproject.toml poetry.lock ./
RUN poetry install
Now, we’ll copy over the rest of the project, and install the Django project itself within the container:
ADD src ./src
RUN poetry install
Finally, we’ll run our project’s start command. In this particular app, it’ll be the command that uses Poetry to start the Django development server:
CMD ["poetry", "run", "python", "src/manage.py", "runserver", "0:8080"]
When we combine the snippets from above, we’ll get this Dockerfile:
FROM python:3.8.8-alpine3.13

WORKDIR /srv

RUN apk add --update --no-cache \
  gcc \
  libc-dev \
  libffi-dev \
  openssl-dev \
  bash \
  git \
  libtool \
  m4 \
  g++ \
  autoconf \
  automake \
  build-base \
  postgresql-dev

RUN pip install --upgrade pip
RUN pip install poetry

ADD pyproject.toml poetry.lock ./
RUN poetry install

ADD src ./src
RUN poetry install

CMD ["poetry", "run", "python", "src/manage.py", "runserver", "0:8080"]
We’re going to split this app into two services: django and postgres. Our django service will be built from our Dockerfile, containing all of our app’s local files.
For this app, we want to build the django service from our single Dockerfile and use the entire root directory as our build context path. We can set our build label accordingly:
django:
  build: .
We can map port 8080 on our host machine to 8080 within the container. This will also be the port we use to access our Django app — which will soon be live at http://localhost:8080.
ports:
  - '8080:8080'
Since our Django app is connecting to a database, we want to instruct Compose to spin up our database container (postgres) first. We’ll use the depends_on label to make sure that service is ready and running before our django service starts:
depends_on:
  - postgres
Since we’ll be sharing files between our host and this container, we can define a bind mount by using the volumes label. To set the volume, we’ll provide a local path, followed by a colon, followed by a path within the container. The ro flag gives the container read-only permissions for these files:
volumes:
  - './src:/srv/src:ro'
Combining all the options/configurations from above, our django service should look like this:
django:
  build: .
  ports:
    - '8080:8080'
  depends_on:
    - postgres
  volumes:
    - './src:/srv/src:ro'
Our Django app is configured to connect to a PostgreSQL database. This is defined in our settings.py:
DATABASES = {
    'default': {
        'ENGINE': 'django.db.backends.postgresql',
        'NAME': 'app',
        'USER': 'obscure-user',
        'PASSWORD': 'obscure-password',
        'HOST': 'postgres',
        'PORT': 5432,
    }
}
We can migrate our existing database to its own Docker container to isolate it from the base Django app. First, let’s define a postgres service in our Compose file and pull the latest lightweight Postgres image from Docker Hub:
postgres:
  image: 'postgres:14.13-alpine3.20'
To configure our PostgreSQL database, we can pass in a few environment variables to set credentials and paths. You may want to consider using a Secrets Manager for this.
environment:
  - POSTGRES_DB=app
  - POSTGRES_USER=obscure-user
  - POSTGRES_PASSWORD=obscure-password
  - PGDATA=/var/lib/postgresql/data/pgdata
We can expose our container port by setting it to the default Postgres port: 5432. For this service, we’re only specifying a single port, which means that the host port will be randomized. This avoids collisions if you’re running multiple Postgres instances.
ports:
  - '5432'
In our postgres definition, we can add a named volume. This is different from the bind mount that we created for the django service. This will persist our data after the Postgres container spins down.
volumes:
  - 'postgres:/var/lib/postgresql/data'
Outside of the service definitions and at the bottom of the Compose file, we’ll declare the named postgres volume again. By doing so, we can reference it from our other services if needed.
volumes:
  postgres:
And here’s the resulting PostgreSQL definition in our Compose file:
  postgres:
    image: 'postgres:14.13-alpine3.20'
    environment:
      - POSTGRES_DB=app
      - POSTGRES_USER=obscure-user
      - POSTGRES_PASSWORD=obscure-password
      - PGDATA=/var/lib/postgresql/data/pgdata
    ports:
      - '5432'
    volumes:
      - 'postgres:/var/lib/postgresql/data'

volumes:
  postgres:
We can get our app production-ready by deploying it in a Shipyard application — this means we’ll get an ephemeral environment for our base branch, as well as environments for every PR we open.

Shipyard transpiles Compose files to Kubernetes manifests, so we’ll add some labels to make it Kubernetes-compatible.
Under our django service, we can add two custom Shipyard labels:
labels:
  shipyard.init: 'poetry run python src/manage.py migrate'
  shipyard.route: '/'
Next, you can go to your Shipyard dashboard. If you haven’t already, sign up for a 30-day free trial.
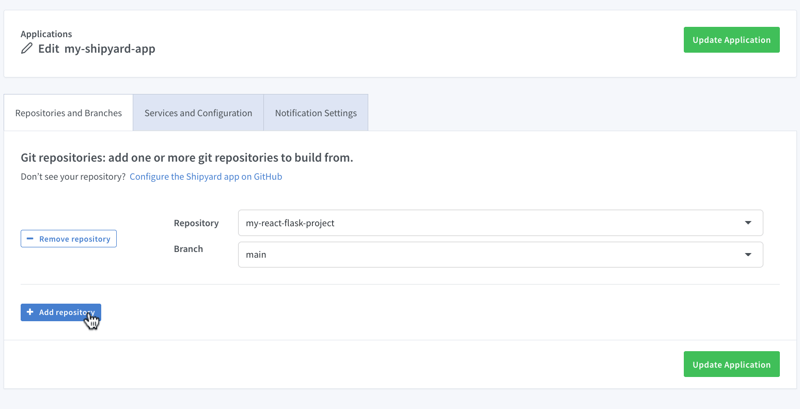
Click the + Application button, then select your repo, services, and import your env vars.

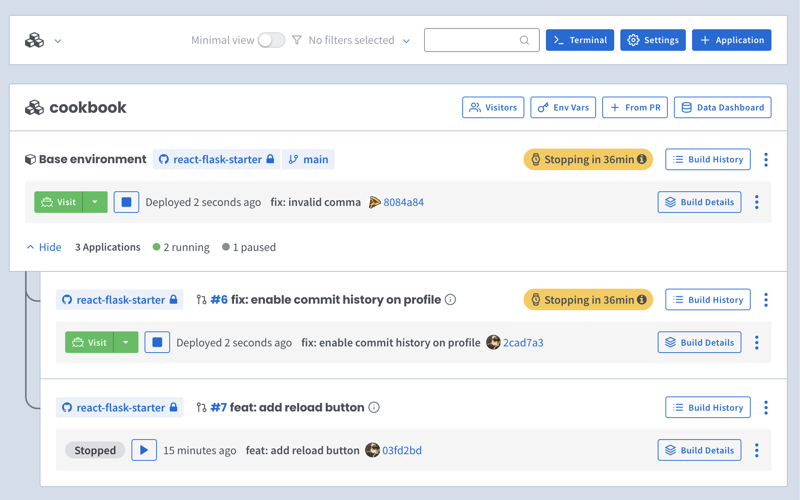
Once it finishes building, you can click the green Visit button to access your short-lived ephemeral environment. What comes next?
Now you have a fully containerized Django app with a database! You can run it locally with Docker Compose, preview and test it in an ephemeral environment, and iterate until it’s production-ready.
Want to Dockerize a Yarn app next? Check out our guide!
Das obige ist der detaillierte Inhalt vonAnleitung: Containerisieren einer Django- und Postgres-App mit Docker. Für weitere Informationen folgen Sie bitte anderen verwandten Artikeln auf der PHP chinesischen Website!
 IIS unerwarteter Fehler 0x8ffe2740 Lösung
 flac-Format
 Welche E-Commerce-Plattformen gibt es?
 Der Unterschied zwischen ++a und a++ in der C-Sprache
 Wo soll ich meinen Geburtsort angeben: Provinz, Stadt oder Kreis?
 Was ist der Unterschied zwischen 5g und 4g?
 So verwenden Sie die magnetische Btbook-Suche
 So konfigurieren Sie die Pfadumgebungsvariable in Java


