
Geschrieben von Carlos Mucuho✏️
Countdown-Timer sind eine beliebte Funktion auf vielen Websites und verbessern die Funktionalität für Veranstaltungen, Verkäufe und Benutzereinbindung. Während JavaScript häufig für dynamisches Verhalten im Web verwendet wird, ist es auch möglich, einen funktionalen und optisch ansprechenden Countdown-Timer nur mit CSS zu erstellen.
In diesem Tutorial werden wir beide Ansätze untersuchen, beginnend mit einem einfachen JavaScript-Countdown-Timer und dann zu einem reinen CSS-Countdown-Timer übergehen. Am Ende werden wir die Leistung beider Ansätze mit Chrome DevTools vergleichen und ihre jeweiligen Vor- und Nachteile diskutieren.
Wir beginnen mit der Erstellung eines einfachen Countdown-Timers, der jede Sekunde aktualisiert wird. Der Timer verfügt über eine Start- und Pause-Taste zur Steuerung seines Betriebs.
Bevor wir den JavaScript-Countdown-Timer erstellen, müssen wir ein Verzeichnis erstellen, um die Anwendungen zu speichern, die wir in diesem Tutorial erstellen werden.
Öffnen Sie ein Terminalfenster, navigieren Sie zu einem für Ihr Projekt geeigneten Verzeichnis und erstellen Sie mit dem folgenden Befehl ein Verzeichnis mit dem Namen countdown-timer:
mkdir countdown-timer
Navigieren Sie dann zu diesem Verzeichnis:
cd countdown-timer
Erstellen Sie zwei Unterverzeichnisse mit den Namen „javascript-countdown“ und „css-only-countdown“ und erstellen Sie in jedem Unterverzeichnis ein Unterverzeichnis mit dem Namen „public:“
mkdir javascript-countdown && mkdir javascript-countdown/public
mkdir css-only-countdown && mkdir css-only-countdown/public
Navigieren Sie als Nächstes zum Unterverzeichnis javascript-countdown, initialisieren Sie ein neues Knotenprojekt mit Standardeinstellungen und installieren Sie das Express-Paket:
cd javascript-countdown
npm init -y
npm install express
Öffnen Sie Ihren bevorzugten Texteditor, erstellen Sie eine Datei mit dem Namen server.js und fügen Sie den folgenden Code hinzu:
const express = require('express');
const app = express();
const port = 3001

app.use(express.static('public'));
app.listen(port, () => {
  console.log(`Javascript countdown app server started on port ${port}`);
});
Der obige Code erstellt einen Express-Server, der zur Bereitstellung der JavaScript-Countdown-Anwendung in Port 3001 verwendet wird.
Erstellen Sie weiterhin in Ihrem Texteditor die folgenden Dateien im öffentlichen Unterverzeichnis im Verzeichnis „javascript-countdown“:
Fügen Sie den folgenden Code zu index.html hinzu:
<!DOCTYPE html>
<html lang="en">
<head>
  <meta charset="UTF-8">
  <meta name="viewport" content="width=device-width, initial-scale=1.0">
  <link rel="stylesheet" href="styles.css">
  <title>Javascript Countdown Timer</title>
</head>

<body>
  <div class="container">
    <div class="controls">
      <button id="startBtn">Start</button>
      <button id="pauseBtn">Pause</button>
    </div>
    <div class="countdown-container">
      <div class="countdown"></div>
    </div>
  </div>
  <script src="index.js"></script>
</body>

</html>
Diese HTML-Datei richtet eine Grundstruktur mit einem Container mit Steuerschaltflächen und einem Countdown-Anzeigebereich ein.
Als nächstes fügen wir JavaScript hinzu, um die Countdown-Logik zu verwalten. Fügen Sie den folgenden Code zu index.js hinzu:
window.addEventListener("load", () => {
  const startBtn = document.getElementById('startBtn');
  const pauseBtn = document.getElementById('pauseBtn');
  const countdownView = document.getElementsByClassName('countdown')[0];

  let totalTime = 10;
  let timeLeft;
  let countDownIntervalID;
  let isPaused = false;

  pauseBtn.style.display = 'none';
});
In diesem Codeblock initialisieren wir die Elemente startBtn, pauseBtn und countdownView anhand ihrer jeweiligen IDs und Klassen. Wir legen auch einige Anfangsvariablen fest: totalTime, timeLeft, countDownIntervalID und isPaused. Zusätzlich haben wir die Pause-Schaltfläche so eingestellt, dass sie zunächst ausgeblendet wird.
Jetzt fügen wir Ereignis-Listener für die Start- und Pause-Schaltflächen hinzu:
startBtn.addEventListener('click', startOrStopTimer);
pauseBtn.addEventListener('click', pauseOrResumeTimer);
Diese Zeilen fügen Click-Event-Listener an die Start- und Pause-Schaltflächen an. Die Funktionen startOrStopTimer und pauseOrResumeTimer werden später definiert, um die Schaltflächenklicks zu verarbeiten.
Fügen Sie den folgenden Code hinzu, um die startOrStopTimer-Funktion zu definieren:
function startOrStopTimer() {
  startBtn.innerHTML = startBtn.innerHTML === 'Start' ? 'Stop' : 'Start';
  if (countDownIntervalID === undefined && !isPaused) {
    timeLeft = totalTime;
    startTimer();
    pauseBtn.style.display = 'inline';
  } else {
    stopTimer();
    countdownView.innerHTML = '';
    pauseBtn.style.display = 'none';
    isPaused = false;
    pauseBtn.innerHTML = 'Pause';
  }
}
In dieser Funktion schalten wir den Text der Startschaltfläche zwischen Start und Stopp um. Wenn der Countdown nicht läuft und nicht pausiert ist, initialisieren wir timeLeft auf totalTime und starten den Timer. Andernfalls stoppen wir den Timer und setzen die Ansicht zurück.
Definieren Sie nun die startTimer-Funktion:
function startTimer() {
  countDownIntervalID = setInterval(() => {
    countdownView.innerHTML = timeLeft;

    if (timeLeft === 0) {
      stopTimer();
      startBtn.innerHTML = 'Start';
      pauseBtn.style.display = 'none';
      countdownView.innerHTML = '';
    } else {
      timeLeft = timeLeft - 1;
    }
  }, 1000);
}
Diese Funktion legt ein Intervall fest, um den Countdown jede Sekunde zu aktualisieren. Wenn timeLeft Null erreicht, stoppen wir den Timer, setzen den Text der Startschaltfläche zurück und blenden die Pauseschaltfläche aus.
Als nächstes fügen Sie die stopTimer-Funktion hinzu:
function stopTimer() {
  if (countDownIntervalID !== undefined) {
    clearInterval(countDownIntervalID);
    countDownIntervalID = undefined;
  }
}
Diese Funktion löscht das Countdown-Intervall und setzt countDownIntervalID zurück. Fügen Sie abschließend die Funktion pauseOrResumeTimer hinzu:
function pauseOrResumeTimer() {
  isPaused = !isPaused;
  pauseBtn.innerHTML = isPaused ? 'Resume' : 'Pause';

  if (countDownIntervalID !== undefined) {
    stopTimer();
  } else {
    startTimer();
  }
}
In dieser Funktion schalten wir den Pausenstatus und den Schaltflächentext zwischen Pause und Fortsetzen um. Wenn der Countdown läuft, stoppen wir den Timer; andernfalls fangen wir wieder von vorne an.
Jetzt gestalten wir den Countdown-Timer mit CSS. Fügen Sie den folgenden Code zu „styles.css“ hinzu:
body {
  background-color: black;
  font-family: Arial, sans-serif;
  height: 100%;
}

.container {
  display: flex;
  flex-direction: column;
  justify-content: center;
  align-items: center;
}

.controls {
  width: 20%;
  margin-top: 10%;
  display: flex;
  justify-content: space-between;
  flex-direction: row;
  flex-wrap: wrap;
}

.countdown-container {
  position: relative;
  width: 20vw;
  height: 20vw;
  margin-top: 2%;
  border: 0.4em solid #9b51e0;
}

button {
  font-size: 1.5em;
  border: none;
  padding: 0.3em;
  background-color: #9b51e0;
  border-radius: 0.4em;
  color: white;
}

.countdown {
  position: relative;
  width: 100%;
  height: 100%;
  list-style: none;
  padding: 0;
  margin: 0;
  display: flex;
  justify-content: center;
  align-items: center;
  font-size: 5em;
  color: #9b51e0;
}
Dieses CSS definiert Stile für die Countdown-Timer-Schnittstelle. Der Textkörperhintergrund ist auf Schwarz eingestellt und wir verwenden Arial als primäre Schriftart. Die .container-Klasse ist so gestaltet, dass sie ihren Inhalt zentriert und für Abstand zwischen Elementen sorgt. Die .controls-Klasse formatiert die Schaltflächen zum Starten und Anhalten des Timers und stellt sicher, dass sie gleichmäßig verteilt sind und reagieren. Die Klasse .countdown-container definiert die Größe und das Erscheinungsbild der Countdown-Anzeige, einschließlich Rahmen und Rand.
Gehen Sie zurück zu Ihrem Terminal und führen Sie den folgenden Befehl aus, um mit der Bereitstellung der JavaScript-Countdown-Anwendung zu beginnen:
node server.js
Open a new tab in your browser, navigate to http://localhost:3001, and you should see something similar to the following: 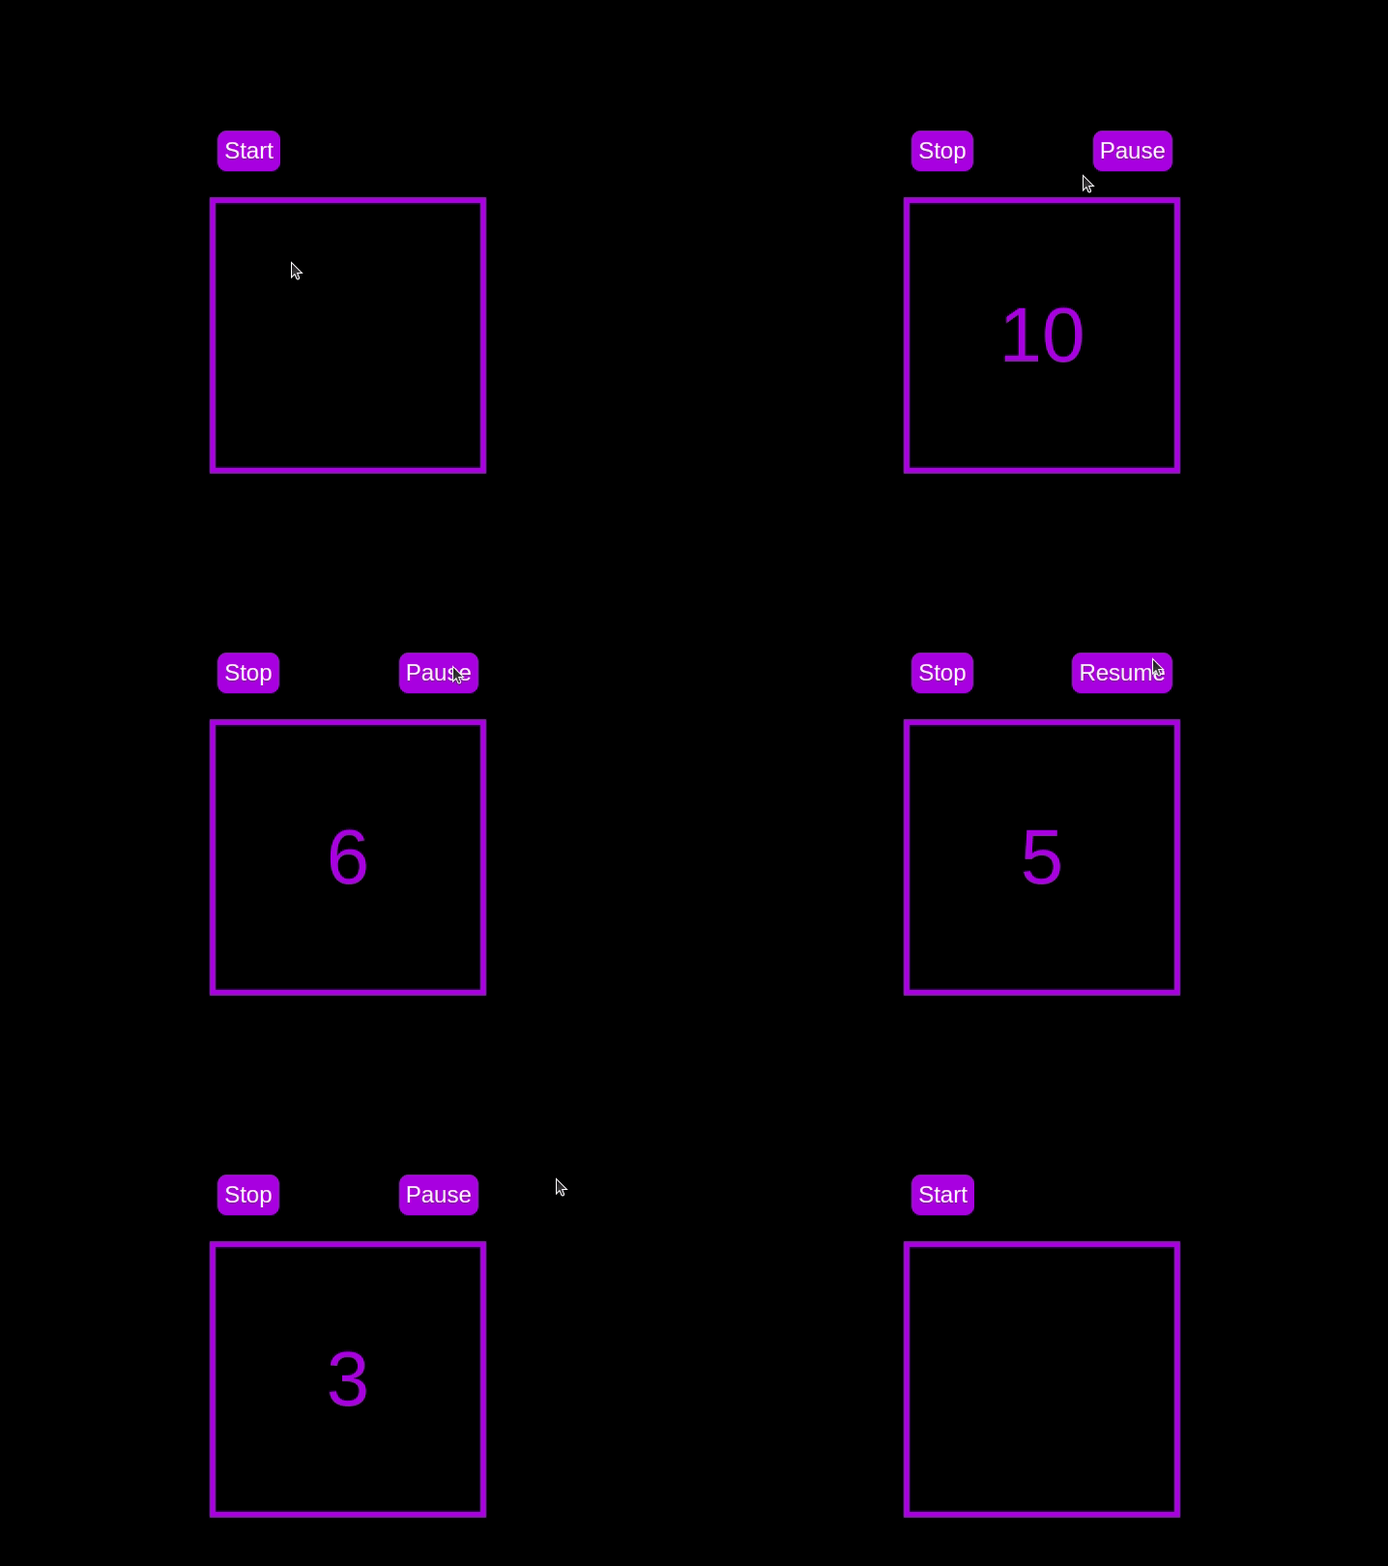 Test out the countdown timer and once you are done, terminate the server application and move to the next step.
To enhance the user experience of our countdown timer, let’s add a circular progress indicator to give the user a visual representation of the time remaining.
First, we need to modify our HTML code to include the circular progress element. In index.html, we add a span element with a class of circular-progress inside the countdown-container div. This span element will be used to create the circular progress indicator:
<div class="countdown-container">
  <span class="circular-progress"></span>
  <div class="countdown"></div>
</div>
Next, we need to define the CSS for the circular progress indicator. In styles.css, we add the following code:
.countdown-container {
  ...
  /* border : 0.4em solid #9b51e0; */
}
.circular-progress {
  width: 20vw;
  height: 20vw;
  border-radius: 50%;
  display: flex;
  justify-content: center;
  align-items: center;
  position: absolute;
  transition: 0.5s;
  background-color: #13171f;
}

.circular-progress::before {
  width: 18.5vw;
  height: 18.5vw;
  content: "";
  position: absolute;
  border-radius: 50%;
  background-color: black;
}
This code first removes the border from the countdown-container div, then sets the dimensions and shape of the circular progress indicator, as well as its position and background color. We also add a ::before pseudo-element to create the inner circle of the progress indicator.
Now we need to add the JavaScript code to animate the circular progress indicator.
Add the following code in the variables initialization block:
const circularProgressEl = document.getElementsByClassName("circular-progress")[0];
let circularProgress;
let circularProgressIntervalID;
This code initializes the circularProgressEl variable to target the circular progress element and creates two new variables, circularProgress and circularProgressIntervalID, that will be used to animate the progress indicator.
Add the following code below the pauseOrResumeTimer() function:
function startCircularProgressAnimation() {
  let start = totalTime - timeLeft;
  let degreesPerSecond = 360 / totalTime;
  let degreesPerInterval = degreesPerSecond / 20;
  circularProgress = degreesPerSecond * start;

  circularProgressIntervalID = setInterval(() => {
    if (Math.round(circularProgress) === 360) {
      clearInterval(circularProgressIntervalID);
    } else {
      circularProgress = circularProgress + degreesPerInterval;
      circularProgressEl.style.background = `conic-gradient(#9b51e0 ${circularProgress}deg, #13171f 0deg)`;
    }
  }, 50);
}
This code defines the startCircularProgressAnimation function, which calculates the starting point and degree of rotation for the circular progress indicator, and sets up an interval to animate the progress indicator.
Add the following code below the startCircularProgressAnimation:
function resumeCircularProgressAnimation() {
  startCircularProgressAnimation();
}

function pauseCircularProgressAnimation() {
  clearInterval(circularProgressIntervalID);
}

function stopCircularProgressAnimation() {
  clearInterval(circularProgressIntervalID);
  circularProgressEl.style.background = `conic-gradient(#9b51e0 0deg, #13171f 0deg)`;
}
This code defines the resumeCircularProgressAnimation, pauseCircularProgressAnimation, and stopCircularProgressAnimation functions, which are used to start, pause, and stop the circular progress animation.
Finally, we need to modify the startOrStopTimer and pauseOrResumeTimer functions to start and stop the circular progress animation along with the timer:
function startOrStopTimer() {
  // ...
  if (countDownIntervalID === undefined && !isPaused) {
    // ...
    startCircularProgressAnimation();
  } else {
    // ...
    stopCircularProgressAnimation();
  }
}

function pauseOrResumeTimer() {
  // ...
  if (countDownIntervalID !== undefined) {
    stopTimer();
    pauseCircularProgressAnimation();
  } else {
    startTimer();
    resumeCircularProgressAnimation();
  }
}
With these modifications, our countdown timer now includes a circular progress indicator that animates along with the timer.
Return to your terminal and run the following command to start serving the JavaScript countdown application:
node server.js
Go back to the tab in your browser where you visited the http://localhost:3001 URL, refresh the page, and you should see something similar to the following: 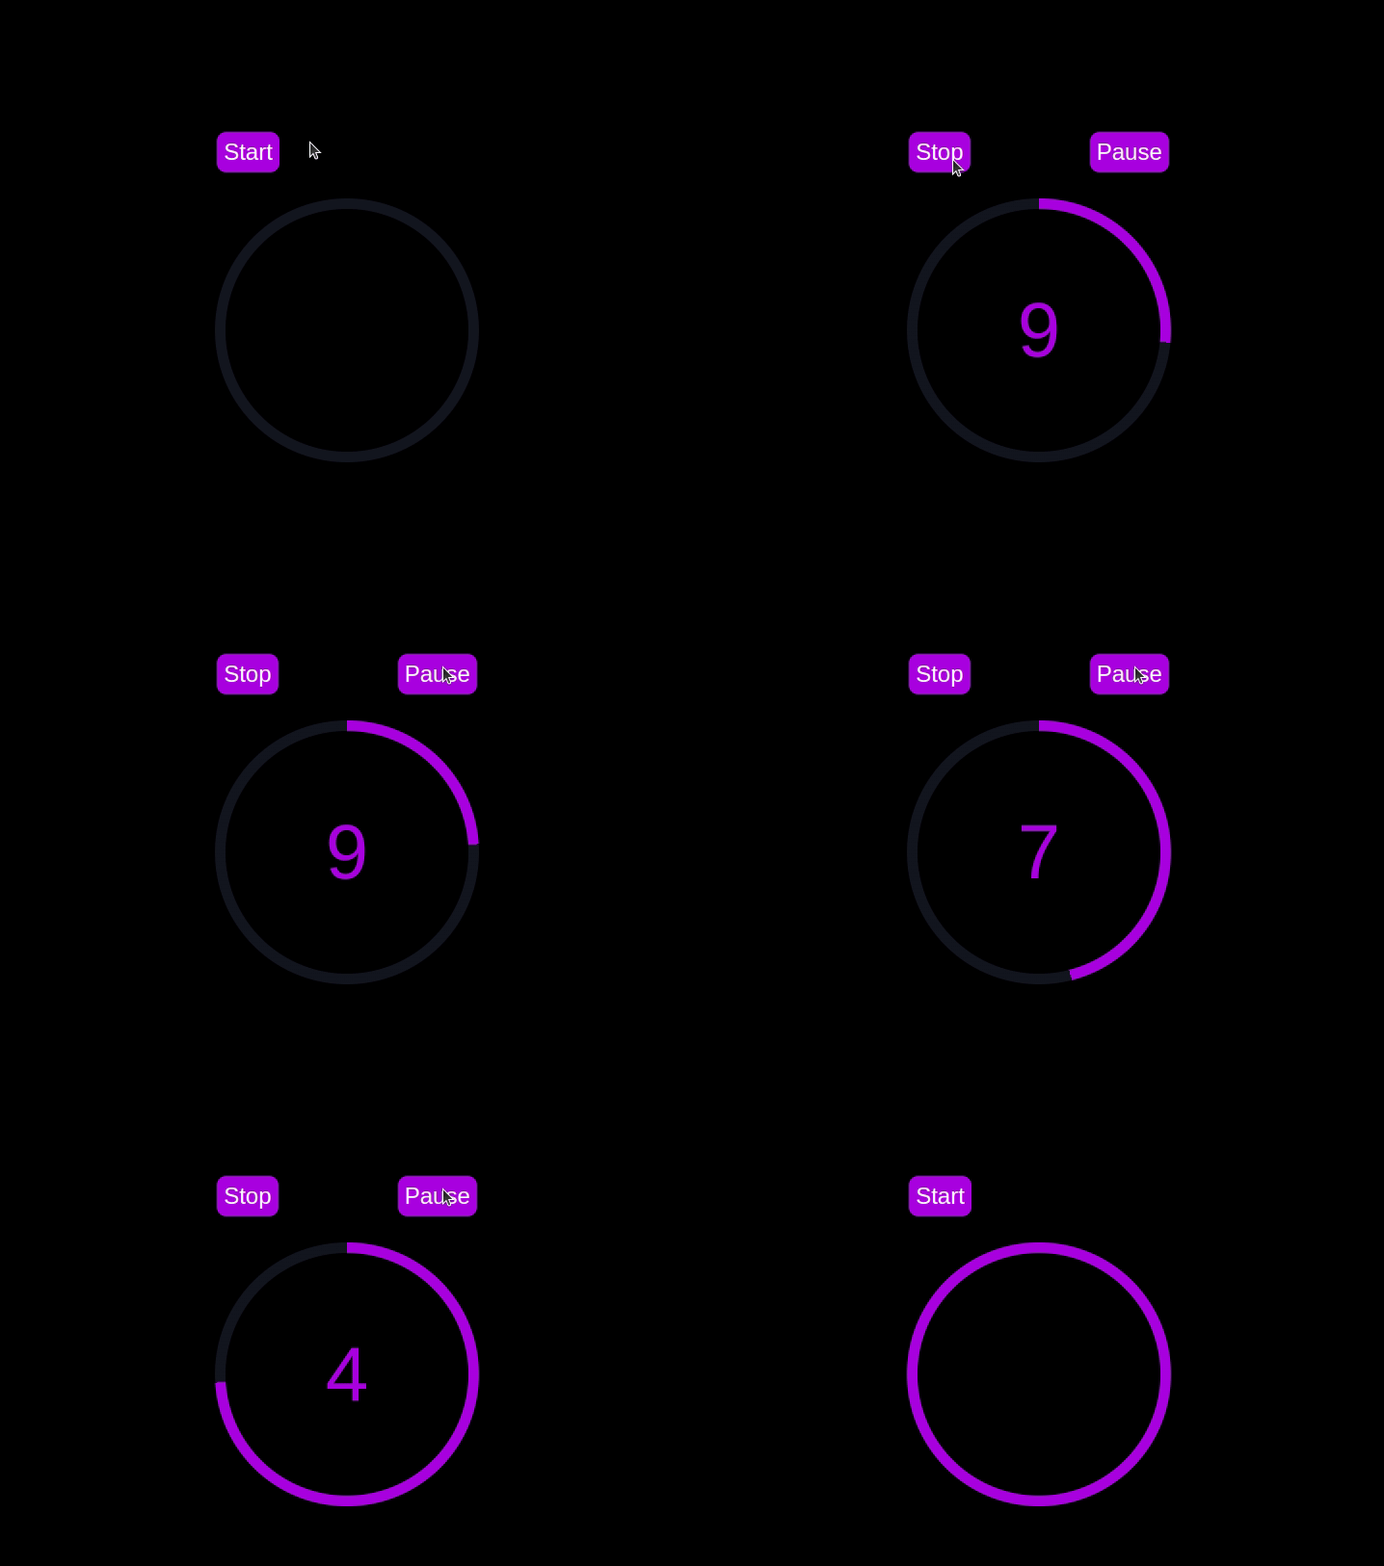
In this section, we'll dive into creating a countdown timer that updates every second and is made using only CSS. Our timer will be simple yet functional, featuring start and pause buttons to control its operation.
Navigate to the css-only-countdown subdirectory, initialize a new node project, and install the express package:
cd ../css-only-countdown
npm init -y
npm install express
Then, return to your text editor, create a file named server.js, and add the following code to it:
const express = require('express');
const app = express();
const port = 3002
app.use(express.static('public'));

app.listen(port, () => {
  console.log(`Css-only countdown app server started on port ${port}`);
});
The code above creates an express server that will be used to serve the JavaScript countdown application in port 3002.
Still in your text editor, create the following files in the public subdirectory:
Add the following code to the index.html file:
<!DOCTYPE html>
<html lang="en">
<head>
  <meta charset="UTF-8">
  <meta name="viewport" content="width=device-width, initial-scale=1.0">
  <link rel="stylesheet" href="styles.css">
  <title>CSS Countdown Timer</title>
</head>
<body>
  <div class="container">
    <div class="controls">
      <input type="checkbox" id="startBtn" class="checkbox-wrapper">
      <label for="startBtn" id="startLabel">
        <span>Stop</span>
        <span>Start</span>
      </label>
      <input type="checkbox" id="pauseBtn" class="checkbox-wrapper">
      <label for="pauseBtn" id="pauseLabel">
        <span>Resume</span>
        <span>Pause</span>
      </label>
      <div class="countdown-container">
        <ul class="countdown">
          <li>10</li>
          <li>9</li>
          <li>8</li>
          <li>7</li>
          <li>6</li>
          <li>5</li>
          <li>4</li>
          <li>3</li>
          <li>2</li>
          <li>1</li>
        </ul>
      </div>
    </div>
  </div>
</body>
</html>
This code sets up the basic structure of our countdown timer. It includes a container div that holds the controls for starting and pausing the timer, as well as the countdown display itself. The controls div contains two checkboxes with labels that will serve as our start and pause buttons. These buttons toggle their respective states using CSS, thanks to the checkbox hack.
The countdown-container div holds an unordered list (ul) of list items (li) representing the countdown numbers from 10 to one. These numbers will be displayed one by one as the timer counts down.
Now, let's style the countdown timer using CSS. Add the following code to styles.css:
body {
  background-color: black;
  font-family: Arial, sans-serif;
  height: 100%;
}

.container {
  display: flex;
  flex-direction: column;
  justify-content: center;
  align-items: center;
}

.controls {
  width: 20%;
  margin-top: 10%;
  display: flex;
  justify-content: space-between;
  flex-direction: row;
  flex-wrap: wrap;
}

.countdown-container {
  position: relative;
  width: 20vw;
  height: 20vw;
  margin-top: 12%;
  border : 0.4em solid #9b51e0;
}

#startLabel span {
  display: none;
}

label {
  cursor: pointer;
  font-size: 1.5em;
  padding: 0.3em;
  background-color: #9b51e0;
  border-radius: 0.4em;
  color: white;
}

#startBtn:checked~#startLabel span:nth-child(1) {
  display: inline;
}

#startBtn:not(:checked)~#startLabel span:nth-child(2) {
  display: inline;
}

#startBtn:not(:checked)~#pauseLabel,
#pauseBtn {
  display: none;
}

#pauseLabel span {
  display: none;
}

#pauseBtn:checked~#pauseLabel span:nth-child(1) {
  display: inline;
}

#pauseBtn:not(:checked)~#pauseLabel span:nth-child(2) {
  display: inline;
}

.checkbox-wrapper {
  display: none;
}
In this CSS file, we start by setting some basic styles for the body and container. The body has a black background and uses the Arial font. The container is centered using flexbox and has a margin to push it down from the top of the viewport.
The controls div is styled to be responsive and to ensure that the buttons are spaced out evenly. The countdown-container div is styled with a border, which will later be replaced by the circular progress indicator.
We use the checkbox hack to toggle the visibility of the labels for the start and pause buttons. Depending on whether the checkboxes are checked or not, different spans within the labels are displayed. This allows the labels to show different text (Start or Stop, Pause or Resume) based on the state of the checkboxes.
Now, add the following code to the bottom of the styles.css file:
.countdown {
  position: relative;
  width: 100%;
  height: 100%;
  list-style: none;
  padding: 0;
  margin: 0;
  display: flex;
  justify-content: center;
  align-items: center;
  font-size: 5em;
  color: #9b51e0;
}

.countdown li {
  position: absolute;
  opacity: 0;
  transition: opacity 1s linear;
}

#startBtn:checked~.countdown-container .countdown li:nth-child(1) {
  animation-delay: 0s;
}

#startBtn:checked~.countdown-container .countdown li:nth-child(2) {
  animation-delay: 1s;
}

#startBtn:checked~.countdown-container .countdown li:nth-child(3) {
  animation-delay: 2s;
}

#startBtn:checked~.countdown-container .countdown li:nth-child(4) {
  animation-delay: 3s;
}

#startBtn:checked~.countdown-container .countdown li:nth-child(5) {
  animation-delay: 4s;
}

#startBtn:checked~.countdown-container .countdown li:nth-child(6) {
  animation-delay: 5s;
}

#startBtn:checked~.countdown-container .countdown li:nth-child(7) {
  animation-delay: 6s;
}

#startBtn:checked~.countdown-container .countdown li:nth-child(8) {
  animation-delay: 7s;
}

#startBtn:checked~.countdown-container .countdown li:nth-child(9) {
  animation-delay: 8s;
}

#startBtn:checked~.countdown-container .countdown li:nth-child(10) {
  animation-delay: 9s;
}

@keyframes countdownAnimation {
  0%,
  10% {
    opacity: 1;
  }
  11%,
  100% {
    opacity: 0;
  }
}

#startBtn:checked~.countdown-container .countdown li {
  animation: countdownAnimation 10s steps(10) forwards;
}

#pauseBtn:checked~.countdown-container .countdown li {
  animation-play-state: paused;
}
With this code, we style the countdown list. The countdown class is positioned absolutely within the countdown-container, and its list items are initially hidden with opacity: 0.
We then use keyframes and the animation property to create the countdown effect. The list items are displayed one by one with a delay using the animation-delay property. The countdownAnimation keyframes control the visibility of each list item, making them visible for a short period before hiding them again.
We also pause the animation when the pause button is checked, using the animation-play-state property.
Go back to your terminal and run the following command to start serving the CSS-only countdown application:
node server.js
Open a new tab in your browser, navigate to http://localhost:3002 URL, and you should see something similar to the following: 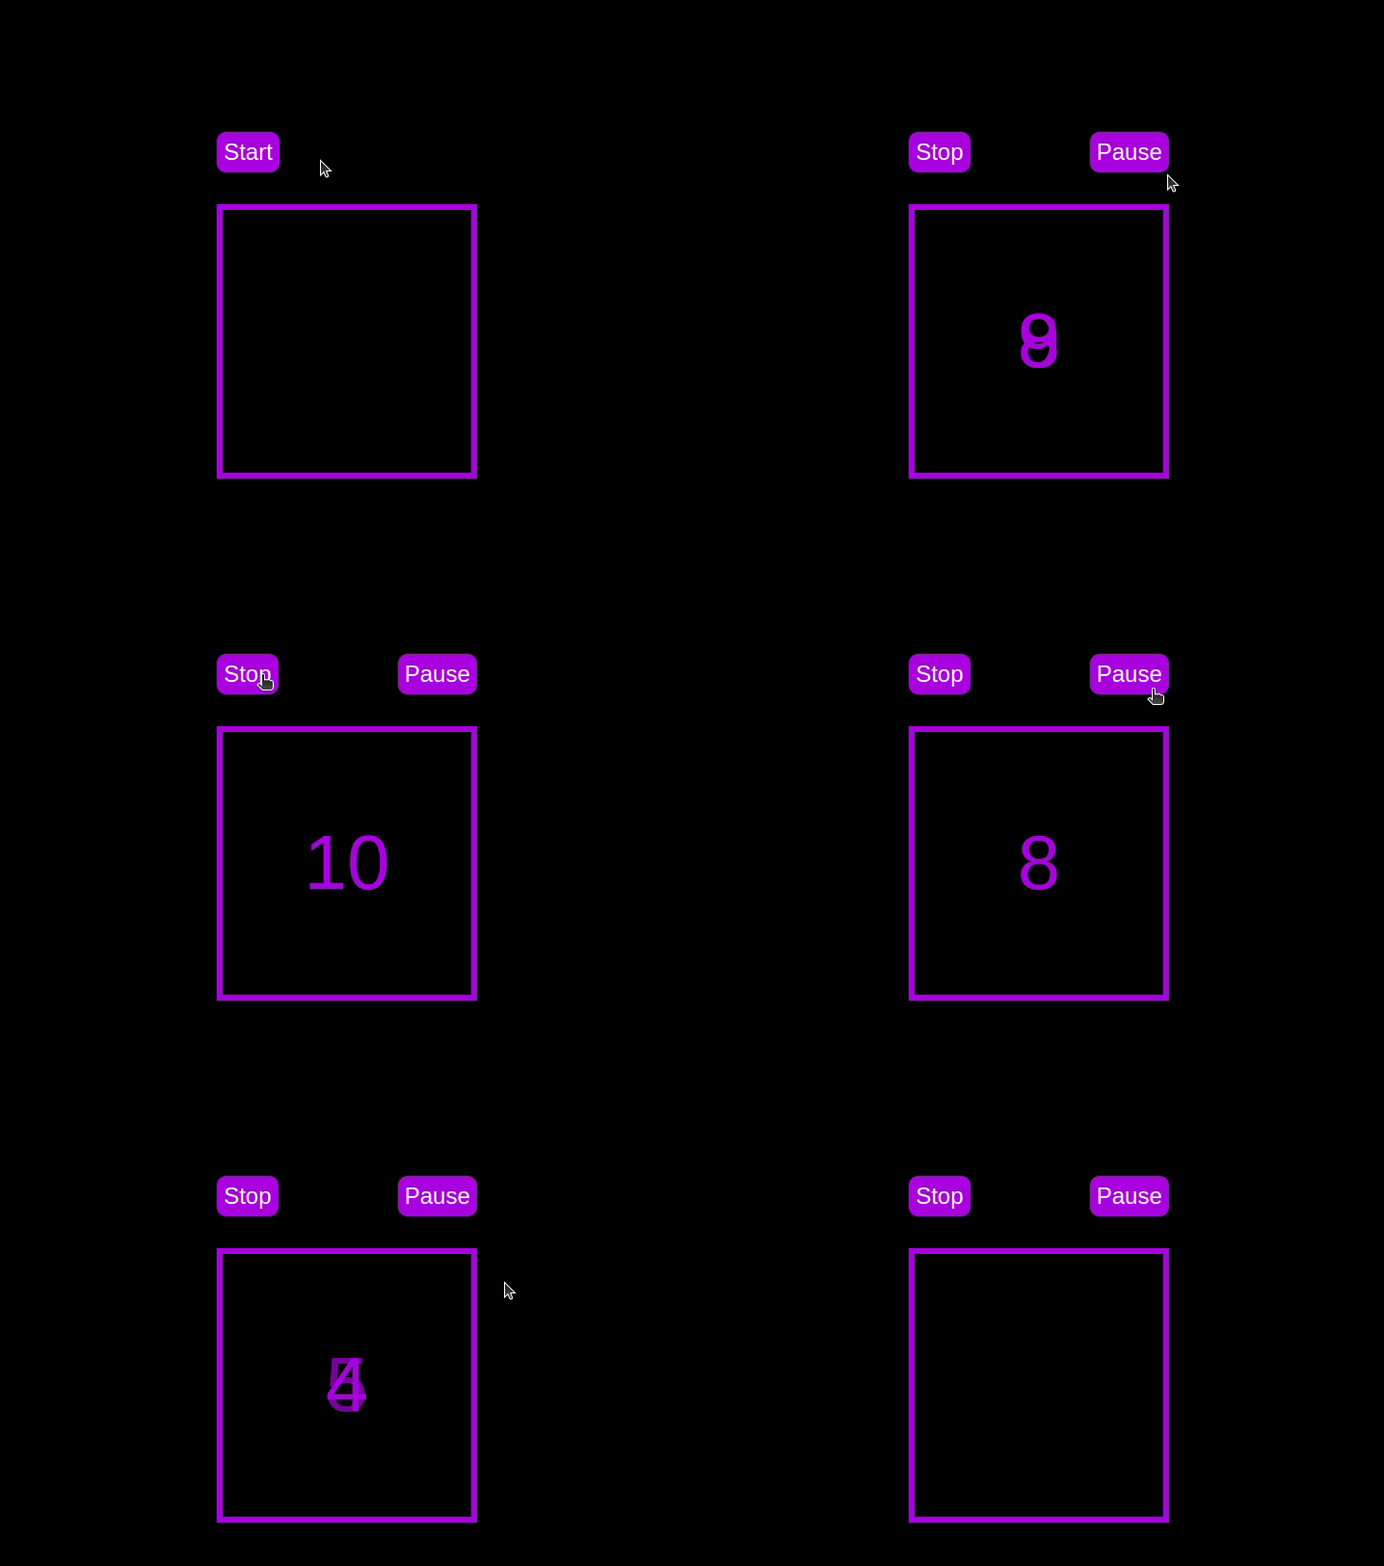 Test out the countdown timer and once you are done, terminate the server application and move to the next step.
To make the countdown timer more visually appealing, we can add a circular progress indicator that shows the remaining time. To do this, we will modify the HTML and CSS code as follows:
First, replace the countdown-container div in the index.html file with the following code:
<div class="countdown-container">
  <span class="circular-progress">
  </span>
  <ul class="countdown">
    <li>10</li>
    <li>9</li>
    <li>8</li>
    <li>7</li>
    <li>6</li>
    <li>5</li>
    <li>4</li>
    <li>3</li>
    <li>2</li>
    <li>1</li>
  </ul>
</div>
In this code, we add a span element with a class of circular-progress inside the countdown-container div.
Next, add the following code to the styles.css file:
.countdown-container {
  ...
  /* border : 0.4em solid #9b51e0; */
}

.circular-progress {
  width: 20vw;
  height: 20vw;
  border-radius: 50%;
  display: flex;
  justify-content: center;
  align-items: center;
  position: absolute;
  transition: 0.5s;
  background: conic-gradient(#9b51e0 var(--angle), #13171f 0deg);
}

.circular-progress::before {
  width: 18.5vw;
  height: 18.5vw;
  content: "";
  position: absolute;
  border-radius: 50%;
  background-color: black;
}

@keyframes circularProgressAnimation {
  to {
    --angle: 360deg;
  }
}

@property --angle {
  syntax: "<angle>";
  initial-value: 0deg;
  inherits: false;
}

#startBtn:checked~.countdown-container .circular-progress {
  opacity: 1;
  animation: circularProgressAnimation 10s linear;
}

#pauseBtn:checked~.countdown-container .circular-progress {
  animation-play-state: paused;
}
In this code, we first remove the border from the countdown-container div, and then add styles for the circular-progress class. The circular progress indicator is a span element that is absolutely positioned within the countdown-container. It uses a conic gradient to create the circular progress effect.
We also define a keyframe animation, circularProgressAnimation, that animates the progress indicator from 0 to 360 degrees over the duration of the countdown. The --angle CSS property is used to control the angle of the gradient.
Finally, we use the checkbox hack to start and pause the circular progress animation along with the countdown numbers. The animation is applied to the circular-progress span when the start button is checked and paused when the pause button is checked.
With these modifications, our countdown timer now includes a circular progress indicator that animates along with the timer.
Go back to your terminal and run the following command to start serving the CSS-only countdown application:
node server.js
Return to the tab in your browser where you visited the http://localhost:3002 URL, refresh the page, and you should see something similar to the following: 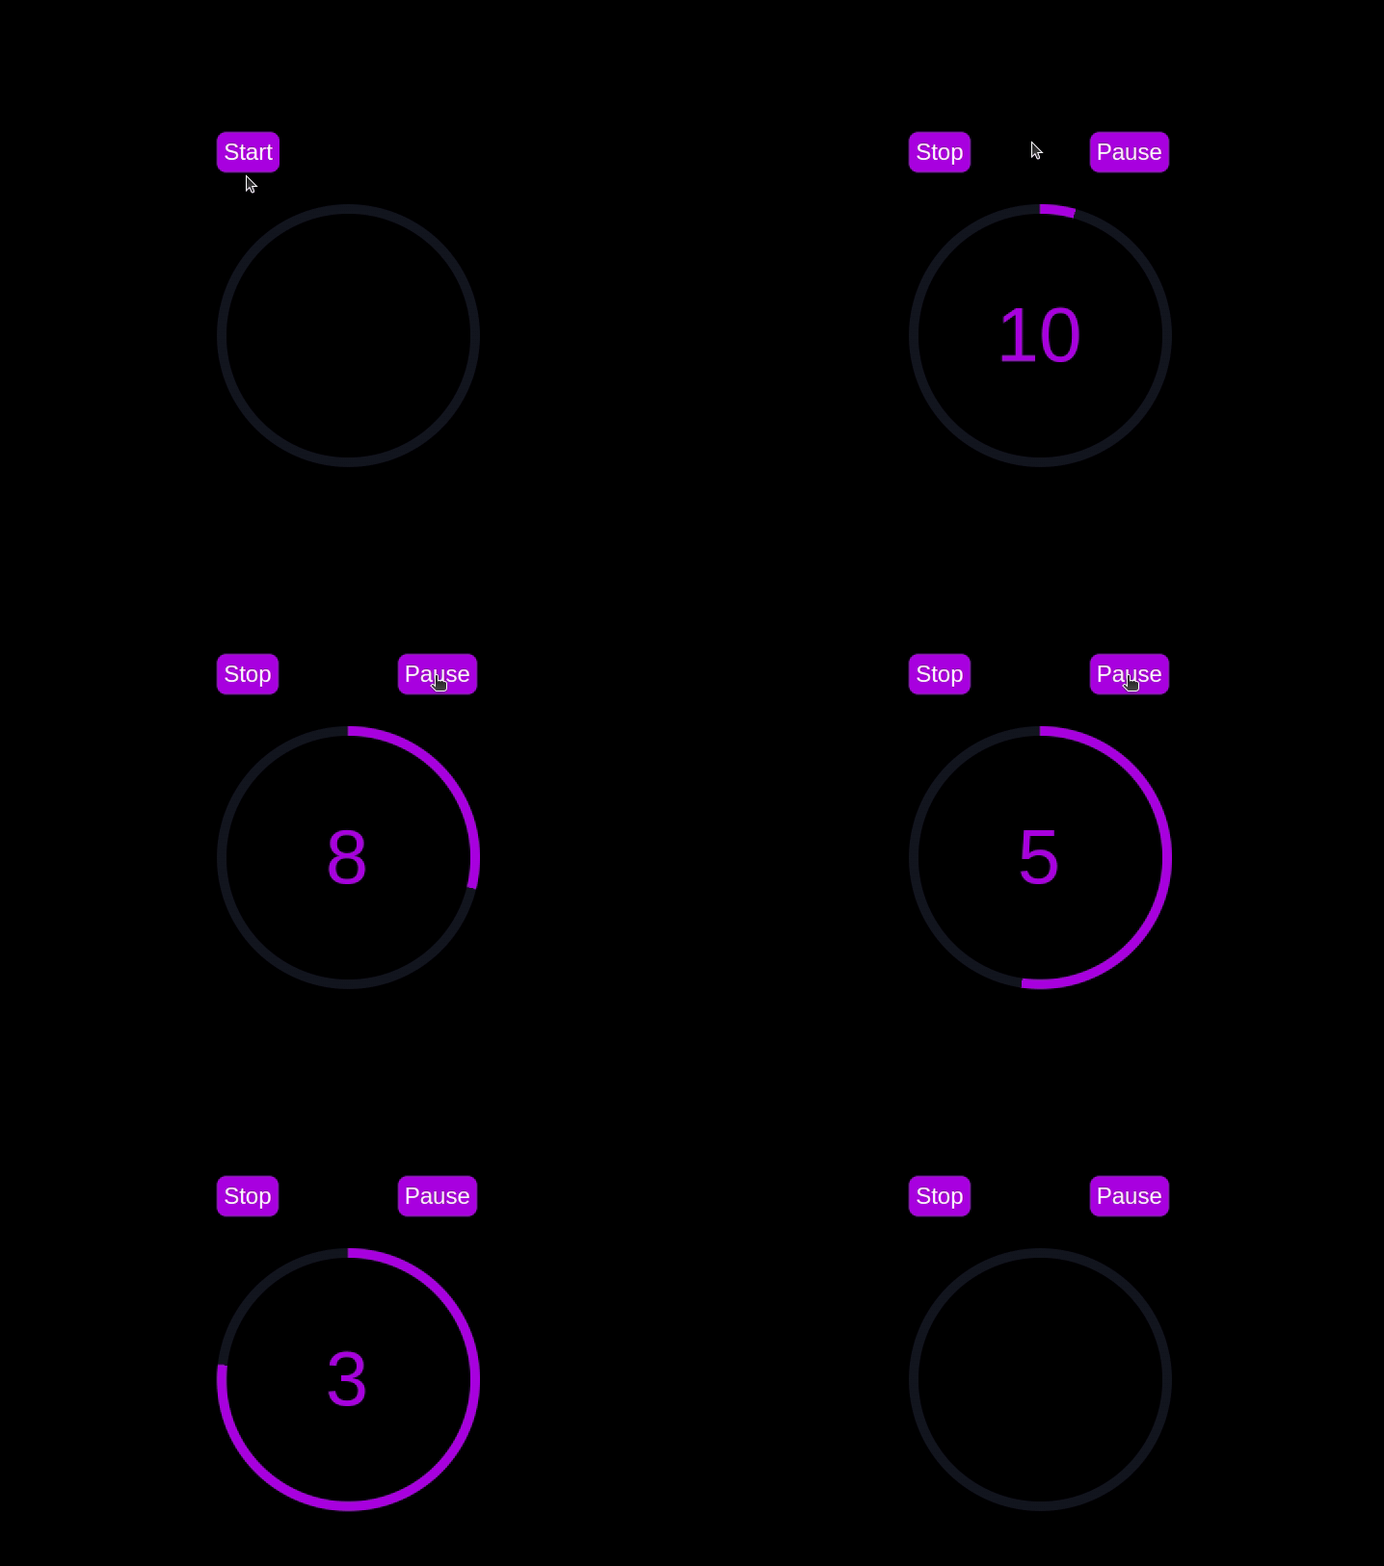
Now that we have implemented both the CSS-only and JavaScript countdown timers, let's compare their performance using Chrome DevTools.
To get started, open the Chrome browser and navigate to the webpage containing the countdown timers. Right-click anywhere on the page and select Inspect to open Chrome DevTools.
In the DevTools window, click on the Network tab and then refresh both the JavaScript and CSS-only countdown pages. This tab allows you to monitor all network requests made by the page, including HTML, CSS, JavaScript, and other resources: 
By analyzing the requests, you can determine how many resources are being loaded, their sizes, and the overall impact on page load time:
| CSS-only countdown timer | JavaScript countdown timer | |
|---|---|---|
| Number of requests | 2 | 3 |
| Total size | 4.5 KB | 4.7 KB |
| Page load | 24 ms | 27 ms |
Daripada keputusan ini, kita dapat melihat bahawa pemasa kira detik CSS sahaja memerlukan permintaan yang lebih sedikit dan mempunyai jumlah saiz yang lebih kecil sedikit berbanding pemasa kira detik JavaScript. Ini membawa kepada masa muat halaman yang sedikit lebih pantas untuk versi CSS sahaja, menjadikannya lebih cekap dari segi pemuatan awal.
Sekarang, dalam tetingkap DevTools, navigasi ke tab Prestasi dan mulakan sesi rakaman dengan mengklik butang Rekod. Untuk menilai pemasa undur JavaScript, klik pada butang Mula yang terletak pada halaman masing-masing dan benarkan pemasa menjalankan laluannya. Setelah pemasa berhenti, hentikan rakaman dalam tab Prestasi.
Lakukan proses ini untuk halaman kira detik JS dan CSS sahaja untuk mengumpulkan data prestasi bagi setiap pelaksanaan. Tab Prestasi menawarkan analisis menyeluruh tentang prestasi masa jalan halaman anda, merangkumi masa skrip, pemaparan dan lukisan. Dengan menganalisis metrik ini, anda boleh menentukan kawasan yang mungkin memerlukan pengoptimuman untuk meningkatkan prestasi aplikasi web anda:
| CSS-only countdown timer | JavaScript countdown timer | |
|---|---|---|
| Scripting | 2 ms | 49 ms |
| Rendering | 510 ms | 103 ms |
| Painting | 275 ms | 55 ms |
Bei der Interpretation dieser Ergebnisse stellen wir fest, dass die Skriptzeit für den reinen CSS-Countdown-Timer deutlich kürzer ist als für den JavaScript-Countdown-Timer, was auf einen minimalen Ausführungsaufwand hinweist. Der reine CSS-Countdown-Timer hat jedoch längere Render- und Malzeiten. Dies liegt daran, dass das Rendern von CSS-Animationen manchmal mehr Aufwand für den Browser erfordert, insbesondere bei komplexen Stilen oder Übergängen.
Im Gegensatz dazu zeigt der JavaScript-Countdown-Timer aufgrund der Logik beim Aktualisieren des Countdowns eine längere Skripterstellungszeit an, profitiert jedoch von kürzeren Rendering- und Malzeiten. Dies deutet darauf hin, dass JavaScript zwar einen gewissen Overhead in Bezug auf die Skriptausführung verursacht, es jedoch effizienter sein kann, wenn es um die Aktualisierung des DOM und das Rendern von Änderungen geht.
Insgesamt ist der Nur-CSS-Countdown-Timer effizienter für Szenarien, in denen die Minimierung der Skriptausführungszeit von entscheidender Bedeutung ist, während der JavaScript-Timer möglicherweise eine bessere Leistung erbringt, wenn die Render- und Zeichenzeiten im Vordergrund stehen.
Nachdem wir sowohl die reinen CSS- als auch die JavaScript-Countdown-Timer untersucht haben, wollen wir ihre Vor- und Nachteile abwägen, um herauszufinden, welcher Ansatz Ihren Anforderungen am besten entspricht.
Der Nur-CSS-Countdown-Timer nutzt reines CSS, um den Countdown-Effekt zu erzielen, und bietet so eine leichte und unkomplizierte Lösung.
Zu seinen Vorteilen gehören die folgenden:
Nachteile dieses Ansatzes sind:
Der JavaScript-Countdown-Timer hingegen verwendet JavaScript, um die Countdown-Logik und DOM-Updates zu verwalten. Dieser Ansatz bietet mehr Kontrolle und Flexibilität.
Zu den Vorteilen dieses Ansatzes gehören:
Zu den Nachteilen gehören:
Der reine CSS-Timer ist leichtgewichtig und leicht zu verstehen, was ihn zu einer guten Wahl für einfache Countdowns mit minimalem Skripting macht. Bei komplexeren Animationen und interaktiven Funktionen kann es jedoch zu Problemen kommen. Andererseits bietet der JavaScript-Timer mehr Kontrolle und Flexibilität und ermöglicht dynamischere Interaktionen. Dies geht mit einem höheren Skriptaufwand und erhöhter Komplexität einher.
Letztendlich hängt die Wahl zwischen den beiden Ansätzen von den spezifischen Anforderungen Ihres Projekts und den Kompromissen ab, die Sie bereit sind zu akzeptieren.
In diesem Tutorial haben wir zwei Methoden zum Erstellen eines Countdown-Timers untersucht: die Verwendung von JavaScript und die ausschließliche Verwendung von CSS. Wir begannen mit einem einfachen JavaScript-Countdown-Timer und fügten Funktionalität und Stil hinzu, um ihn benutzerfreundlich und optisch ansprechend zu gestalten. Anschließend haben wir einen reinen CSS-Countdown-Timer implementiert, der die Leistungsfähigkeit von CSS für die Erstellung einfacher, aber effektiver Animationen demonstriert.
Ganz gleich, ob Sie den reinen CSS-Ansatz wegen seiner Einfachheit oder den JavaScript-Ansatz wegen seiner Flexibilität wählen, Sie verfügen jetzt über die Tools und das Wissen, um einen Countdown-Timer zu implementieren, der den Anforderungen Ihres Projekts entspricht.
Da Web-Frontends immer komplexer werden, fordern ressourcenintensive Funktionen immer mehr vom Browser. Wenn Sie daran interessiert sind, die clientseitige CPU-Nutzung, Speichernutzung und mehr für alle Ihre Benutzer in der Produktion zu überwachen und zu verfolgen, probieren Sie LogRocket aus.
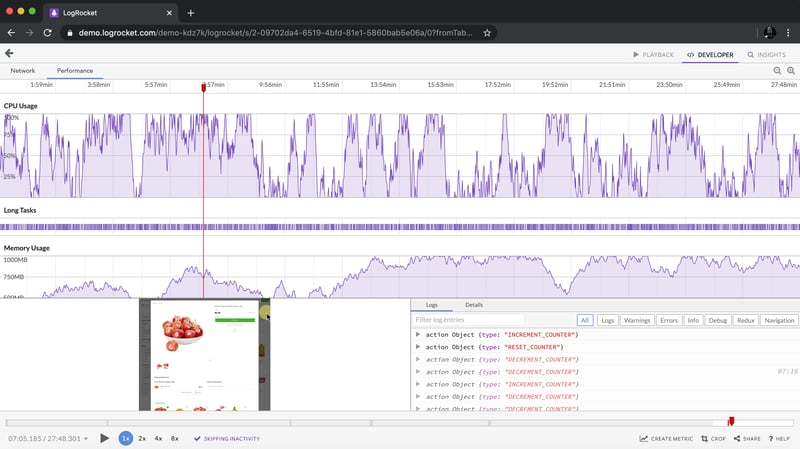
LogRocket ist wie ein DVR für Web- und mobile Apps und zeichnet alles auf, was in Ihrer Web-App, mobilen App oder Website passiert. Anstatt zu erraten, warum Probleme auftreten, können Sie wichtige Frontend-Leistungsmetriken zusammenfassen und darüber berichten, Benutzersitzungen zusammen mit dem Anwendungsstatus wiedergeben, Netzwerkanfragen protokollieren und alle Fehler automatisch aufdecken.
Modernisieren Sie die Art und Weise, wie Sie Web- und mobile Apps debuggen – beginnen Sie mit der kostenlosen Überwachung.
Das obige ist der detaillierte Inhalt vonSo erstellen Sie einen Countdown-Timer mit CSS. Für weitere Informationen folgen Sie bitte anderen verwandten Artikeln auf der PHP chinesischen Website!
 Seriennummer der pscs5-Installation
 Der Unterschied zwischen Win10-Ruhezustand und Ruhezustand
 Methoden zur Verhinderung von CC-Angriffen
 Beliebte Erklärung, was Metaverse XR bedeutet
 Wo ist der PR-Ein- und Ausblendeffekt?
 Eingabemethode für abgeleitete Symbole
 So aktualisieren Sie den DNS-Cache
 Die Hauptgefahren von Trojanern


