Correction status:qualified
Teacher's comments:这个总结, 一定要记住哟


<!DOCTYPE html>
<html lang="en">
<head>
    <meta charset="UTF-8">
    <link rel="stylesheet" href="static/css/style2.css">
    <title>清华大学EMBA课程表</title>
</head>
<body>
<!--一个表单有 table  标题caption  表头thead  表主体tbody 等构成-->
<table>
    <caption>清华大学EMBA课程表</caption>
    <thead>
    <tr>
        <th>星期</th>
        <th>星期一</th>
        <th>星期二</th>
        <th>星期三</th>
        <th>星期四</th>
        <th>星期五</th>
    </tr>
    </thead>
    <tbody>
    <tr>
        <td rowspan="3">上午<br>9:00-11:50</td>
        <td>入门</td>
        <td>入门</td>
        <td>进阶</td>
        <td>进阶</td>
        <td>进阶</td>
    </tr>
    <tr>
        <td>入门</td>
        <td>入门</td>
        <td>进阶</td>
        <td>进阶</td>
        <td>进阶</td>
    </tr>
    <tr>
        <td>入门</td>
        <td>入门</td>
        <td>进阶</td>
        <td>进阶</td>
        <td>进阶</td>
    </tr>
    <tr>
        <td rowspan="2">下午<br>14:00-17:50</td>
        <td>入门</td>
        <td>入门</td>
        <td>进阶</td>
        <td>进阶</td>
        <td>进阶</td>
    </tr>
    <tr>
        <td>入门</td>
        <td>入门</td>
        <td>进阶</td>
        <td>进阶</td>
        <td>进阶</td>
    </tr>
    </tbody>
    <tfoot>
    <tr>
        <td>备注:</td>
        <td colspan="5">一周快速毕业,轻松走向人生巅峰</td>
    </tr>
    </tfoot>
</table>

</body>
</html>
点击 "运行实例" 按钮查看在线实例
table {
    border: 1px solid darkslategrey;
    border-collapse: separate;
    border-spacing: 0;
    width: 800px;
    margin: 20px auto;
    box-shadow: 1px 1px 1px darkslategrey;
    position: relative;
    border-radius: 20px;
    overflow: hidden;

}

th,td {
    border: 1px solid darkslategrey;
    text-align: center;
    padding: 10px;

}


table caption {
    font-size: 1.5rem;
    margin-bottom: 10px;
    font-weight: bolder;

}

table thead > tr:first-of-type {
    background-color: cornflowerblue;
}
/*这个地方要多注意实际应用*/
table tbody > tr:first-of-type > td:first-of-type {
    background-color: moccasin;
}
table tbody > tr:nth-last-of-type(2) > td:first-of-type {
    background-color: salmon;
}
table tfoot > tr:last-of-type {
    background-color: #8abeb7;
}

table:before {
    content: '';
    width: 800px;
    height: 295px;
    position: absolute;
    left: 0;
    top: 45px;
    background-image: url("images/banner1.jpg");
    background-size: cover;
    opacity: 0.2;
    border-radius: 20px;

}

/*设置表格圆角*/
table tr:first-child th:first-child {
    border-top-left-radius: 12px;
}

table tr:first-child th:last-child {
    border-top-right-radius: 12px;
}
tfoot tr:last-child td:first-child {
    border-bottom-left-radius: 12px;
}

tfoot tr:last-child td:last-child {
    border-bottom-right-radius: 12px;
}点击 "运行实例" 按钮查看在线实例
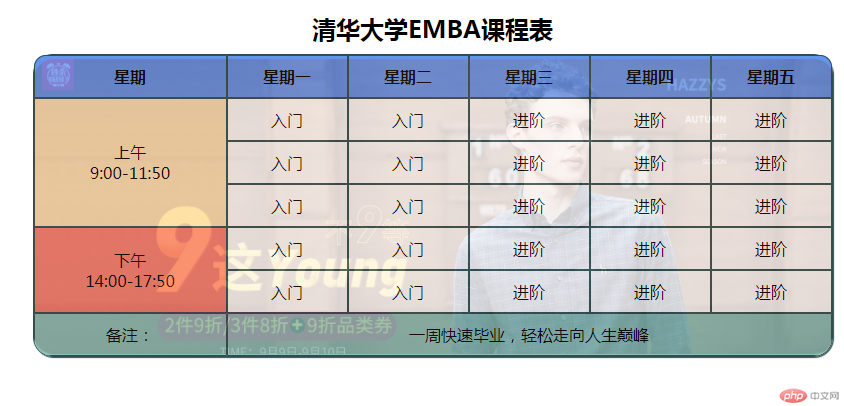
运行后效果图:
 总结:
总结:
border-collapse: separate; border-spacing: 0;这两个值要注意,如果用 border-collapse:collapse是不行的。
分别从四个角入手设置圆角,下方的圆角可以从tfoot下手来解决。