

keepalive是vue3中的一个全局组件
keepalive 本身不会渲染出来,也不会出现在dom节点当中,但是它会被渲染为vnode,通过vnode可以跟踪到keepalive中的cache和keys,当然也是在开发环境才可以,build打包以后没有暴露到vnode中(这个还要再确认一下)
keepalive 最重要的功能就是缓存组件
keepalive 通过LRU缓存淘汰策略来更新组件缓存,可以更有效的利用内存,防止内存溢出,源代码中的最大缓存数max为10,也就是10个组件之后,就开始淘汰最先被缓存的组件了
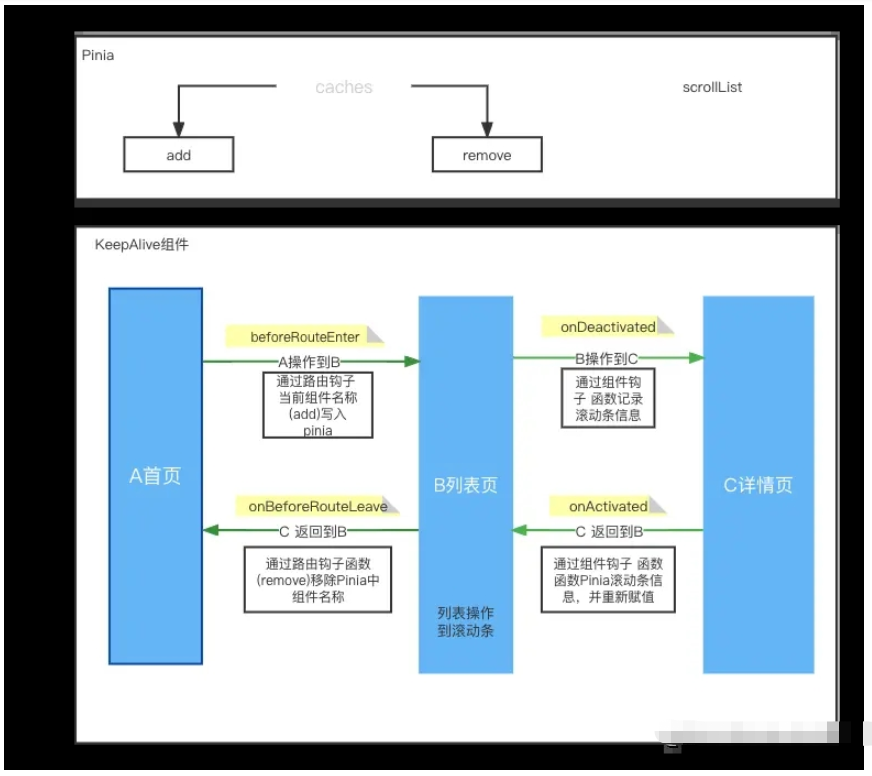
这里先假设一个场景: A页面是首页=====> B页面列表页面(需要缓存的页面)=======> C 详情页 由C详情页到到B页面的时候,要返回到B的缓存页面,包括页面的基础数据和列表的滚动条位置信息 如果由B页面返回到A页面,则需要将B的缓存页清空
上述另外一个场景:进入页面直接缓存,然后就结束了,这个比较简单本文就不讨论了
keepalive组件总共有三个参数
include:可传字符串、正则表达式、数组,名称匹配成功的组件会被缓存
exclude:可传字符串、正则表达式、数组,名称匹配成功的组件不会被缓存
max:可传数字,限制缓存组件的最大数量,默认为10
首先在App.vue根代码中添加引入keepalive组件,通过这里可以发现,我这里缓存的相当于整个页面,当然你也可以进行更细粒度的控制页面当中的某个区域组件
通过App.vue可以发现,通过pinia(也就是vue2中使用的vuex)保存要缓存的页面组件, 来处理include缓存,和保存页面组件中的滚动条信息数据
import { defineStore } from "pinia"; export const useKeepAliverStore = defineStore("useKeepAliverStore", { state: () => ({ caches: [] as any, scrollList: new Map(), // 缓存页面组件如果又滚动条的高度 }), actions: { add(name: string) { this.caches.push(name); }, remove(name: string) { console.log(this.caches, 'this.caches') this.caches = this.caches.filter((item: any) => item !== name); console.log(this.caches, 'this.caches') }, clear() { this.caches = [] } } });
组件路由刚刚切换时,通过beforeRouteEnter将组件写入include, 此时组件生命周期还没开始。如果都已经开始执行组件生命周期了,再写入就意义了。
所以这个钩子函数就不能写在setup中,要单独提出来写。当然你也可以换成路由的其他钩子函数处理beforeEach,但这里面使用的话,好像使用不了pinia,这个还需要进一步研究一下。
import { useRoute, useRouter, onBeforeRouteLeave } from "vue-router"; import { useKeepAliverStore } from "@/store"; const useStore = useKeepAliverStore() export default { name:"record-month", beforeRouteEnter(to, from, next) { next(vm => { if(from.name === 'Home' && to.name === 'record-month') { useStore.add(to.name) } }); } }
组件路由离开时判断,是否要移出缓存,这个钩子就直接写在setup中就可以了。
onBeforeRouteLeave((to, from) => { console.log(to.name, "onBeforeRouteLeave"); if (to.name === "new-detection-detail") { console.log(to, from, "进入详情页面不做处理"); } else { useStore.remove(from.name) console.log(to, from, "删除组件缓存"); } });
在keepalive两个钩子函数中进行处理scroll位置的缓存,onActivated中获取缓存中的位置, onDeactivated记录位置到缓存
onActivated(() => { if(useStore.scrollList.get(routeName)) { const top = useStore.scrollList.get(routeName) refList.value.setScrollTop(Number(top)) } }); onDeactivated(() => { const top = refList.value.getScrollTop() useStore.scrollList.set(routeName, top) });
这里定义一个方法,设置scrollTop使用了原生javascript的api
const setScrollTop = (value: any) => { const dom = document.querySelector('.van-pull-refresh') dom!.scrollTop = value }
同时高度怎么获取要先注册scroll事件,然后通过getScrollTop 获取当前滚动条的位置进行保存即可
onMounted(() => { scrollDom.value = document.querySelector('.van-pull-refresh') as HTMLElement const throttledFun = useThrottleFn(() => { console.log(scrollDom.value?.scrollTop, 'addEventListener') state.scrollTop = scrollDom.value!.scrollTop }, 500) if(scrollDom.value) { scrollDom.value.addEventListener('scroll',throttledFun) } }) const getScrollTop = () => { console.log('scrollDom.vaue', scrollDom.value?.scrollTop) return state.scrollTop }
上面注册scroll事件中使用了一个useThrottleFn,这个类库是@vueuse/core中提供的,其中封装了很多工具都非常不错,用兴趣的可以研究研究
https://vueuse.org/shared/usethrottlefn/#usethrottlefn
此时也可以查看找到实例的vnode查找到keepalive,是在keepalive紧挨着的子组件里
const instance = getCurrentInstance() console.log(instance.vnode.parent) // 这里便是keepalive组件vnode // 如果是在开发环境中可以查看到cache对象 instance.vnode.parent.__v_cache // vue源码中,在dev环境对cache进行暴露,生产环境是看不到的 if (__DEV__ || __FEATURE_PROD_DEVTOOLS__) { ;(instance as any).__v_cache = cache }
1、克隆代码
git clone git@github.com:vuejs/core.git
2、安装依赖
pnpm i
3、如果不能使用pnpm,可以先通过npm安装一下
npm i pnpm -g
4、安装完成以后,找到根目录package.json文件中的scripts
// 在dev命令后添加 --source-map是从已转换的代码,映射到原始的源文件 "dev": "node scripts/dev.js --sourcemap"
参考 https://www.yisu.com/article/154583.htm
5、执行pnpm run dev则会build vue源码
pnpm run dev //则会出现以下,代表成功了(2022年5月27日),后期vue源代码作者可能会更新,相应的提示可能发生变更,请注意一下 > @3.2.36 dev H:\github\sourceCode\core > node scripts/dev.js --sourcemap watching: packages\vue\dist\vue.global.js //到..\..\core\packages\vue\dist便可以看到编译成功,以及可以查看到examples样例demo页面
6、然后在 ....\core\packages\vue\examples\composition中添加一个aehyok.html文件,将如下代码进行拷贝,然后通过chrome浏览器打开,F12,找到源代码的Tab页面,通过快捷键Ctrl+ P 输入KeepAlive便可以找到这个组件,然后通过左侧行标右键就可以添加断点,进行调试,也可以通过右侧的【调用堆栈】进行快速跳转代码进行调试。
Hello WorldHello WorldHello World
7、调试源码发现 keepalive中的render函数(或者说时setup中的return 函数)在子组件切换时就会去执行,变更逻辑缓存
第一次进入页面初始化keepalive组件会执行一次,
然后点击组件一,再次执行render函数
然后点击组件二,会再次执行render函数
8、调试截图说明
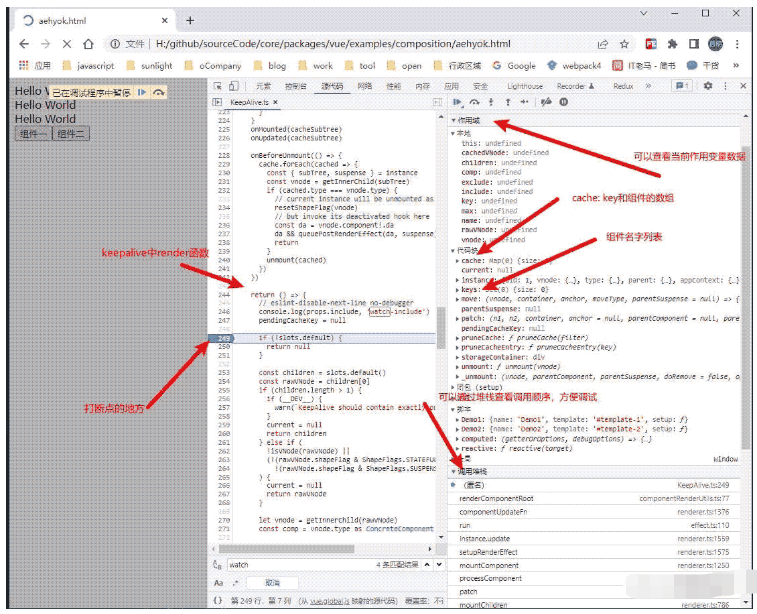
通过查看vue3 KeepAlive.ts源码
// 在setup初始化中,先获取keepalive实例 // getCurrentInstance() 可以获取当前组件的实例 const instance = getCurrentInstance()! // KeepAlive communicates with the instantiated renderer via the // ctx where the renderer passes in its internals, // and the KeepAlive instance exposes activate/deactivate implementations. // The whole point of this is to avoid importing KeepAlive directly in the // renderer to facilitate tree-shaking. const sharedContext = instance.ctx as KeepAliveContext // if the internal renderer is not registered, it indicates that this is server-side rendering, // for KeepAlive, we just need to render its children /// SSR 判断,暂时可以忽略掉即可。 if (__SSR__ && !sharedContext.renderer) { return () => { const children = slots.default && slots.default() return children && children.length === 1 ? children[0] : children } } // 通过Map存储缓存vnode, // 通过Set存储缓存的key(在外面设置的key,或者vnode的type) const cache: Cache = new Map() const keys: Keys = new Set() let current: VNode | null = null if (__DEV__ || __FEATURE_PROD_DEVTOOLS__) { ;(instance as any).__v_cache = cache } const parentSuspense = instance.suspense const { renderer: { p: patch, m: move, um: _unmount, o: { createElement } } } = sharedContext // 创建了隐藏容器 const storageContainer = createElement('div') // 在实例上注册两个钩子函数 activate, deactivate sharedContext.activate = (vnode, container, anchor, isSVG, optimized) => { const instance = vnode.component! move(vnode, container, anchor, MoveType.ENTER, parentSuspense) // in case props have changed patch( instance.vnode, vnode, container, anchor, instance, parentSuspense, isSVG, vnode.slotScopeIds, optimized ) queuePostRenderEffect(() => { instance.isDeactivated = false if (instance.a) { invokeArrayFns(instance.a) } const vnodeHook = vnode.props && vnode.props.onVnodeMounted if (vnodeHook) { invokeVNodeHook(vnodeHook, instance.parent, vnode) } }, parentSuspense) if (__DEV__ || __FEATURE_PROD_DEVTOOLS__) { // Update components tree devtoolsComponentAdded(instance) } } sharedContext.deactivate = (vnode: VNode) => { const instance = vnode.component! move(vnode, storageContainer, null, MoveType.LEAVE, parentSuspense) queuePostRenderEffect(() => { if (instance.da) { invokeArrayFns(instance.da) } const vnodeHook = vnode.props && vnode.props.onVnodeUnmounted if (vnodeHook) { invokeVNodeHook(vnodeHook, instance.parent, vnode) } instance.isDeactivated = true }, parentSuspense) if (__DEV__ || __FEATURE_PROD_DEVTOOLS__) { // Update components tree devtoolsComponentAdded(instance) } } // 组件卸载 function unmount(vnode: VNode) { // reset the shapeFlag so it can be properly unmounted resetShapeFlag(vnode) _unmount(vnode, instance, parentSuspense, true) } // 定义 include和exclude变化时,对缓存进行动态处理 function pruneCache(filter?: (name: string) => boolean) { cache.forEach((vnode, key) => { const name = getComponentName(vnode.type as ConcreteComponent) if (name && (!filter || !filter(name))) { pruneCacheEntry(key) } }) } function pruneCacheEntry(key: CacheKey) { const cached = cache.get(key) as VNode if (!current || cached.type !== current.type) { unmount(cached) } else if (current) { // current active instance should no longer be kept-alive. // we can't unmount it now but it might be later, so reset its flag now. resetShapeFlag(current) } cache.delete(key) keys.delete(key) } // 可以发现通过include 可以配置被显示的组件, // 当然也可以设置exclude来配置不被显示的组件, // 组件切换时随时控制缓存 watch( () => [props.include, props.exclude], ([include, exclude]) => { include && pruneCache(name => matches(include, name)) exclude && pruneCache(name => !matches(exclude, name)) }, // prune post-render after `current` has been updated { flush: 'post', deep: true } ) // 定义当前组件Key // cache sub tree after render let pendingCacheKey: CacheKey | null = null // 这是一个重要的方法,设置缓存 const cacheSubtree = () => { // fix #1621, the pendingCacheKey could be 0 if (pendingCacheKey != null) { cache.set(pendingCacheKey, getInnerChild(instance.subTree)) } } onMounted(cacheSubtree) onUpdated(cacheSubtree) // 组件卸载的时候,对缓存列表进行循环判断处理 onBeforeUnmount(() => { cache.forEach(cached => { const { subTree, suspense } = instance const vnode = getInnerChild(subTree) if (cached.type === vnode.type) { // current instance will be unmounted as part of keep-alive's unmount resetShapeFlag(vnode) // but invoke its deactivated hook here const da = vnode.component!.da da && queuePostRenderEffect(da, suspense) return } unmount(cached) }) }) // 同时在keepAlive组件setup生命周期中,return () => {} 渲染的时候,对组件进行判断逻辑处理,同样对include和exclude判断渲染。 // 判断keepalive组件中的子组件,如果大于1个的话,直接警告处理了 // 另外如果渲染的不是虚拟dom(vNode),则直接返回渲染即可。 return () => { // eslint-disable-next-line no-debugger console.log(props.include, 'watch-include') pendingCacheKey = null if (!slots.default) { return null } const children = slots.default() const rawVNode = children[0] if (children.length > 1) { if (__DEV__) { warn(`KeepAlive should contain exactly one component child.`) } current = null return children } else if ( !isVNode(rawVNode) || (!(rawVNode.shapeFlag & ShapeFlags.STATEFUL_COMPONENT) && !(rawVNode.shapeFlag & ShapeFlags.SUSPENSE)) ) { current = null return rawVNode } // 接下来处理时Vnode虚拟dom的情况,先获取vnode let vnode = getInnerChild(rawVNode) // 节点类型 const comp = vnode.type as ConcreteComponent // for async components, name check should be based in its loaded // inner component if available // 获取组件名称 const name = getComponentName( isAsyncWrapper(vnode) ? (vnode.type as ComponentOptions).__asyncResolved || {} : comp ) //这个算是最熟悉的通过props传递进行的参数,进行解构 const { include, exclude, max } = props // include判断 组件名称如果没有设置, 或者组件名称不在include中, // exclude判断 组件名称有了,或者匹配了 // 对以上两种情况都不进行缓存处理,直接返回当前vnode虚拟dom即可。 if ( (include && (!name || !matches(include, name))) || (exclude && name && matches(exclude, name)) ) { current = vnode return rawVNode } // 接下来开始处理有缓存或者要缓存的了 // 先获取一下vnode的key设置,然后看看cache缓存中是否存在 const key = vnode.key == null ? comp : vnode.key const cachedVNode = cache.get(key) // 这一段可以忽略了,好像时ssContent相关,暂时不管了,没看明白?? // clone vnode if it's reused because we are going to mutate it if (vnode.el) { vnode = cloneVNode(vnode) if (rawVNode.shapeFlag & ShapeFlags.SUSPENSE) { rawVNode.ssContent = vnode } } // 上面判断了,如果没有设置key,则使用vNode的type作为key值 pendingCacheKey = key //判断上面缓存中是否存在vNode // if 存在的话,就将缓存中的vnode复制给当前的vnode // 同时还判断了组件是否为过渡组件 transition,如果是的话 需要注册过渡组件的钩子 // 同时先删除key,然后再重新添加key // else 不存在的话,就添加到缓存即可 // 并且要判断一下max最大缓存的数量是否超过了,超过了,则通过淘汰LPR算法,删除最旧的一个缓存 // 最后又判断了一下是否为Suspense。也是vue3新增的高阶组件。 if (cachedVNode) { // copy over mounted state vnode.el = cachedVNode.el vnode.component = cachedVNode.component if (vnode.transition) { // recursively update transition hooks on subTree setTransitionHooks(vnode, vnode.transition!) } // avoid vnode being mounted as fresh vnode.shapeFlag |= ShapeFlags.COMPONENT_KEPT_ALIVE // make this key the freshest keys.delete(key) keys.add(key) } else { keys.add(key) // prune oldest entry if (max && keys.size > parseInt(max as string, 10)) { pruneCacheEntry(keys.values().next().value) } } // avoid vnode being unmounted vnode.shapeFlag |= ShapeFlags.COMPONENT_SHOULD_KEEP_ALIVE current = vnode return isSuspense(rawVNode.type) ? rawVNode : vnode
以上是vue3 keepalive线上问题怎么解决的详细内容。更多信息请关注PHP中文网其他相关文章!


