工作场景中遇到这样一个需求:根据主机的 IP 地址联动更新其他模型的相关信息。需求很简单,只涉及一般的数据库联动查询以及更新操作,然而在编码实现过程中发现,由于主机的数量很多,导致循环遍历查询、更新时花费很长的时间,调用一次接口大概需要 30-40 min 时间才能完成操作。
因此,为了有效缩短接口方法的执行时间,便考虑使用多线程并发编程方法,利用多核处理器并行执行的能力,通过异步处理数据的方式,便可以大大缩短执行时间,提高执行效率。
这里使用可重用固定线程数的线程池 FixedThreadPool,并使用 CountDownLatch 并发工具类提供的并发流程控制工具作为配合使用,保证多线程并发编程过程中的正常运行:
首先,通过 Runtime.getRuntime().availableProcessors() 方法获取运行机器的 CPU 线程数,用于后续设置固定线程池的线程数量。
其次,判断任务的特性,如果为计算密集型任务则设置线程数为 CPU 线程数+1,如果为 IO 密集型任务则设置线程数为 2 * CPU 线程数,由于在方法中需要与数据库进行频繁的交互,因此属于 IO 密集型任务。
之后,对数据进行分组切割,每个线程处理一个分组的数据,分组的组数与线程数保持一致,并且还要创建计数器对象 CountDownLatch,调用构造函数,初始化参数值为线程数个数,保证主线程等待所有子线程运行结束后,再进行后续的操作。
然后,调用 executorService.execute() 方法,重写 run 方法编写业务逻辑与数据处理代码,执行完当前线程后记得将计数器减1操作。最后,当所有子线程执行完成后,关闭线程池。
在省略工作场景中的业务逻辑代码后,通用的处理方法示例如下所示:
public ResponseData updateHostDept() {
		// ...
		List<Map> hostMapList = mongoTemplate.find(query, Map.class, "host");
        // split the hostMapList for the following multi-threads task
        // return the number of logical CPUs
        int processorsNum = Runtime.getRuntime().availableProcessors();
        // set the threadNum as 2*(the number of logical CPUs) for handling IO Tasks,
        // if Computing Tasks set the threadNum as (the number of logical  CPUs) + 1
        int threadNum = processorsNum * 2;
        // the number of each group data
        int eachGroupNum = hostMapList.size() / threadNum;
        List<List<Map>> groupList = new ArrayList<>();
        for (int i = 0; i < threadNum; i++) {
            int start = i * eachGroupNum;
            if (i == threadNum - 1) {
                int end = mapList.size();
                groupList.add(hostMapList.subList(start, end));
            } else {
                int end = (i+1) * eachGroupNum;
                groupList.add(hostMapList.subList(start, end));
            }
        }
        // update data by using multi-threads asynchronously
        ExecutorService executorService = Executors.newFixedThreadPool(threadNum/2);
        CountDownLatch countDownLatch = new CountDownLatch(threadNum);
        for (List<Map> group : groupList) {
            executorService.execute(()->{
                try {
                    for (Map map : group) {
                    	// update the data in mongodb
                    }
                } catch (Exception e) {
                    e.printStackTrace();
                } finally {
                	// let counter minus one
                    countDownLatch.countDown();
                }
            });
        }
        try {
        	// main thread donnot execute until all child threads finish
            countDownLatch.await();
        } catch (Exception e) {
            e.printStackTrace();
        }
        // remember to shutdown the threadPool
        executorService.shutdown();
        return ResponseData.success();
}那么在使用多线程异步更新的策略后,从当初调用接口所需的大概时间为 30-40 min 下降到了 8-10 min,大大提高了执行效率。
需要注意的是,这里使用的
newFixedThreadPool创建线程池,它有一个缺陷就是,它的阻塞队列默认是一个无界队列,默认值为Integer.MAX_VALUE极有可能会造成 OOM 问题。因此,一般可以使用ThreadPoolExecutor来创建线程池,自己可以指定等待队列中的线程个数,避免产生 OOM 问题。
public ResponseData updateHostDept() {
		// ...
		List<Map> hostMapList = mongoTemplate.find(query, Map.class, "host");
        // split the hostMapList for the following multi-threads task
        // return the number of logical CPUs
        int processorsNum = Runtime.getRuntime().availableProcessors();
        // set the threadNum as 2*(the number of logical CPUs) for handling IO Tasks,
        // if Computing Tasks set the threadNum as (the number of logical  CPUs) + 1
        int threadNum = processorsNum * 2;
        // the number of each group data
        int eachGroupNum = hostMapList.size() / threadNum;
        List<List<Map>> groupList = new ArrayList<>();
        for (int i = 0; i < threadNum; i++) {
            int start = i * eachGroupNum;
            if (i == threadNum - 1) {
                int end = mapList.size();
                groupList.add(hostMapList.subList(start, end));
            } else {
                int end = (i+1) * eachGroupNum;
                groupList.add(hostMapList.subList(start, end));
            }
        }
        // update data by using multi-threads asynchronously
        ThreadPoolExecutor executor = new ThreadPoolExecutor(5, 8, 30L, TimeUnit.SECONDS,
                new ArrayBlockingQueue<>(100));
        CountDownLatch countDownLatch = new CountDownLatch(threadNum);
        for (List<Map> group : groupList) {
            executor.execute(()->{
                try {
                    for (Map map : group) {
                    	// update the data in mongodb
                    }
                } catch (Exception e) {
                    e.printStackTrace();
                } finally {
                	// let counter minus one
                    countDownLatch.countDown();
                }
            });
        }
        try {
        	// main thread donnot execute until all child threads finish
            countDownLatch.await();
        } catch (Exception e) {
            e.printStackTrace();
        }
        // remember to shutdown the threadPool
        executor.shutdown();
        return ResponseData.success();
}在上述的代码中,核心线程数和最大线程数分别为 5 和 8,并没有设置的很大的值,因为如果如果设置的很大,线程间频繁的上下文切换也会增加时间消耗,反而不能最大程度上发挥多线程的优势。至于如何选择合适的参数,需要根据机器的参数以及任务的类型综合考虑决定。
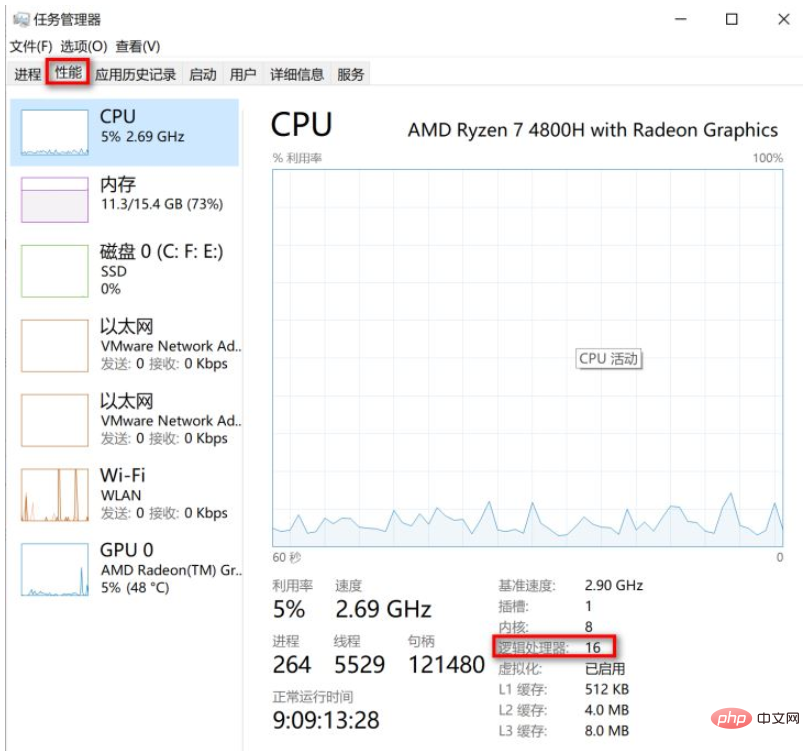
最后补充一点,如果想要通过非编码的方式获取机器的 CPU 线程个数也很简单,windows 系统通过任务管理器,选择 “性能”,便可以查看 CPU 线程个数的情况,如下图所示:

从上图可以看到,我的机器中内核是八个 CPU,但是通过超线程技术一个物理的 CPU 核心可以模拟成两个逻辑 CPU 线程,因此我的机器是支持8核16线程的。
以上是Java多线程并发编程提高数据处理效率是多少的详细内容。更多信息请关注PHP中文网其他相关文章!


