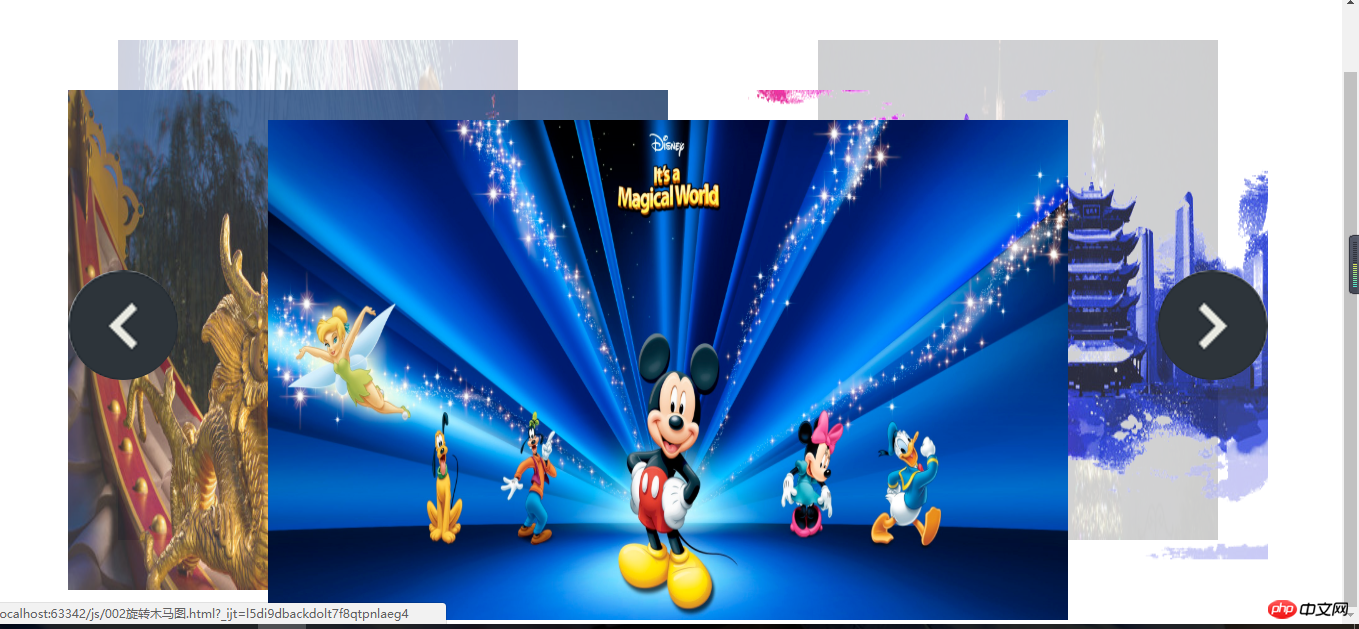
本篇文章给大家带来的内容是关于原生js旋转木马的效果图的动画效果(附代码),有一定的参考价值,有需要的朋友可以参考一下,希望对你有所帮助。
原生JS-旋转木马
今天写一个原生JS写的旋转木马JS效果。
实现原理:
1.建立一个数组给每一张图片写对应的z-index,opacity,top,width;
2.实现旋转的操作是把建造的数组里面的第一组值放到最后一组,点下按钮就执行一次。
显示效果图: 
html布局:
<p class="wrap" id="wrap">
    <p class="slide" id="slide">
        <ul>
            <li><a href=""><img src="images/logo.png" width="900" height="500" alt=""></a></li>
            <li><a href=""><img src="images/slide.jpg" width="900" height="500" alt=""></a></li>
            <li><a href=""><img src="images/slide2.jpg" width="900" height="500" alt=""></a></li>
            <li><a href=""><img src="images/i1.jpg" width="900" height="500" alt=""></a></li>
            <li><a href=""><img src="images/sto.jpg" width="900" height="500" alt=""></a></li>
        </ul>
        <p class="arrow" id="arrow">
            <a href="javascript:;" id="arrLeft" class="prev"></a>
            <a href="javascript:;" id="arrRight" class="next"></a>
        </p>
</p></p>css样式:
* {            margin: 0;            padding: 0;        }

        ul {            list-style: none;        }

        .wrap {            width: 1200px;            margin: 100px auto;        }

        .slide {            height: 500px;            position: relative;            width: 1200px;        }

        .slide ul li {            position: absolute;            top: 0;            left: 0;            z-index: 1;        }

        .slide li img {            width: 100%;        }

        .arrow {            position: absolute;            width: 100%;            top: 50%;            opacity: 0;            z-index: 3;        }

        .prev,        .next {            position: absolute;            height: 110px;            width: 110px;            border-radius: 50%;            top: 50%;            //margin-top: -56px;            overflow: hidden;            text-decoration: none;        }
        .prev{            left: 0;            background: url("images/slider-icons.png") no-repeat left top;        }
.next{ right: 0; background: url("images/slider-icons.png") no-repeat right top; }JS部分:
接下来我们先把对应图片的样式存放到一个数组里面。
//写每张图片对应的样式
    var config = [
        {            "width": 400,            "top": 20,            "left": 50,            "opacity": 0.2,            "zIndex": 2
        },      //0
        {            "width": 600,            "top": 70,            "left": 0,            "opacity": 0.8,            "zIndex": 3
        },     //1
        {            "width": 800,            "top": 100,            "left": 200,            "opacity": 1,            "zIndex": 4
        },     //2
        {            "width": 600,            "top": 70,            "left": 600,            "opacity": 0.8,            "zIndex": 3
        },    //3
        {            "width": 400,            "top": 20,            "left": 750,            "opacity": 0.2,            "zIndex": 2
        }    //4
];页面加载时,图片就散开了,即调用了刚刚建造的数组,把他们逐一分配给每张图片
var list=my$("slide").getElementsByTagName("li"); //拿到所有li
        function assign() {    //分配函数
            for (var i=0;i<list.length;i++){
                animate(list[i],config[i],function () {
                    flag=true;
                });
            }
        }
assign();鼠标进入和离开会有有左右箭头的显示和隐藏,点击按钮旋转的原理即改变数组第一个放在最后或把最后一组放在第一个。其中的flag为控制点击按钮时确保一组动画完成后才能继续执行下一个旋转动画。
//鼠标进入,左右焦点的p显示
        my$("wrap").onmouseover=function () {
            animate(my$("arrow"),{"opacity":1});
        };        //鼠标离开,左右焦点的p隐藏
        my$("wrap").onmouseout=function () {
            animate(my$("arrow"),{"opacity":0});
        };        //点击右边按钮事件
        my$("arrRight").onclick=function () {
            if (flag){
                flag=false;
                config.push(config.shift());     //把第一组值放到最后一组

                assign();
            }

        };        //点击左边按钮事件
        my$("arrLeft").onclick=function () {
            if (flag){
                flag=false;
                config.unshift(config.pop());   //把最后一组值放到第一组
                assign();
            }
        };
};完整JS代码:
<script>
//变速动画函数
function animate(element, json, fn) {
clearInterval(element.timeId); //清理定时器
element.timeId = setInterval(function () {
var flag = true; //假设默认为当前值已经等于目标值
for (var arrt in json) { if (arrt == "opacity") { //如果属性值为opacity
var current = getStyle(element, arrt) * 100; //current和target先扩大100倍
target = json[arrt] * 100; var step = (target - current) / 10;
step = step > 0 ? Math.ceil(step) : Math.floor(step);
current += step;
element.style[arrt] = current / 100; //运算完后缩小100倍
} else if (arrt == "zIndex") { //如果属性值为zindex
element.style[arrt] = json[arrt];
} else { //普通属性
var current = parseInt(getStyle(element, arrt));
target = json[arrt]; var step = (target - current) / 10;
step = step > 0 ? Math.ceil(step) : Math.floor(step); //step大于零向上取整,小于零向下取整
current += step;
element.style[arrt] = current + "px";
} if (current != target) {
flag = false;
}
} if (flag) { //只有所有属性的当前值已经等于目标值,才清理定时器
clearInterval(element.timeId); if (fn) { //回调函数
fn();
}
}
console.log("当前位置:" + current + "目标位置:" + target + " 移动步数:" + step); //测试函数
}, 20);
} function getStyle(element, arrt) {
return window.getComputedStyle ? window.getComputedStyle(element, null)[arrt] : element.currentStyle[arrt];
} function my$(id) {
return document.getElementById(id);
} //写每张图片对应的样式
var config = [
{ "width": 400, "top": 20, "left": 50, "opacity": 0.2, "zIndex": 2
}, //0
{ "width": 600, "top": 70, "left": 0, "opacity": 0.8, "zIndex": 3
}, //1
{ "width": 800, "top": 100, "left": 200, "opacity": 1, "zIndex": 4
}, //2
{ "width": 600, "top": 70, "left": 600, "opacity": 0.8, "zIndex": 3
}, //3
{ "width": 400, "top": 20, "left": 750, "opacity": 0.2, "zIndex": 2
} //4
]; var flag=true; //假设动画全部执行完毕-----锁
//页面加载的事件
window.onload=function () {
//1---散开图片
var list=my$("slide").getElementsByTagName("li"); //拿到所有li
function assign() { //分配函数
for (var i=0;i<list.length;i++){
animate(list[i],config[i],function () {
flag=true;
});
}
}
assign(); //鼠标进入,左右焦点的p显示
my$("wrap").onmouseover=function () {
animate(my$("arrow"),{"opacity":1});
}; //鼠标离开,左右焦点的p隐藏
my$("wrap").onmouseout=function () {
animate(my$("arrow"),{"opacity":0});
}; //点击右边按钮事件
my$("arrRight").onclick=function () {
if (flag){
flag=false;
config.push(config.shift()); //把第一组值放到最后一组
assign();
}
}; //点击左边按钮事件
my$("arrLeft").onclick=function () {
if (flag){
flag=false;
config.unshift(config.pop()); //把最后一组值放到第一组
assign();
}
};
};</script>相关推荐:
javascript实现省市联动的代码分享以上是原生js旋转木马的效果图的动画效果(附代码)的详细内容。更多信息请关注PHP中文网其他相关文章!


