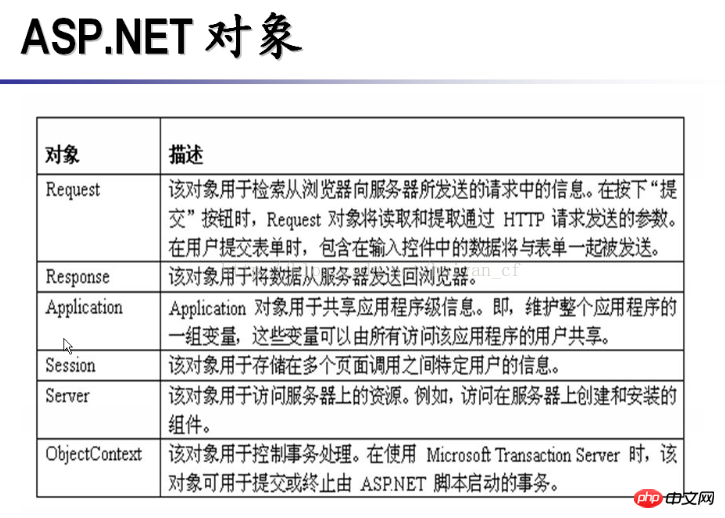
ASP.NET对象有如下几个:

本文从“asp.net中通过from表单submit提交到后台的实例”来谈谈Request和Response这两个对象的使用。
(一)引入实例
前台中的表单代码:
<body>
    <form method="get" action="WebForm1.aspx">
        <table style="width:50%;">
            <tr>
                <td> </td>
                <td>
                    <input id="text1"  name="txtUserName" type="text" /></td>
                <td class="auto-style1"> </td>
            </tr>
            <tr>
                <td> </td>
                <td>
                    <input id="text2"  name="txtUserPwd" type="text" /></td>
                <td class="auto-style1"> </td>
            </tr>
            <tr>
                <td> </td>
                <td>
                    <input id="ccc" type="submit" value="提交" /></td>
                <td class="auto-style1"> </td>
            </tr>
        </table>
    </form>
</body> 表单中的method方法,即表单的提交方法。
表单中的action方法,指定表单的提交目标。
action=“WebFrom1”,指的是表单的提交后指向WebForm1窗体。在该路径的页面中,用Request.From可以接受到Post方法的数据。用Requet.QuestString可以接受Get的数据。具体用Post还是用Get,可以在表单中的Method属性中设置。
后台的C#代码:
    public partial class WebForm1 : System.Web.UI.Page
    {
        protected void Page_Load(object sender, EventArgs e)
        {
            //Request三种获取表单值得方法。

            #region  对于post方法递交表单的获取值方法
            //string userName = Request.Form.Get("txtUserName").ToString();
            //string userPwd = Request.Form.Get("txtUserPwd").ToString();
            #endregion

            #region  对于get方法递交表单的获取值方法
            //string userName = Request.QueryString["txtUserName"].ToString();
            //string userPwd = Request.QueryString["txtUserPwd"].ToString();
            #endregion

            #region  对两者方法都适用的方法,运用Reuqest的索引值去获取所要求的表单值
            string userName = Request["txtUserName"].ToString();
            string userPwd = Request["txtUserPwd"].ToString();
            #endregion
            Response.Write("登陆的用户名为:" + userName + ";密码为:" + userPwd);

            if (userName=="a"&&userPwd=="b")
            {
                Response.Redirect("WebForm2.aspx");
            }
            else
            {
                Response.Redirect("login.html");
            }
        }
}(二)Request对象和Response对象用法总结
一、Request对象:
Request三种获取表单值得方法的具体实现,我已都写入到后代代码的实例中了,在这里就不赘述。
这里需要注意的是:get和post方法的区别如下:
get方法提交,直接定义一个url就可以传值。缺点是,传的值是明码显示的。因为浏览器显示的字符是有长度的,所以他的数据显示的时候是受限制的。
post提交,是把数据作为一个整个集合进行提交,对于post方法传值的方法传的参数不会在url中用明码显示。
二、Response对象
response对象,最主要的用到的方法是respone.write(string)和responst.redirect(url).
response.write(string)的作用是从服务器端向客户端返回数据(写数据)。
response.rediec("url")的作用是在服务器端重定向另一个网页。
【相关推荐】
1. 总结Asp.net内置对象之Request对象使用实例
3. 分享asp中request对象五个获取客户端资料的方法
以上是谈谈Request和Response这两个对象的使用的详细内容。更多信息请关注PHP中文网其他相关文章!


