代码不能运行,说明你的浏览器版本不够高,加上对应浏览器前缀,还不行,浏览器不支持。
(1)知识预备
a.transform-origin
transform-origin: x-axis y-axis z-axis;
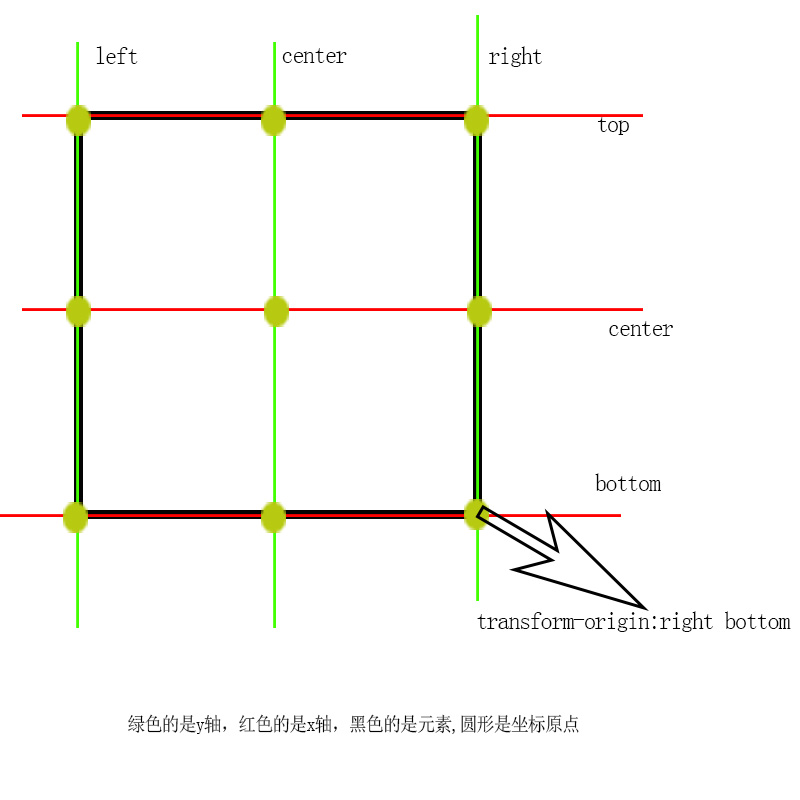
x-axis取值为例left 、center 、right 、length 、%,默认center即50%,指的时x轴坐标原点相对于元素宽的位置
y-axis取值为例top 、center 、bottom 、length ,%默认center即50%,指的时y轴坐标原点相对于元素高的位置

个人感觉将x-axis、y-axis的取值对换会更好,就可以有这样的理解:在left画y轴,在center画x轴,那么两轴的交点就是坐标轴原点了
b.过渡与转换的结合使用
transition-duration:500ms;
transform:rotate(0deg)
元素旋转到0度用时500ms
c. #lol:hover p:nth-child(2)
当鼠标放在id为lol的元素A上时,在A所有的子元素中如果第二个是p元素则匹配成功。
d.关键代码
#lol:hover p:nth-child(2)/*鼠标放在p元素上时触发*/
      {
           transform:rotate(0deg)
           /*等价于transform:translate(0px,0px) rotate(0deg) 不要忘记默认属性*/
           /* transition-duration:500ms;transform-origin:right bottom;不写也是一样的,因为#lol p:nth-child(2)设置了*/
      }
      #lol p:nth-child(2)/*浏览器显示p元素时执行*/
      {
           transition-duration:500ms;
           transform-origin:right bottom;
           transform:rotate(90deg);
           …
}(2)全部代码
<!DOCTYPE html>
<html>
<head>
<meta charset=utf-8>
<link rel="shortcut icon" href="favicon.ico" type="image/x-icon">
<title>为了生活</title>
<style type="text/css">
      *
      {
           margin:0px;
           padding:0;
      }
      #lol
      {
           width:222px;
           height:221px;
           position:relative;
           overflow:hidden;
           cursor:pointer;
           margin:20px auto;
           border:10px #333 solid;

      }
      #lol:hover p:nth-child(2)
      {
           transform:rotate(0deg)
      }
      #lol p:nth-child(2)
      {
           width:222px;
           height:221px;
           position:absolute;
           transition-duration:500ms;
           transform-origin:right bottom;
           transform:rotate(90deg);
           background:orange;
           top:0px;
           left:0px;
      }
</style>
</head
<body>
      <div id="lol">
           <img  src="images/1.jpg" alt="H5图像遮罩" >
           <p>Hello World</p>
      </div>
</body>
</html>


