

应用程序的身份验证是系统中非常重要的事情,但也非常敏感,有各种实现、安全性、验证需要考虑。
我决定发表一篇文章来演示 Cognito,这是来自 AWS 的一个非常好的工具,可以帮助您对许多人不知道的 Web 和移动应用程序进行用户身份验证和验证。
Cognito 是一个 AWS 平台,负责创建和验证用户访问数据,以及能够注册用户并存储其信息,除了生成 OAuth 令牌之外,Cognito 还可以提供所有用户验证。
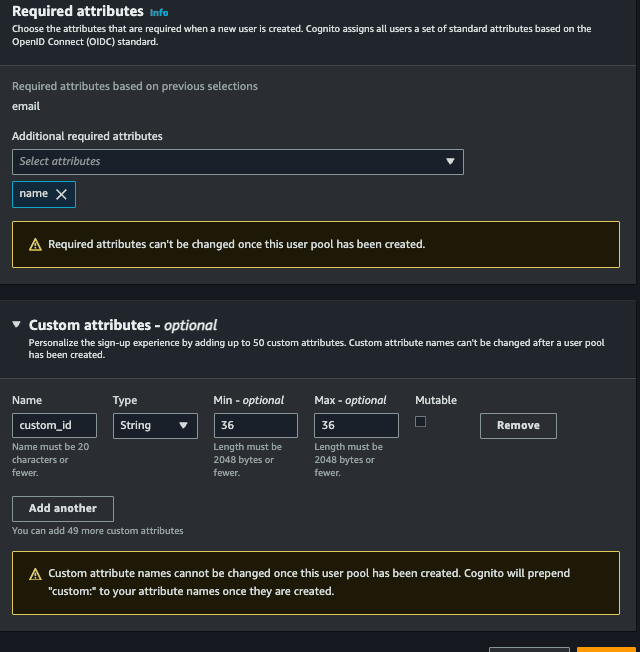
我们可以创建一些用户数据,例如:电子邮件、姓名、电话、生日、昵称、性别、网站等,我们还可以放置自定义字段。
Cognito 仍然允许我们与“联合提供商”合作,称为社交登录,例如 Google、Facebook 和 GitHub,我们不打算讨论这篇文章,但可以使用 Cognito 来做到这一点。
我们将创建一些端点来展示 Cognito 的工作原理,我们将创建一个用户,确认电子邮件,登录,使用 Cognito 提供的令牌搜索用户,更新信息。
我们要做一些非常简单的事情,我们不会担心项目父亲,我们只想解决知识的使用。
为了创建端点,我们将使用 gin。
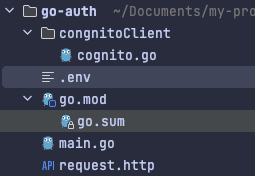
让我们创建以下文件:
我们的应用程序 main.go 的入口点位于项目的根目录
.env 保存认知凭证
名为cognitoClient的粘贴,位于名为 cognito.go
有一个名为 request.http 的文件,可以完成您的请求。
结构如下:
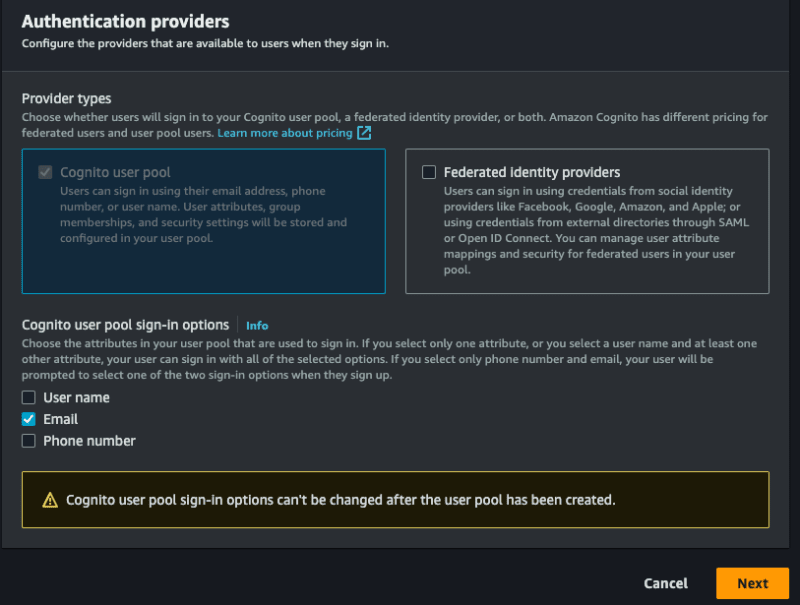
在开始代码之前,我们将在AWS中配置cognito,以访问面板并通过cognito进行搜索,在创建池后,选择选项将用户目录添加到您的应用程序。
对于提供商类型,选择Cognito用户池选项,您可以选择允许使用电子邮件、用户名和电话登录,您只能选择电子邮件,选择您喜欢的,选择assim到第一阶段:
我需要配置更多东西,我们开始吧!
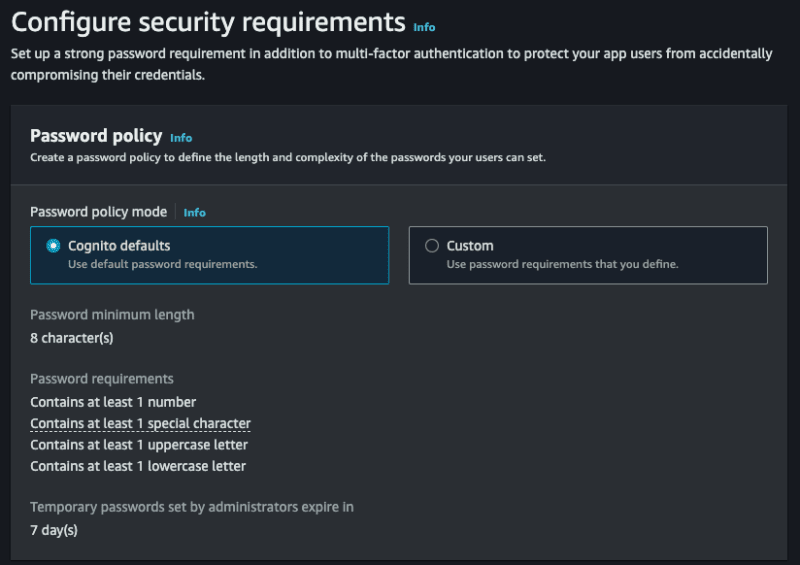
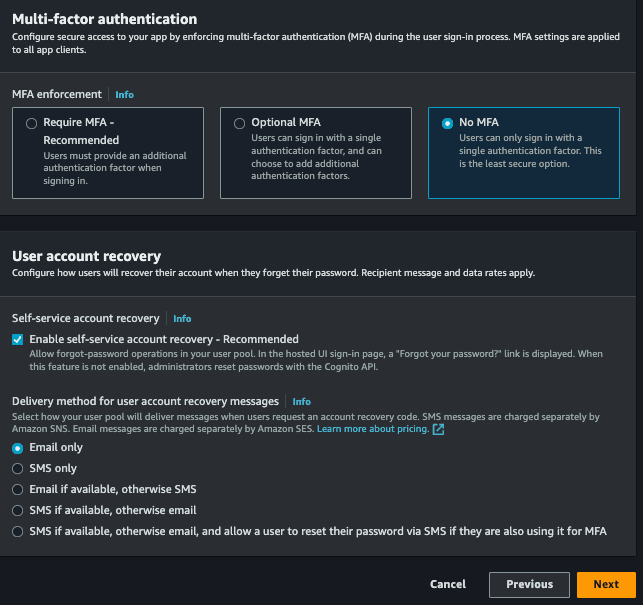
下一步:
这个阶段也发生了:
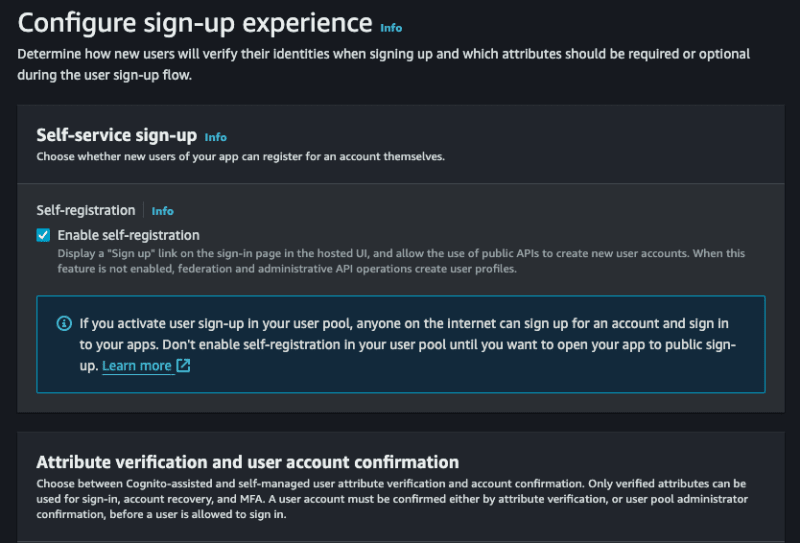
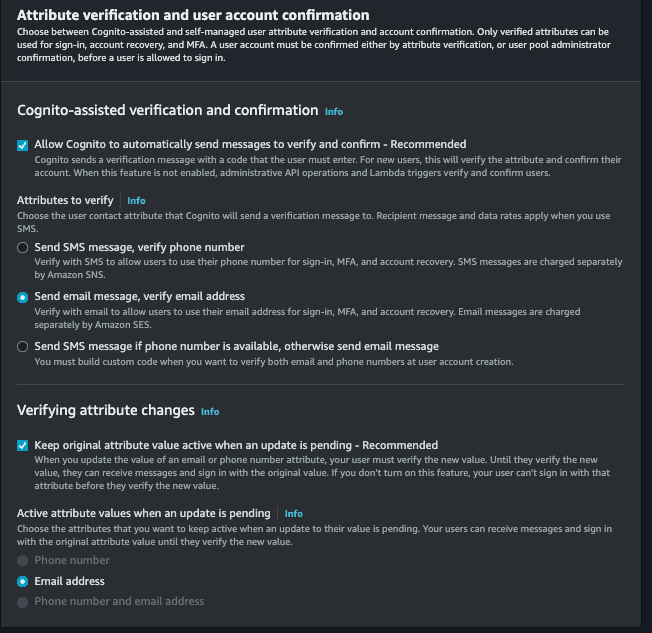
接下来,选择使用 Cognito 发送电子邮件选项,因此我们不需要配置任何内容来触发电子邮件。
下一步,在用户池名称中输入您想要的名称,在应用程序客户端名称中也输入您想要的名称并继续。
在最后阶段,我们不需要更改任何内容,只需完成并创建用户池即可。
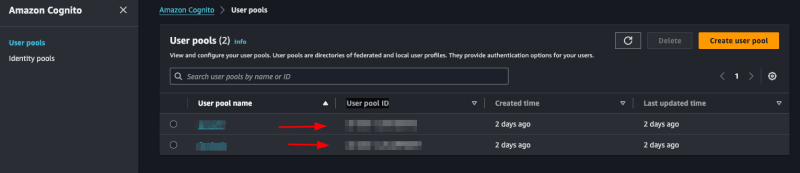
一切,访问或认知>用户池,选择您刚刚创建的池,这部分将列出您应用程序的所有用户,并且可以撤销用户的令牌,停用,验证等功能。
我们将指定池的 id,以便能够使用适用于 aws 的 Go sdk,访问创建的池应用程序集成>应用程序客户列表并查看我们的客户ID:

让我们将此 id 保存在我们的 .env 文件中:
请记住,您仍然需要拥有 AWS 凭证,通常位于 /Users/your-user/.aws 目录中,如果您尚未配置,请参阅此处如何进行配置。
让我们将 cognito 部分分离到另一个文件中。
在 cognito.go 文件中,我们将初始化我们的 cognito 并创建我们的界面:
首先我们创建一个名为 User 的结构体,该结构体将包含我们需要在 cognito 中保存的用户字段。
然后我们创建一个名为 CognitoInterface 的接口,我们将拥有我们将使用的方法,首先我们只有 SignUp 它将接收指向 User 结构的指针。
然后我们将有另一个名为 cognitoClient 的结构,它将包含 NewCognitoClient 的实例,它将成为我们的构造函数。
如上所述,NewCognitoClient 就像我们的构造函数,我们将在其中创建与 AWS 的会话并返回此连接。此连接可以是全局变量,在我们的例子中,我们不会这样做,由您来检查哪种方法最适合您的用例。
现在让我们实现注册:
我们将使用 Cognito 中的 AttributeType 来组装我们将发送到 AWS SDK 的 SignUp 的参数,请注意,custom_id 是我们的自定义字段,需要先自定义,否则将不会被接受,我们刚刚使用 Google 包创建了一个 uuid,该字段只是为了展示如何使用自定义属性。
ClientId 字段指的是我们环境的 COGNITO_CLIENT_ID,我们会在启动 main.go 时传递它。
这就是我们拯救用户所需要的,是不是很简单?
不要忘记开始项目:
并安装必要的软件包:
让我们创建另一个函数来通过电子邮件验证用户的帐户。要验证帐户,用户需要输入通过电子邮件发送的代码。让我们创建一个新的结构体并将新的ConfirmAccount方法添加到接口中:
现在让我们实现:
非常简单,我们将使用cognito包中的ConfirmSignUpInput来组装参数,记住用户名是用户的电子邮件。最后,我们将调用ConfirmSignUp并传递confirmationInput。
记住我们只返回错误,您可以改进并检查错误消息的类型。
这应该是最常用的功能,让我们创建一个名为 SignIn 的方法和一个结构体:
我们的登录将收到一个用户登录。
让我们实现:
我们将使用 aws cognito 包中的 InitiateAuth 函数,我们需要传递用户名(用户的电子邮件)、密码和 AuthFlow,该字段指的是我们允许的访问类型,在我们的例子中为 USER_PASSWORD_AUTH。
如果您收到这样的错误:
您信任所有代理,这并不安全。我们建议您设置一个值
需要启用 ALLOW_USER_PASSWORD_AUTH 流程,将其配置为在 aws 面板上访问 cognito,请转到:
用户池>Selecione seu 泳池>应用程序集成>应用程序客户端列表>选择客户端,将打开此屏幕:
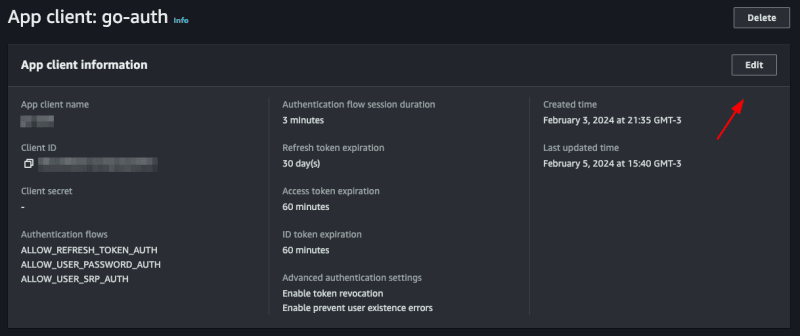
Click oneditand inAuthentication flowsselect the optionALLOW_USER_PASSWORD_AUTHthen save, with this you can now log in with the user's password and email.
Para mostrar como utilizar o token jwt fornecido pelo cognito vamos criar um endpoint que mostra os dados do usuário salvos no cognito apenas com o token.
Let's create another function called GetUserByToken that will receive a token and return a struct of type GetUserOutput that we will get from the cognito package.
type CognitoInterface interface { SignUp(user *User) error ConfirmAccount(user *UserConfirmation) error SignIn(user *UserLogin) (string, error) GetUserByToken(token string) (*cognito.GetUserOutput, error) }
If you click on GetUserOutput you will see what is inside this struct
type GetUserOutput struct { _ struct{} `type:"structure"` MFAOptions []*MFAOptionType `type:"list"` PreferredMfaSetting *string `type:"string"` UserAttributes []*AttributeType `type:"list" required:"true"` UserMFASettingList []*string `type:"list"` Username *string `min:"1" type:"string" required:"true" sensitive:"true"` }
inside the _ struct{} there are custom attributes that we created for our user, in our case the custom_id.
Let's implement:
func (c *cognitoClient) GetUserByToken(token string) (*cognito.GetUserOutput, error) { input := &cognito.GetUserInput{ AccessToken: aws.String(token), } result, err := c.cognitoClient.GetUser(input) if err != nil { return nil, err } return result, nil }
We use GetUser from the cognito package, it only needs an AccessToken which is the token provided by cognito itself.
Finally, we will update the user's password. To do this, we will need the email address and the new password. We already have the UserLogin struct with the fields we need. We will reuse it. If you wish, create a new one just for this function. Let's create the UpdatePassword function:
type CognitoInterface interface { SignUp(user *User) error ConfirmAccount(user *UserConfirmation) error SignIn(user *UserLogin) (string, error) GetUserByToken(token string) (*cognito.GetUserOutput, error) UpdatePassword(user *UserLogin) error }
Let's implement:
func (c *cognitoClient) UpdatePassword(user *UserLogin) error { input := &cognito.AdminSetUserPasswordInput{ UserPoolId: aws.String(os.Getenv("COGNITO_USER_POOL_ID")), Username: aws.String(user.Email), Password: aws.String(user.Password), Permanent: aws.Bool(true), } _, err := c.cognitoClient.AdminSetUserPassword(input) if err != nil { return err } return nil }
We will use the AdminSetUserPassword function from the cognito package, we need to pass the user's email and the new password, in addition we have to pass the UserPoolId, we will put the COGNITO_USER_POOL_ID in the .env file, to search in aws just access your pool and copy the User pool ID
We will also pass Permanent, informing that it is a permanent password, you could pass false, so Cognito would create a temporary password for the user, this will depend on the strategy you will use in your application.
Let's create our main.go, this will be the file where we will start cognito and create our routes.
func main() { err := godotenv.Load() if err != nil { panic(err) } cognitoClient := congnitoClient.NewCognitoClient(os.Getenv("COGNITO_CLIENT_ID")) r := gin.Default() fmt.Println("Server is running on port 8080") err = r.Run(":8080") if err != nil { panic(err) } }
First we will load our envs with the godotenv package, then we start our cognito client, passing the COGNITO_CLIENT_ID, which we got earlier, then we start gin and create a server, that's enough.
Let's create a function inside the main.go file itself, let's call it CreateUser:
func CreateUser(c *gin.Context, cognito congnitoClient.CognitoInterface) error { var user congnitoClient.User if err := c.ShouldBindJSON(&user); err != nil { return errors.New("invalid json") } err := cognito.SignUp(&user) if err != nil { return errors.New("could not create use") } return nil }
Something simple, we just convert what we receive in the body to our struct using gin's ShouldBindJSON, then we call the SignUp that we created in cognito.go.
Now let's create the endpoint inside the main.go function:
r.POST("user", func(context *gin.Context) { err := CreateUser(context, cognitoClient) if err != nil { context.JSON(http.StatusBadRequest, gin.H{"error": err.Error()}) return } context.JSON(http.StatusCreated, gin.H{"message": "user created"}) })
We call the function we just created CreateUser, if there is an error we throw a StatusBadRequest, if it is successful a StatusCreated, let's test.
Let's do a go mod tidy downloading all the packages, then we'll run the application with go run main.go
Now we can create a call in the request.http file and execute:
POST http://localhost:8080/user HTTP/1.1 content-type: application/json { "Name": "John Doe", "email": "wivobi1159@bitofee.com", "password": "Pass@1234" }
If everything is correct we will receive the message:
{ "message": "user created" }
Now entering the Cognito panel on AWS, and accessing the pool then the users, we will have our user there:
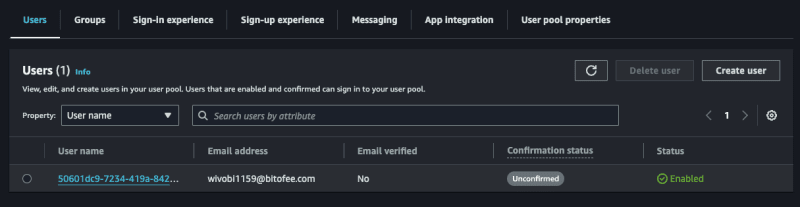
Note that the user we created above is not confirmed, let's confirm it!
Create a function called ConfirmAccount in the main.go file:
func ConfirmAccount(c *gin.Context, cognito congnitoClient.CognitoInterface) error { var user congnitoClient.UserConfirmation if err := c.ShouldBindJSON(&user); err != nil { return errors.New("invalid json") } err := cognito.ConfirmAccount(&user) if err != nil { return errors.New("could not confirm user") } return nil }
Same concept we used before, let's convert the body to the UserConfirmation struct and pass it to ConfirmAccount in cognito.go.
Let's create the endpoint:
r.POST("user/confirmation", func(context *gin.Context) { err := ConfirmAccount(context, cognitoClient) if err != nil { context.JSON(http.StatusBadRequest, gin.H{"error": err.Error()}) return } context.JSON(http.StatusCreated, gin.H{"message": "user confirmed"}) })
It's also simple, we just handle the error and return a message, let's create our call and test it:
POST http://localhost:8080/user/confirmation HTTP/1.1 content-type: application/json { "email": "wivobi1159@bitofee.com", "code": "363284" }
We will receive the message:
{ "message": "user confirmed" }
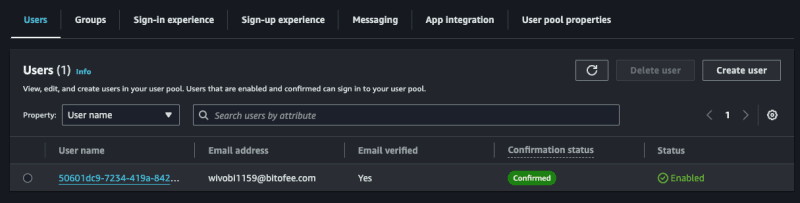
Now accessing Cognito again on the AWS panel, notice that the user is confirmed, remembering that you need to enter a valid email, you can use a temporary email to play around, but it needs to be valid, as Cognito will send the confirmation code and it needs to be a valid code to confirm successfully.
Now let's create our token, to do this in the main.go file create a function called SignIn, this function will return an error and a token.
func SignIn(c *gin.Context, cognito congnitoClient.CognitoInterface) (string, error) { var user congnitoClient.UserLogin if err := c.ShouldBindJSON(&user); err != nil { return "", errors.New("invalid json") } token, err := cognito.SignIn(&user) if err != nil { return "", errors.New("could not sign in") } return token, nil }
Same pattern as the other functions, we convert the body to the UserLogin struct and pass it to SignIn of cognito.go.
Let's create the endpoint:
r.POST("user/login", func(context *gin.Context) { token, err := SignIn(context, cognitoClient) if err != nil { context.JSON(http.StatusBadRequest, gin.H{"error": err.Error()}) return } context.JSON(http.StatusCreated, gin.H{"token": token}) })
Now we return a token to the user, let's create the call and test:
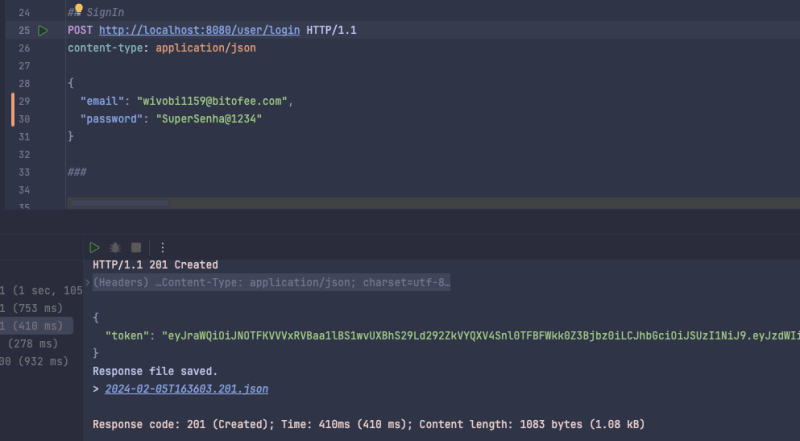
POST http://localhost:8080/user/login HTTP/1.1 content-type: application/json { "email": "wivobi1159@bitofee.com", "password": "Pass@1234" }
When making the call we will receive our jwt token:
{ "token": "token_here" }
If we get the jwt token we can see what's inside, using the website jwt.io.
Now we will list the user data saved in cognito using only the token, to do this create a function called GetUserByToken in main.go and we will need a struct to represent the response that we will return to the user, we will create it in main as well:
type UserResponse struct { ID string `json:"id"` Name string `json:"name"` Email string `json:"email"` CustomID string `json:"custom_id"` EmailVerified bool `json:"email_verified"` } func main() {}
Now the function:
func GetUserByToken(c *gin.Context, cognito congnitoClient.CognitoInterface) (*UserResponse, error) { token := strings.TrimPrefix(c.GetHeader("Authorization"), "Bearer ") if token == "" { return nil, errors.New("token not found") } cognitoUser, err := cognito.GetUserByToken(token) if err != nil { return nil, errors.New("could not get user") } user := &UserResponse{} for _, attribute := range cognitoUser.UserAttributes { switch *attribute.Name { case "sub": user.ID = *attribute.Value case "name": user.Name = *attribute.Value case "email": user.Email = *attribute.Value case "custom:custom_id": user.CustomID = *attribute.Value case "email_verified": emailVerified, err := strconv.ParseBool(*attribute.Value) if err == nil { user.EmailVerified = emailVerified } } } return user, nil }
This will be the biggest function, we need to map what we receive from Cognito to our UserResponse struct, we do this with a for and a switch, of course we could improve it, but for the sake of example we will keep it like this. Also to map custom attributes we need to put custom before, like custom:custom_id.
We also check if the user passed the token in the header, if not we return an error.
Let's create the endpoint:
r.GET("user", func(context *gin.Context) { user, err := GetUserByToken(context, cognitoClient) if err != nil { if err.Error() == "token not found" { context.JSON(http.StatusUnauthorized, gin.H{"error": "token not found"}) return } context.JSON(http.StatusBadRequest, gin.H{"error": err.Error()}) return } context.JSON(http.StatusOK, gin.H{"user": user}) })
We perform the same validation as the other endpoints, but now we check the error type and if it is of the token not found type we return a StatusUnauthorized.
Let's test:
GET http://localhost:8080/user HTTP/1.1 content-type: application/json Authorization: Bearer token_jwt
Let's receive the user:
{ "user": { "id": "50601dc9-7234-419a-8427-2a4bda92d33f", "name": "John Doe", "email": "wivobi1159@bitofee.com", "custom_id": "cb748d09-40de-457a-af23-ed9483d69f8d", "email_verified": true } }
Finally, let's create the UpdatePassword function that will update the user's password:
func UpdatePassword(c *gin.Context, cognito congnitoClient.CognitoInterface) error { token := strings.TrimPrefix(c.GetHeader("Authorization"), "Bearer ") if token == "" { return errors.New("token not found") } var user congnitoClient.UserLogin if err := c.ShouldBindJSON(&user); err != nil { return errors.New("invalid json") } err := cognito.UpdatePassword(&user) if err != nil { return errors.New("could not update password") } return nil }
We also make it mandatory to inform the token in the header, the rest of the function is what we have already done previously.
Let's create the last endpoint:
r.PATCH("user/password", func(context *gin.Context) { err := UpdatePassword(context, cognitoClient) if err != nil { if err.Error() == "token not found" { context.JSON(http.StatusUnauthorized, gin.H{"error": "token not found"}) return } context.JSON(http.StatusBadRequest, gin.H{"error": err.Error()}) return } context.JSON(http.StatusOK, gin.H{"message": "password updated"}) })
Let's make the call:
PATCH http://localhost:8080/user/password HTTP/1.1 content-type: application/json Authorization: Bearer token_jwt { "email": "wivobi1159@bitofee.com", "password": "NovaSenha2@2222" }
Now when you update your password and try to log in you will receive an error, and if you use the new password, everything will work.
In this post we talk a little about Cognito, one of the many AWS services that many people don't know about but that helps a lot in the evolution of your system.
Cognito's practicality goes beyond what I've discussed. Making a basic login is simple, but Cognito stands out for already providing you with an account verification system "ready", a login option with social networks (which can be quite annoying to implement without Coginito), two-factor authentication, among others, and it also has AWS security to protect user data.
Cognito has more functionality, it's worth seeing all of them in the documentation.
Project repository
See the post on my blog here
Subscribe and receive notification of new posts, participate
以上是使用 Golang 和 AWS Cognito 进行身份验证的详细内容。更多信息请关注PHP中文网其他相关文章!


