

本教程的目的是创建一个应用程序来控制用户的发音。
要遵循它,您必须具备 javascript 知识,更理想的是 Vue.js 3.
我最近决定回到德语。我在使用这种语言时遇到的主要困难是正确发音。通常我会听一个例子,然后把自己重复的录音录下来,然后再听一遍。这是一个复杂的过程,我必须承认我的耳朵不太好。
基于这一观察,我想知道是否有一个应用程序或 API 可以告诉我我的德语单词或句子的发音是否正确!经过一些调查和重大发现后,我想编写自己的应用程序来解决我的问题。
我就是这样做的!
经过一番研究,我找到了解决我问题的应用程序。但总的来说,发音验证通常只是付费应用程序(或与订阅一起使用的应用程序)的一项附加功能。然后我决定寻找 API。
这里是完成这项工作的 API 列表:
这些 API 是付费的,但通常允许您获得 2 周的测试和实验访问权限。
由于我想检查我的德语发音,所以我选择使用 SpeechSuper API 进行测试,因为它支持包括德语在内的多种语言。在本教程的后面部分,我们将尝试 Speechace API 来演示根据您的需求从一个 API 切换到另一个 API 是多么容易。
目标是实现一个简单的应用程序,允许您输入单词、录制你的声音、将录音发送到 API 并显示你的分数。
这就是应用程序的样子:
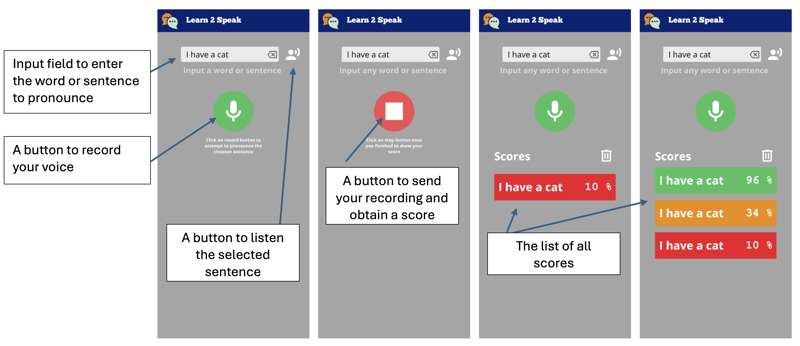
因此,我们将创建一个应用程序,该应用程序将显示一个文本字段,允许输入单词或句子。一个按钮即可让您收听。
然后我们有一个按钮来录制我们的声音,这个按钮在录音模式下会改变风格。只需点击它即可停止并发送到API以获得发音分数。
获得分数后,它会显示为一个图块,其颜色代表我们的分数,从红色到绿色到橙色。
理想的情况是能够将应用程序部署为 Web 应用程序,也可以部署为原生 Android 应用程序。因此我们将使用 Quasar。
Quasar 是一个开源 Vue.js 框架,用于使用单一代码库开发应用程序。它们可以部署在网络上(SPA、PWA、SSR)、作为移动应用程序(Android、iOS)或桌面应用程序(MacOs、Windows、Linux)。
如果还不是这种情况,您需要安装 NodeJS。更好的是使用 volta,因为它允许您根据您的项目使用不同版本的 NodeJs。
我们将首先使用 Quasar 脚手架工具初始化我们的项目。
cli 会问我们几个问题,选择以下选项:
命令执行后,就可以进入目录并在本地提供应用程序:
您的默认浏览器应该打开以下地址的页面:http://localhost:9000
示例应用程序可用,我们将删除不需要的元素。为此,我们将在 VSCode 中打开源代码(您当然可以使用其他编辑器)
code .
Quasar provides us with the notion of Layout and then of page included in the latter. The pages and the layout are chosen via the router. For this tutorial, we do not need to know these notions, but you can learn them here: Quasar layout
We do not need drawer, at least not for now so we will delete it from the src/layouts/MainLayout.vue file. To do this, delete the section of the
included between the
Learn2Speak
We can then remove the entire script part and replace it with the following code:
We don't need more for the layout part because our application will define only one page.
The implementation of the main page is in the file: src/pages/IndexPage.vue
this is the main page where we will position our text field and the save button.
For this file, we simply remove the Quasar logo from the template (thetag) and modify the script part to use the vueJS 3 composition api, so that the source looks like the following file:
We will now add the text field using the Quasar component QInput
To do this we add the q-input component to the page template:
You can see that the text field is displayed in the center of the screen, this is due to the Quasar flex and flex-center classes. These classes are defined by Quasar: Flexbox. We will fix this by placing the text field at the top of the screen, we will also take advantage of this to style the component.
Quasar even provides us with a Flex Playground to experiment and find the classes to put.
As you can see, we have defined a sentence reference in the script part to store the value entered by the user. It is associated via the v-model directive to the q-input component
We will finish this first part by adding the button allowing the recording of our pronunciation of the word or sentence. For this we will simply use the q-button component of Quasar and position it after our text field.
Note that we added the q-mt-lg class to air out the interface a bit by leaving some space above each component. You can refer to the Quasar documentation on spacing.
The application will look like:
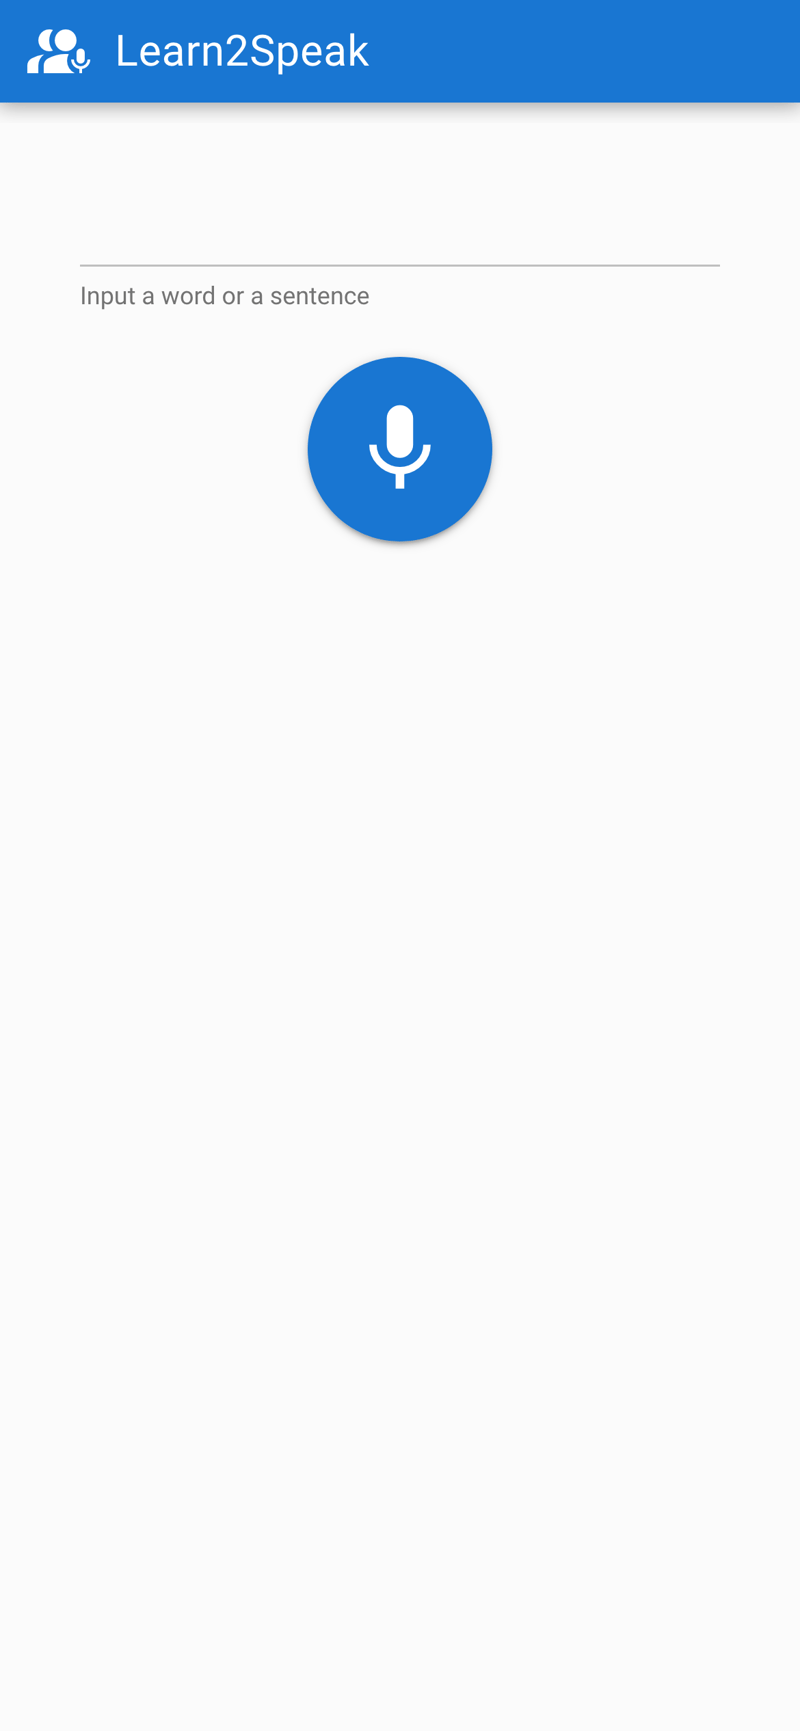
We have therefore managed to obtain the skeleton of our application.
In a future part we will see how to acquire the audio, then how to obtain a score via the SpeechSuper API
Don't hesite on comments the post ! Part 2 will follow soon !
以上是创建发音评估应用程序(第 1 部分)的详细内容。更多信息请关注PHP中文网其他相关文章!


