Microsoft 使用其媒体创建工具可以轻松创建安装媒体。此外,您还可以使用 Rufus 和命令提示符来创建一个。在本指南中,我们向您展示为 Windows 11 创建 USB 闪存驱动器安装程序的三种不同方法。
开始之前:如何下载 Windows 11 ISO 映像
要成功创建Windows 11 USB 可启动驱动器,您将需要 Windows 11 ISO 文件,也称为 ISO 映像。因此,在继续创建可启动 USB 之前,请先解决这个问题。您可以轻松地从微软官方网站下载Windows 11 ISO。操作方法如下:
- 访问 Microsoft 官方页面下载 Windows 11。
- 向下滚动到下载适用于 X64 设备的 Windows 11 磁盘映像 (ISO) 部分。
- 单击下拉菜单并选择 Windows 11(多版本 ISO)。

- 接下来,单击“立即下载”按钮继续。
- 当前页面将加载附加信息并显示“选择产品语言”部分。单击“选择一种”下拉菜单,然后选择您的首选语言。单击“确认”继续。

- 下载部分加载后,单击 64 位下载按钮。

- 您的下载将立即开始。但是,完成下载可能需要一些时间,具体取决于您的互联网速度。
下载 ISO 文件后,请按照以下方法之一创建 Windows 11 可启动 USB 驱动器。
1. 如何使用 Rufus 创建 Windows 11 可启动 USB

Rufus 是一个开源实用程序,用于格式化和创建适用于 Windows 操作系统的可启动 USB 闪存驱动器。与微软的内部媒体创建工具相比,它是一个轻量级实用程序,并提供了更多的自定义选项。
使用 Rufus 创建 Windows 11 可启动 USB 驱动器:
- 访问 Rufus 网站并向下滚动到“下载”部分。
- 单击 Rufus 链接下载最新版本。
- 运行可执行文件,如果出现 UAC 提示,请单击“是”。
- 将 USB 闪存驱动器连接到 PC 并等待 Rufus 检测到并将其显示在“设备”部分下。
- 单击启动选择下拉列表,然后选择磁盘或 ISO 映像。
- 然后,单击“选择”按钮。
- 选择 Windows ISO 文件并单击“打开”。
- 单击“映像”选项下的下拉菜单,然后选择“标准 Windows 11 安装”。
- 将分区方案 (GPT) 和目标系统 (UEFI) 保留为默认值。
- 在卷标下,输入可启动闪存驱动器的名称。
- 将文件系统和簇大小以及其他选项保留为默认值。
- 确保快速格式化和创建扩展标签和图标文件选项已选中。
- 单击“开始”按钮启动可启动驱动器创建过程。
完成后,Rufus 将显示成功消息。现在,您可以使用 Windows 11 可启动驱动器在任何兼容系统上安装操作系统。
媒体创建工具是 Microsoft 用于创建安装媒体的内部解决方案。您可以使用媒体创建工具创建可启动 USB 闪存驱动器或将 ISO 文件下载到本地驱动器。由于它需要下载 ISO 来创建可启动驱动器,因此您无法通过此工具使用现有的 Windows ISO 映像。
使用介质创建工具创建安装介质:
- 将至少 8GB 的 USB 闪存驱动器连接到您的 PC。确保检测到它并且您已备份 USB 驱动器上的所有文件。
- 接下来,访问 Microsoft 下载中心页面。
- 在“创建 Windows 11 安装介质”部分下,单击“立即下载”按钮并将文件保存到您的电脑。
- 接下来,运行 Mediacreationtool.exe 文件,如果出现 UAC 提示,请单击“是”。该工具可能需要几秒钟才能启动,因此请耐心等待,直到您看到安装向导。
- 单击“接受”按钮同意条款。

- 媒体创建工具将自动选择版本和语言以匹配您当前的 Windows 配置。个人电脑。要更改语言,请取消选中“使用此电脑的推荐选项”框,然后从下拉菜单中选择您的首选语言。
- 选择您的选项,然后单击“下一步”。

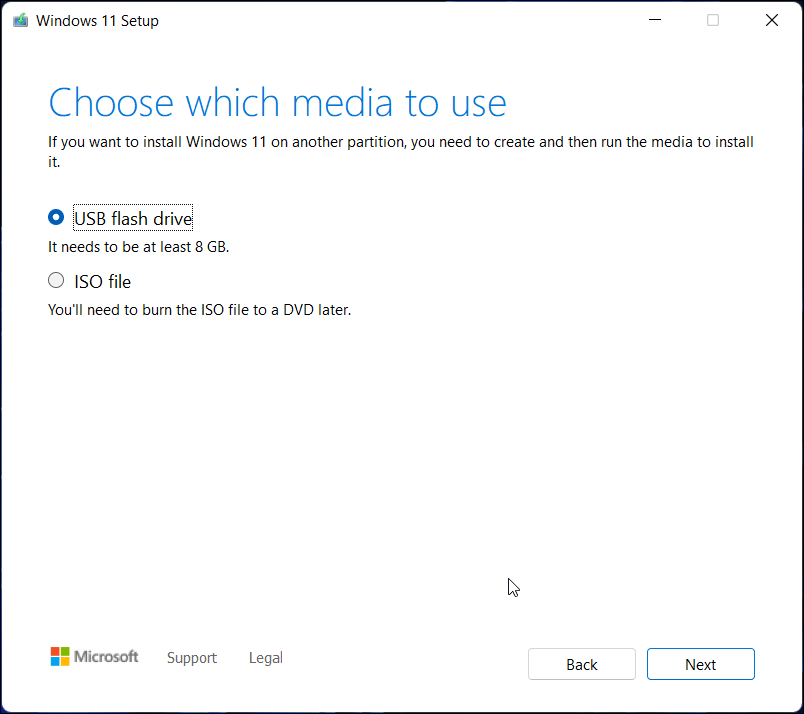
- 在“选择要使用的介质”窗口中,选择 USB 闪存驱动器。
- 单击“下一步”按钮。
- 从可用驱动器列表中选择您的 USB 驱动器。

- 单击“下一步”按钮继续。
- 接下来,单击“完成”按钮。
媒体创建工具现在将下载必要的 Windows 11 文件并创建安装媒体。当出现“您的 USB 闪存驱动器已准备就绪”消息时,单击“完成”按钮关闭设置向导。现在,您可以从 USB 驱动器启动以排除故障或全新安装 Windows 11。
3. 如何使用命令提示符创建可启动驱动器
如果您不想使用第三个 - party工具来创建可启动驱动器,您可以使用Diskpart实用程序和命令提示符来创建安装介质。以下是具体操作方法。
- 首先,备份 USB 驱动器上的所有文件,然后将其连接到电脑。
- 按 Win 键,输入 cmd,然后单击“命令提示符”下的“以管理员身份运行”。如果您更喜欢 PowerShell 而不是命令提示符,也可以使用 PowerShell。

- 在命令提示符窗口中,键入以下命令并按 Enter 键启动 Windows Diskpart 实用程序。
<code class="hljs ">DISKPART</code>
登录后复制
- 下一步,键入以下命令列出所有可用的存储设备:
<code class="hljs php">LIST DISK</code>
登录后复制
- 在此处找到您的 USB 驱动器。您可以查看“大小”列来确定您的 USB 驱动器。在本例中,USB 驱动器列为磁盘 2。
- 接下来,键入以下命令以选择您的驱动器:
<code class="hljs ">SEL DISK 2</code>
登录后复制
- 在上述命令中,更改 DISK 2 带有分配给您的 USB 驱动器的编号。例如,如果您有单个 SSD 或 SATA 驱动器设置,则您的主驱动器将显示为 DISK 0,USB 驱动器将显示为 DISK 1。选择正确的驱动器至关重要,因为下一步涉及擦除所选驱动器。
- 擦除驱动器后,键入以下命令并按 Enter 键以擦除驱动器中的所有内容:
<code class="hljs ">Clean</code>
登录后复制
- 接下来,键入以下命令创建主分区:
<code class="hljs sql">CreatePartition Primary</code>
登录后复制
- 创建主分区后,键入以下命令以选择主分区:
<code class="hljs php">List Par</code>
登录后复制
- 命令提示符将显示 USB 驱动器的详细信息。

- 键入以下命令命令并按 Enter 键激活分区:
<code class="hljs ">Active</code>
登录后复制
- 然后键入以下命令以格式化 USB 驱动器。将驱动器格式化为 NTFS 格式非常重要,因为 FAT32 格式将导致参数错误。
<code class="hljs xml">FORMAT FS=NTFS LABEL=“BootableUSB” QUICK OVERRIDE</code>
登录后复制
- 完成后,键入 Exit 并按 Enter 键退出磁盘部件实用程序。
现在您需要安装 ISO 映像,然后将其内容移动到 USB 驱动器。

- To do this, type the following command and hit Enter to mount the Windows 11 ISO file:
<code class="hljs xml">PowerShell Mount-DiskImage -ImagePath "C:\Users\UserName\Downloads\Win11_English_x64v1.iso"</code>
登录后复制
- In the above command, replace the file path with the location of your Windows 11 ISO.

- Once the ISO is mounted, type the following command to launch Diskpart.
<code class="hljs ">Diskpart</code>
登录后复制
- Next, type the following command to show the available volume.
<code class="hljs php">List volume</code>
登录后复制
- This will help you determine the Drive letter for the mounted ISO file. In the Type column, the mounted ISO will be listed as DVD-ROM. And the Ltr column lists the letter associated with the volume. Note down the details of the ISO volume as you will be using it moving forward.

- Once you have the volume details for the mounted ISO, type the following command to exit Diskpart:
<code class="hljs php">Exit</code>
登录后复制
- Next, type the mounted ISO volume letter and hit enter. For example, if your mounted ISO volume letter is J, then type the following command and press Enter.
<code class="hljs ">J:</code>
登录后复制
- Type the following command to boot from CD:
<code class="hljs bash">cd boot</code>
登录后复制
- Next, type the following command to apply the master boot code compatible with Bootmgr to the USB flash drive:
<code class="hljs ">Bootsect /nt60 I:</code>
登录后复制
- In the above command, replace I with the drive letter associated with your USB flash drive.

- Next, type the following command and hit Enter to copy Windows 11 system files to the USB flash drive:
<code class="hljs ">xcopy J:\*.* I:\ /E /F /H</code>
登录后复制
- In the above command, replace K: and I: with your Mounted ISO Volume and USB drive letter, respectively.
- The process may take a 5-10 minutes to complete. If the Command Prompt feels stuck, it is normal behaviour, so wait until the process is complete.
- If successful, you will see a Files (s) Copied message.
That’s it. Now you can use the USB bootable drive to clean install Windows 11.
Multiple Ways to Create a Windows 11 Bootable USB Drive
With its Media Creation Tool, Microsoft makes it easy to create installaltion media. However, if you have a Windows 11 ISO image ready, you can use Rufus or the Command Prompt to create a Windows 11 bootable USB drive quickly. You can use the same to clean install Windows 11 on a new PC, troubleshoot your Windows computer or dual boot Windows 10 with Windows 11.
以上是创建 Windows 11 可启动 USB 驱动器的 3 种方法的详细内容。更多信息请关注PHP中文网其他相关文章!


