微控制器製造商提供的開發板和相關的軟體專案例程,在工程師開始新設計時通常能提供很大的幫助。然而,在設計專案的早期階段完成後,在進一步設計時,製造商提供的軟體可能會引發一些問題。
對於使用即時作業系統作為應用程式碼平台的設計來說,也面臨許多挑戰。例如,如何有效地將功能分配給不同的平行任務,如何設計可靠的進程間通信,以及如何在硬體上對整個軟體包進行測試等問題。
越來越多的OEM廠商發現,避免上述問題的最佳方式是使用基於開源、經過驗證、可擴展,並能運行在各種硬體平台上的Linux作業系統來開始新的設計。 Linux作業系統在各種電腦硬體平台上的移植數量也是首屈一指的。
Linux的衍生版本已被廣泛應用於各種嵌入式系統中,包括網路路由器、行動電話、建築自動化控制、電視機以及電玩控制台。
雖然Linux被廣泛應用並取得成功,但這並不意味著它易於使用。 Linux包含的程式碼超過一百萬行,並且運行方式具有明顯的“Linux方式”,初學者可能需要一定時間來適應。
因此,本文的目的是為了幫助使用Linux嵌入式作業系統版本-μClinux,來啟動一個新的設計專案。本指南將分為五個步驟。為了說明該指南,文中介紹了在意法半導體的STM32F429微控制器上實現的一個μClinux項目,該微控制器採用ARMCortex-M4內核,最高主頻為180MHz,並使用了Emcraft的STM32F429DiscoveryLinux板支援包(BSP )。
#每個嵌入式軟體設計都從選擇合適的工具開始。
工具鍊是一組連接(或連結)在一起的軟體開發工具,它包含諸如GNU編譯器集合(GCC)、binutils(一組包括連接器、彙編器和其它用於目標檔案和檔案工具的開發工具)和glibc(提供系統呼叫和基本函數的C函式庫)等元件;在某些情況下,還可能包括編譯器和偵錯器等其它工具。
用於嵌入式開發的工具鍊是一個交叉工具鏈,更常見的叫法是交叉編譯器。
GNUBinutils是嵌入式Linux工具鏈的第一個元件。 GNUBinutils包含兩款重要工具:
●“as”,彙編器,將彙編程式碼(GCC所產生)轉換成二進位程式碼
●“ld”,連接器,將離散目標程式碼段連接到庫或形成可執行檔
編譯器是工具鏈的第二個重要組成部分。在嵌入式Linux,它被稱為GCC,支援許多種微控制器和處理器架構。
接下來是C函數庫。它實作Linux的傳統POSIX應用程式介面(API),該API可被用來開發使用者空間應用。它透過系統呼叫與核心對接,並提供高階服務。
工程師有幾種C函數庫選擇:
●glibc是開源GNU專案提供的可用C函數庫。該庫是全功能、可移植的,它符合Linux標準。
●嵌入式GLIBC(EGLIBC)是一款針對嵌入式系統最佳化的衍生版。其程式碼是精簡的,支援交叉編譯和交叉測試,其原始程式碼和二進位程式碼與GLIBC的相容。
●uClibc是另一個C函數庫,可在快閃記憶體空間有限、和/或記憶體佔用必須最小的情況下使用。
偵錯器通常也是工具鏈的一部分,因為在目標機上偵錯應用程式運行時,需要一個交叉偵錯器。在嵌入式Linux領域,GDB是常用偵錯器。
上述工具是如此地不可或缺,但當它們各自為戰時,會花太長時間來編譯Linux原始碼並將其整合成最終映像(image)。幸運的是,Buildroot(自動產生交叉編譯工具的工具)會自動完成建構一個完整嵌入式系統的過程,並透過產生下述任一或所有任務,簡化了交叉編譯:
●交叉編譯工具鏈
●根檔案系統
●核心映像
●引導映像
For embedded system designers, it is also convenient to use a tool (utility) aggregation tool, such as BusyBox, which integrates the tools that are usually most needed. According to BusyBox's information page, "It combines tiny versions of many common UNIX tools into a small executable. It provides an alternative to most of the tools you would typically see in tools like GNU fileutils and shellutils. BusyBox The tools in BusyBox are generally less selective than their full-featured GNU counterparts; but the included options provide expected functionality and behavior that is almost identical to that provided by the GNU counterpart. For any small or embedded system, BusyBox provides The environment is quite complete.”
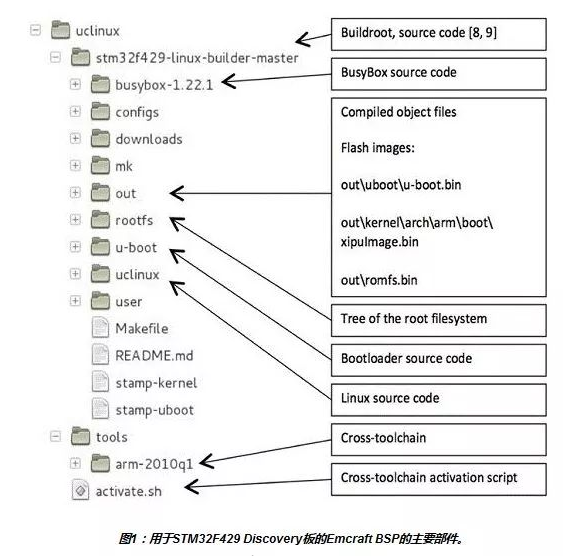
The last important tool is a BSP, which is specially made for the motherboard equipped with the project target MCU or processor.
The BSP includes pre-configured tools, as well as a bootloader to load the operating system onto the motherboard. It also provides source code for the kernel and device drivers (see Figure 1).

The typical embedded Linux startup sequence is as follows:
1) The bootloader firmware (U-Boot in the example project) runs in the target MCU's built-in flash memory (no external memory required), and after power-on/reset, performs all necessary initialization work, including setting up the serial port and using Memory controller for external memory (RAM) access.
2) U-Boot can transfer the Linux image from external Flash to external RAM and transfer control to the kernel entry point in RAM. Linux images can be compressed to save flash space at the expense of decompression time at boot time.
3) Linux boots and installs a RAM-based file system (initramfs) as the root file system. When the project is built, the Initramfs is populated with the required files and directories and then simply linked to the kernel.
4) Under the Linux kernel, execute /sbin/init. The /sbin/init program initializes the system according to the description of the configuration file in /etc/inittab.
5) Once the initialization process completes run-level execution and commands in /sbin/init, it starts a login process.
6) The execution of the shell initialization file /etc/profile marks the completion of the startup process.
You can significantly shorten startup time and improve overall performance by enabling in-place execution (ExecuteInPlace—XIP), which is a method of executing code from flash memory. Typically, Linux code is loaded from flash memory to external memory and then executed from the external memory. By executing from flash memory, less memory is required because this copying step is no longer required, and read-only memory no longer takes up program space.
以上是嵌入式Linux專案開發的幾個步驟的詳細內容。更多資訊請關注PHP中文網其他相關文章!


