

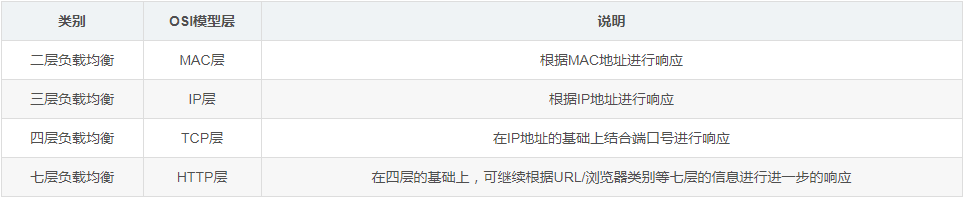
四層負載平衡vs 七層負載平衡
常常會說七層負載平衡還是四層負載平衡,其實根據iso的osi網路模型的所在層的叫法而決定的,nginx因為在使用http協定在應用層進行負載平衡的操作,所以稱為七層負載平衡。而諸如lvs在tcp層進行負載平衡操作的則稱為四層負載平衡。一般來說,有如下層的負載平衡分類:
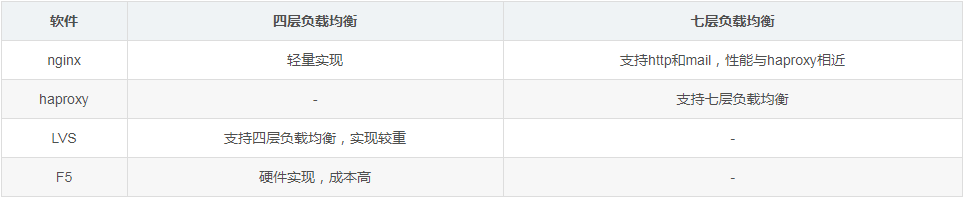
常見軟體的支援
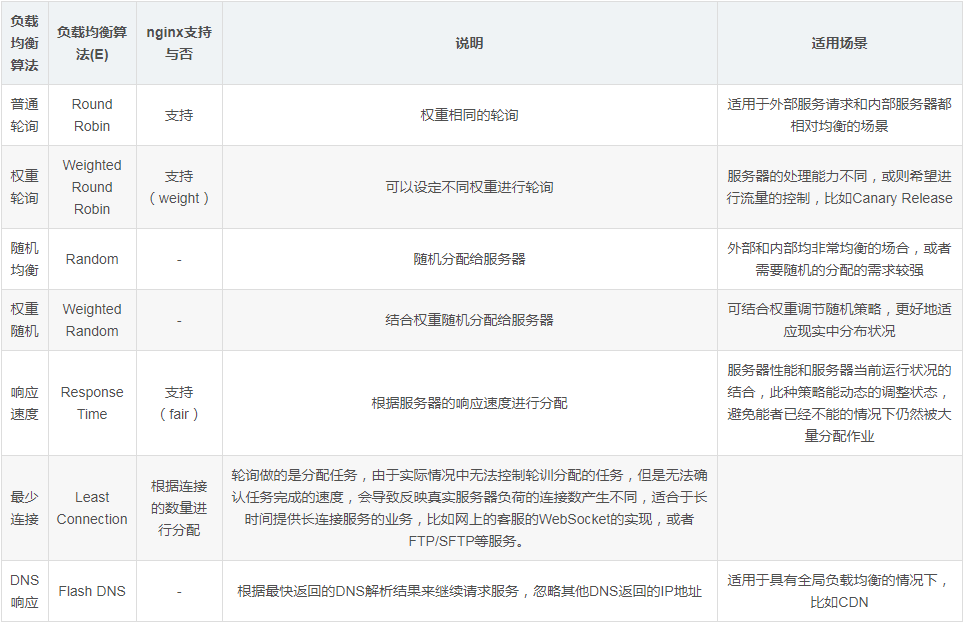
#常見的負載平衡演算法
負載平衡常見有以下幾種演算法:
負載平衡示範實例:普通輪詢
接下來用nginx來示範如何進行普通輪詢:

##事前準備
事前在7001/7002兩個端口分別啟動兩個服務,用於顯示不同信息,為了演示方便,使用tornado做了一個鏡像,通過docker容器啟動時傳遞的參數不同用於顯示服務的不同。[root@kong ~]# docker run -d -p 7001:8080 liumiaocn/tornado:latest python /usr/local/bin/daemon.py "user service 1: 7001" ddba0abd24524d270a782c3fab907f6a35c0ce514eec3159357bded09022ee57 [root@kong ~]# docker run -d -p 7002:8080 liumiaocn/tornado:latest python /usr/local/bin/daemon.py "user service 1: 7002" 95deadd795e19f675891bfcd44e5ea622c95615a95655d1fd346351eca707951 [root@kong ~]# [root@kong ~]# curl http://192.168.163.117:7001 hello, service :user service 1: 7001 [root@kong ~]# [root@kong ~]# curl http://192.168.163.117:7002 hello, service :user service 1: 7002 [root@kong ~]#
啟動nginx
[root@kong ~]# docker run -p 9080:80 --name nginx-lb -d nginx 9d53c7e9a45ef93e7848eb3f4e51c2652a49681e83bda6337c89a3cf2f379c74 [root@kong ~]# docker ps |grep nginx-lb 9d53c7e9a45e nginx "nginx -g 'daemon ..." 11 seconds ago up 10 seconds 0.0.0.0:9080->80/tcp nginx-lb [root@kong ~]#
#nginx程式碼片段
準備如下nginx程式碼段將其新增至nginx的/etc /nginx/conf.d/default.conf中http { upstream nginx_lb { server 192.168.163.117:7001; server 192.168.163.117:7002; } server { listen 80; server_name www.liumiao.cn 192.168.163.117; location / { proxy_pass http://nginx_lb; } }
修改default.conf的方法
可以透過在容器中安裝vim達到效果,也可以在本地修改然後透過docker cp傳入,或直接sed修改都可。如果在容器中安裝vim,使用下列方式即可[root@kong ~]# docker exec -it nginx-lb sh # apt-get update ...省略 # apt-get install vim ...省略
#修改前
# cat default.conf server { listen 80; server_name localhost; #charset koi8-r; #access_log /var/log/nginx/host.access.log main; location / { root /usr/share/nginx/html; index index.html index.htm; } #error_page 404 /404.html; # redirect server error pages to the static page /50x.html # error_page 500 502 503 504 /50x.html; location = /50x.html { root /usr/share/nginx/html; } # proxy the php scripts to apache listening on 127.0.0.1:80 # #location ~ \.php$ { # proxy_pass http://127.0.0.1; #} # pass the php scripts to fastcgi server listening on 127.0.0.1:9000 # #location ~ \.php$ { # root html; # fastcgi_pass 127.0.0.1:9000; # fastcgi_index index.php; # fastcgi_param script_filename /scripts$fastcgi_script_name; # include fastcgi_params; #} # deny access to .htaccess files, if apache's document root # concurs with nginx's one # #location ~ /\.ht { # deny all; #} } #
已修改後
# cat default.conf upstream nginx_lb { server 192.168.163.117:7001; server 192.168.163.117:7002; } server { listen 80; server_name www.liumiao.cn 192.168.163.117; #charset koi8-r; #access_log /var/log/nginx/host.access.log main; location / { #root /usr/share/nginx/html; #index index.html index.htm; proxy_pass http://nginx_lb; } #error_page 404 /404.html; # redirect server error pages to the static page /50x.html # error_page 500 502 503 504 /50x.html; location = /50x.html { root /usr/share/nginx/html; } # proxy the php scripts to apache listening on 127.0.0.1:80 # #location ~ \.php$ { # proxy_pass http://127.0.0.1; #} # pass the php scripts to fastcgi server listening on 127.0.0.1:9000 # #location ~ \.php$ { # root html; # fastcgi_pass 127.0.0.1:9000; # fastcgi_index index.php; # fastcgi_param script_filename /scripts$fastcgi_script_name; # include fastcgi_params; #} # deny access to .htaccess files, if apache's document root # concurs with nginx's one # #location ~ /\.ht { # deny all; #} } #

重啟nginx容器
[root@kong ~]# docker restart nginx-lb nginx-lb [root@kong ~]#
#可以清楚地看到依照順序,進行輪詢:
[root@kong ~]# curl
hello, service :user service 1: 7001[root@kong ~]# curl####負載平衡示範實例:權重輪詢#########而在此基礎上,進行權重輪詢只需加上weight即可##### #############修改default.conf#########依照以下修改default.conf###hello, service :user service 1: 7002
[root@kong ~]# curl
hello, service :user service 1: 7001
[root@kong ~]# curl
hello, service :user service 1: 7002
[root@kong ~]
# cp default.conf default.conf.org # vi default.conf # diff default.conf default.conf.org 2,3c2,3 < server 192.168.163.117:7001 weight=100; < server 192.168.163.117:7002 weight=200; --- > server 192.168.163.117:7001; > server 192.168.163.117:7002; #
[root@kong ~]# docker restart nginx-lb nginx-lb [root@kong ~]#
以上是怎麼使用nginx進行負載平衡的詳細內容。更多資訊請關注PHP中文網其他相關文章!


