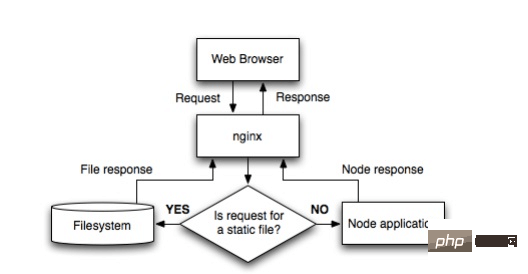
流程圖

#nginx設定如下:
http { proxy_cache_path /var/cache/nginx levels=1:2 keys_zone=one:8m max_size=3000m inactive=600m; proxy_temp_path /var/tmp; include mime.types; default_type application/octet-stream; sendfile on; keepalive_timeout 65; gzip on; gzip_comp_level 6; gzip_vary on; gzip_min_length 1000; gzip_proxied any; gzip_types text/plain text/html text/css application/json application/x-javascript text/xml application/xml application/xml+rss text/javascript; gzip_buffers 16 8k; ssl_certificate /some/location/sillyfacesociety.com.bundle.crt; ssl_certificate_key /some/location/sillyfacesociety.com.key; ssl_protocols sslv3 tlsv1; ssl_ciphers high:!anull:!md5; upstream silly_face_society_upstream { server 127.0.0.1:61337; server 127.0.0.1:61338; keepalive 64; } server { listen 80; listen 443 ssl; server_name sillyfacesociety.com; return 301 $scheme://www.sillyfacesociety.com$request_uri; } server { listen 80; listen 443 ssl; server_name www.sillyfacesociety.com; error_page 502 /errors/502.html; location ~ ^/(images/|img/|javascript/|js/|css/|stylesheets/|flash/|media/|static/|robots.txt|humans.txt|favicon.ico) { root /usr/local/silly_face_society/node/public; access_log off; expires max; } location /errors { internal; alias /usr/local/silly_face_society/node/public/errors; } location / { proxy_redirect off; proxy_set_header x-real-ip $remote_addr; proxy_set_header x-forwarded-for $proxy_add_x_forwarded_for; proxy_set_header x-forwarded-proto $scheme; proxy_set_header host $http_host; proxy_set_header x-nginx-proxy true; proxy_set_header connection ""; proxy_http_version 1.1; proxy_cache one; proxy_cache_key sfs$request_uri$scheme; proxy_pass http://silly_face_society_upstream; } } }
配置段說明
http { ... upstream silly_face_society_upstream { server 127.0.0.1:61337; server 127.0.0.1:61338; keepalive 64; } ... }
nginx負載平衡多個nodo.js實例。 keepalive 64 指示nginx在任何時候保持最少64個http/ 1.1連接到代理伺服器。如果有更多的流量nginx將開啟更多的連線。
http { ... server { ... location / { proxy_redirect off; proxy_set_header x-real-ip $remote_addr; proxy_set_header x-forwarded-for $proxy_add_x_forwarded_for; proxy_set_header host $http_host; proxy_set_header x-nginx-proxy true; ... proxy_set_header connection ""; proxy_http_version 1.1; proxy_pass http://silly_face_society_upstream; } ... } }
將符合哪些的請求傳送到代理程式上。 nginx的符合規則可以取看看前面的文章。
nginx處理靜態內容
http { ... server { ... location ~ ^/(images/|img/|javascript/|js/|css/|stylesheets/|flash/|media/|static/|robots.txt|humans.txt|favicon.ico) { root /usr/local/silly_face_society/node/public; access_log off; expires max; } ... } }
設定快取
http { ... proxy_cache_path /var/cache/nginx levels=1:2 keys_zone=one:8m max_size=3000m inactive=600m; proxy_temp_path /var/tmp; ... } http { server { ... location / { ... proxy_cache one; proxy_cache_key sfs$request_uri$scheme; ... } ... } }
快取是透過http頭部來控制的。
helloworld
試驗一下,我們來寫個helloworld.js
var http = require('http'); http.createserver(function (request, response) { response.writehead(200, {'content-type': 'text/plain'}); response.end('hello world\n'); }).listen(61337); console.log('server running at http://127.0.0.1:61337/');
然後用node helloworld.js指令開啟,這樣跑在本地的機子的nodejs的程式就算開起來了,佔用的是8000端口,可自行修改。
此時確定在nginx的vhost.conf裡面的設定應有:
server { listen 80; server_name jb51.net.jb51.net; location / { proxy_pass http://127.0.0.1:61337; } }
將網站網域設定好,然後連接埠設定為80,最後proxy_pass設定為http:/ /127.0.0.1:61337,將所有從jb51.net:80的請求傳遞到nodejs程式去。
重啟nginx、造訪域名,就可以了看到helloworld了。
雖然node.js本身就可以做伺服器是沒錯啦,例如welcome.js裡面設定為80埠就可以了。
但是一個機子跑多個網站,其他網站又是用別的伺服器,在80埠已經被佔用的情況下,是可以用代理到別的埠來處理的。
以上是Node.js怎麼設定使用Nginx伺服器的詳細內容。更多資訊請關注PHP中文網其他相關文章!


