由於最近工作需求,需要在已有專案中新增一個功能,實現配置熱載入的功能。所謂的配置熱加載,也就是說當服務收到配置更新訊息之後,我們不用重啟服務就可以使用最新的配置去執行任務。
下面我分別採用多行程、多執行緒、協程的方式去實作設定熱載入。
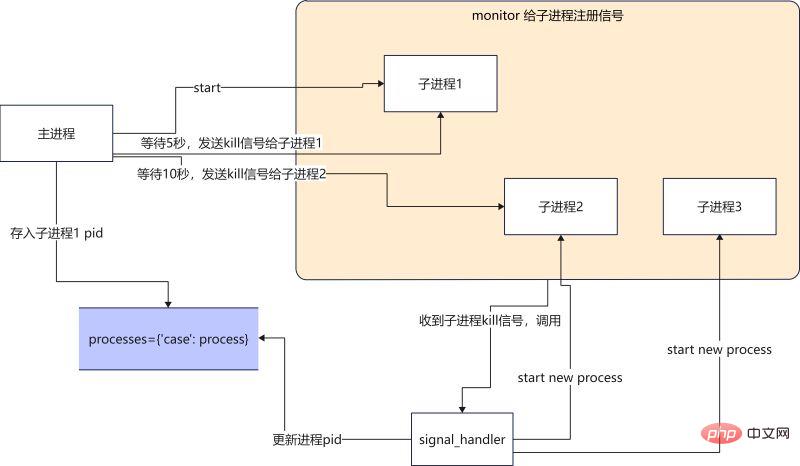
如果我們程式碼實作上使用多進程,主進程1來更新配置並發送指令,任務的呼叫是進程2,如何實現配置熱加載呢?

當主程序收到配置更新的訊息之後(配置讀取是如何收到配置更新的訊息的? 這裡我們暫不討論), 主進程就向進子程1發送kill信號,子進程1收到kill的信號就退出,之後由信號處理函數來啟動一個新的進程,使用最新的配置文件來繼續執行任務。
main 函數
def main():
    # 启动一个进程执行任务
    p1 = Process(target=run, args=("p1",))
    p1.start()

    monitor(p1, run) # 注册信号
    processes["case100"] = p1 #将进程pid保存
    num = 0
    while True: # 模拟获取配置更新
        print(
            f"{multiprocessing.active_children()=}, count={len(multiprocessing.active_children())}\n")
        print(f"{processes=}\n")
        sleep(2)
        if num == 4:
            kill_process(processes["case100"]) # kill 当前进程
        if num == 8:
            kill_process(processes["case100"]) # kill 当前进程
        if num == 12:
            kill_process(processes["case100"]) # kill 当前进程
num += 1signal_handler 函數
def signal_handler(process: Process, func, signum, frame):
    # print(f"{signum=}")
    global counts

    if signum == 17:  # 17 is SIGCHILD
        # 这个循环是为了忽略SIGTERM发出的信号,避免抢占了主进程发出的SIGCHILD
        for signame in [SIGTERM, SIGCHLD, SIGQUIT]:
            signal.signal(signame, SIG_DFL)

        print("Launch a new process")
        p = multiprocessing.Process(target=func, args=(f"p{counts}",))
        p.start()
        monitor(p, run)
        processes["case100"] = p
        counts += 1

    if signum == 2:
        if process.is_alive():
            print(f"Kill {process} process")
            process.terminate()
        signal.signal(SIGCHLD, SIG_IGN)
sys.exit("kill parent process")完整程式碼如下
#! /usr/local/bin/python3.8
from multiprocessing import Process
from typing import Dict
import signal
from signal import SIGCHLD, SIGTERM, SIGINT, SIGQUIT, SIG_DFL, SIG_IGN
import multiprocessing
from multiprocessing import Process
from typing import Callable
from data import processes
import sys
from functools import partial
import time
processes: Dict[str, Process] = {}
counts = 2
def run(process: Process):
while True:
print(f"{process} running...")
time.sleep(1)
def kill_process(process: Process):
print(f"kill {process}")
process.terminate()
def monitor(process: Process, func: Callable):
for signame in [SIGTERM, SIGCHLD, SIGINT, SIGQUIT]:
# SIGTERM is kill signal.
# No SIGCHILD is not trigger singnal_handler,
# No SIGINT is not handler ctrl+c,
# No SIGQUIT is RuntimeError: reentrant call inside <_io.BufferedWriter name='<stdout>'>
signal.signal(signame, partial(signal_handler, process, func))
def signal_handler(process: Process, func, signum, frame):
print(f"{signum=}")
global counts
if signum == 17: # 17 is SIGTERM
for signame in [SIGTERM, SIGCHLD, SIGQUIT]:
signal.signal(signame, SIG_DFL)
print("Launch a new process")
p = multiprocessing.Process(target=func, args=(f"p{counts}",))
p.start()
monitor(p, run)
processes["case100"] = p
counts += 1
if signum == 2:
if process.is_alive():
print(f"Kill {process} process")
process.terminate()
signal.signal(SIGCHLD, SIG_IGN)
sys.exit("kill parent process")
def main():
p1 = Process(target=run, args=("p1",))
p1.start()
monitor(p1, run)
processes["case100"] = p1
num = 0
while True:
print(
f"{multiprocessing.active_children()=}, count={len(multiprocessing.active_children())}\n")
print(f"{processes=}\n")
time.sleep(2)
if num == 4:
kill_process(processes["case100"])
if num == 8:
kill_process(processes["case100"])
if num == 12:
kill_process(processes["case100"])
num += 1
if __name__ == '__main__':
main()執行結果如下
multiprocessing.active_children()=[<Process name='Process-1' pid=2533 parent=2532 started>], count=1
processes={'case100': <Process name='Process-1' pid=2533 parent=2532 started>}
p1 running...
p1 running...
kill <Process name='Process-1' pid=2533 parent=2532 started>
multiprocessing.active_children()=[<Process name='Process-1' pid=2533 parent=2532 started>], count=1
processes={'case100': <Process name='Process-1' pid=2533 parent=2532 started>}
signum=17
Launch a new process
p2 running...
p2 running...
multiprocessing.active_children()=[<Process name='Process-2' pid=2577 parent=2532 started>], count=1
processes={'case100': <Process name='Process-2' pid=2577 parent=2532 started>}
p2 running...
p2 running...
multiprocessing.active_children()=[<Process name='Process-2' pid=2577 parent=2532 started>], count=1
processes={'case100': <Process name='Process-2' pid=2577 parent=2532 started>}
p2 running...
p2 running...
multiprocessing.active_children()=[<Process name='Process-2' pid=2577 parent=2532 started>], count=1
processes={'case100': <Process name='Process-2' pid=2577 parent=2532 started>}
p2 running...
p2 running...
kill <Process name='Process-2' pid=2577 parent=2532 started>
signum=17
Launch a new process
multiprocessing.active_children()=[<Process name='Process-2' pid=2577 parent=2532 stopped exitcode=-SIGTERM>], count=1
processes={'case100': <Process name='Process-3' pid=2675 parent=2532 started>}
p3 running...
p3 running...
multiprocessing.active_children()=[<Process name='Process-3' pid=2675 parent=2532 started>], count=1總結
好處:使用訊號量可以處理多進程之間通訊的問題。
壞處:程式碼不好寫,寫出來程式碼不好理解。信號量使用必須要很熟悉,不然很容易自己給自己寫了一個bug.(所有初學者慎用,老司機除外。)
還有一點不是特別理解的就是process. terminate() 發出訊號是SIGTERM number是15,但是第一次signal_handler收到訊號卻是number=17,如果我要去處理15的訊號,就會導致前一個行程不能kill掉的問題。歡迎有對信號量比較熟悉的大佬,來指點迷津,不甚感謝。
實作邏輯是主進程1 更新設定並傳送指令。進程2啟動調度任務。
這時候當主進程1更新好設定之後,發送指令給進程2,這時候的指令就是用Event一個非同步事件通知。
直接上程式碼
scheduler 函數
def scheduler():
    while True:
        print('wait message...')
        case_configurations = scheduler_notify_queue.get()
        print(f"Got case configurations {case_configurations=}...")

        task_schedule_event.set() # 设置set之后, is_set 为True

        print(f"Schedule will start ...")
        while task_schedule_event.is_set(): # is_set 为True的话,那么任务就会一直执行
            run(case_configurations)

print("Clearing all scheduling job ...")event_scheduler 函數
def event_scheduler(case_config):

    scheduler_notify_queue.put(case_config)
    print(f"Put cases config to the Queue ...")

    task_schedule_event.clear() # clear之后,is_set 为False
    print(f"Clear scheduler jobs ...")

print(f"Schedule job ...")完整程式碼如下
import multiprocessing
import time


scheduler_notify_queue = multiprocessing.Queue()
task_schedule_event = multiprocessing.Event()


def run(case_configurations: str):
    print(f'{case_configurations} running...')
    time.sleep(3)


def scheduler():
    while True:
        print('wait message...')
        case_configurations = scheduler_notify_queue.get()

        print(f"Got case configurations {case_configurations=}...")
        task_schedule_event.set()

        print(f"Schedule will start ...")
        while task_schedule_event.is_set():
            run(case_configurations)

        print("Clearing all scheduling job ...")


def event_scheduler(case_config: str):

    scheduler_notify_queue.put(case_config)
    print(f"Put cases config to the Queue ...")

    task_schedule_event.clear()
    print(f"Clear scheduler jobs ...")

    print(f"Schedule job ...")


def main():
    scheduler_notify_queue.put('1')
    p = multiprocessing.Process(target=scheduler)
    p.start()

    count = 1
    print(f'{count=}')
    while True:
        if count == 5:
            event_scheduler('100')
        if count == 10:
            event_scheduler('200')
        count += 1
        time.sleep(1)


if __name__ == '__main__':
main()執行結果如下
wait message...
Got case configurations case_configurations='1'...
Schedule will start ...
1 running...
1 running...
Put cases config to the Queue ...
Clear scheduler jobs ...
Schedule job ...
Clearing all scheduling job ...
wait message...
Got case configurations case_configurations='100'...
Schedule will start ...
100 running...
Put cases config to the Queue ...
Clear scheduler jobs ...
Schedule job ...
Clearing all scheduling job ...
wait message...
Got case configurations case_configurations='200'...
Schedule will start ...
200 running...
200 running...
總結
#使用Event事件通知,程式碼不易出錯,程式碼寫少,易讀。相較於之前信號量的方法,推薦大家多使用這種方式。
使用多執行緒或協程的方式,其實和上述實作方式一致。唯一差別就是呼叫了不同函式庫中,queue和 event.
# threading
scheduler_notify_queue = queue.Queue()
task_schedule_event = threading.Event()

# async
scheduler_notify_queue = asyncio.Queue()
task_schedule_event = asyncio.Event()
以上是Python實作熱載入設定檔的方法的詳細內容。更多資訊請關注PHP中文網其他相關文章!


