

這裡有兩個簡單的測試展示,最後有更多的測試範例。
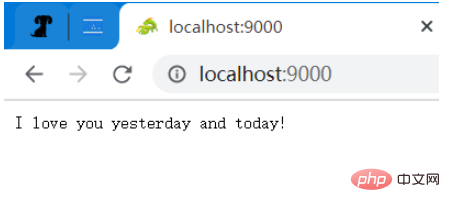
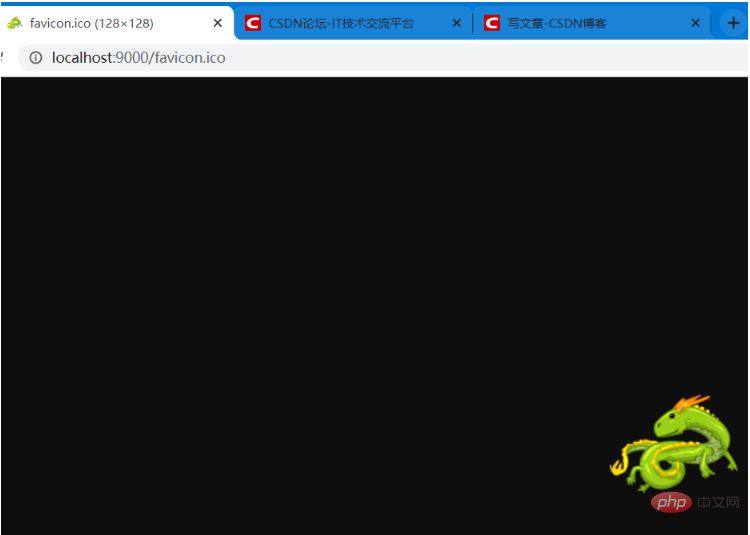
存取根目錄,然後會回傳一句話(字串)(注意:那條綠色的龍,只有使用瀏覽器存取才能看到的,圖片本身也是屬於一個請求的。)Content-Type: application/json
# 單獨存取這張圖片,傳回值是圖片(二進位資料)
所以只要使用者事先設定好請求訊息和回應訊息,在存取特定請求時,就能傳回特定數據。所以,我設計了一個簡單的 xml 檔案用來配置這些訊息,使用 xml 配置比較方便,properties 設定檔無法表達層次訊息,只能適用於簡單的設定要求。
一個大的request_and_responses代表許多個請求和回應配置,每一個request_and_response節點代表一個request請求和response回應訊息,裡麵包含了請求和回應的基本訊息。 GET 方式請求主要包括:(method) 請求方法 和 (path) 請求路徑和參數。 POST 方法請求也包含一個 (param)請求參數。 response 包括:content_type(回應內容類型) 和value(回應內容)。
GET 和POST 方式的差異在於,GET 方式的請求路徑和請求參數是在一起的(都在請求頭中,沒有請求體),而POST 方式的請求參數則是在請求體裡面的,請求頭和請求體之間有一個CRLF 分隔。
GET / application/json I love you yesterday and today! GET /login?account=123&pwd=456 application/json success GET /query/龙 application/json 龙是中国等东亚国家古代神话传说生活于海中的神异生物。 POST /login account=123&pwd=456application/json {"result":success} POST /login workId=12345application/json {"result":"success", "data":{"name":"李工", "sex":"男", "age":35}} GET /pictures/husky.jpeg image/jpeg D:/DB/husky.jpeg GET /favicon.ico image/webp D:/DB/favicon.ico
xml 中的信息,讀取到記憶體中,使用一個實體類別來封裝資訊。
package com.dragon; public class RequestAndResponse { private String method; private String path; private String param; private String content_type; private String value; public String getMethod() { return method; } public void setMethod(String method) { this.method = method; } public String getPath() { return path; } public void setPath(String path) { this.path = path; } public String getParam() { return param; } public void setParam(String param) { this.param = param; } public String getContent_type() { return content_type; } public void setContent_type(String content_type) { this.content_type = content_type; } public String getValue() { return value; } public void setValue(String value) { this.value = value; } @Override public String toString() { return "RequestAndResponse [method=" + method + ", path=" + path + ", param=" + param + ", content_type=" + content_type + ", value=" + value + "]"; } }
使用一個類別專門解析 xml 檔案為Java 對象,然後使用一個 List 集合來儲存所有的對象。
註:不太會取名字,有點太長了,湊合著看吧!哈哈。附註:這裡使用一個xml解析的jar套件:dom4j。
package com.dragon; import java.io.File; import java.util.ArrayList; import java.util.Iterator; import java.util.List; import org.dom4j.Document; import org.dom4j.DocumentException; import org.dom4j.Element; import org.dom4j.io.SAXReader; /** * 解析 xml 文件中配置的用户请求和响应数据。 * */ public class RequestAndResponseResolver { private static final String method = "method"; private static final String path = "path"; private static final String param = "param"; private static final String content_type = "content_type"; private static final String value = "value"; public static List listRequestAndResponse(String filePath) throws DocumentException{ File file = new File(filePath); SAXReader reader = new SAXReader(); Document doc = reader.read(file); Element root = doc.getRootElement(); //获取根元素下面所有的子元素,利用迭代器方式 Iterator it = root.elementIterator(); List requestAndResponses = new ArrayList<>(); while (it.hasNext()) { //取出元素request_and_response Element e = (Element)it.next(); //依次遍历每一个 request_and_response,获取相应的信息 Element request = e.element("request"); Element response = e.element("response"); RequestAndResponse requestAndResponse = new RequestAndResponse(); requestAndResponse.setMethod(request.elementText(method)); requestAndResponse.setPath(request.elementText(path)); requestAndResponse.setParam(request.elementText(param)); //GET 方式,这个属性为 null requestAndResponse.setContent_type(response.elementText(content_type)); requestAndResponse.setValue(response.elementText(value)); requestAndResponses.add(requestAndResponse); } return requestAndResponses; } }
#下面介紹一下,使用 Socket 接收並處理請求的部分。這裡涉及的知識和使用 Socket 基本上都是一樣的,唯一的區別就是對於內容本身的處理,因為內容本身是包含資料和非資料部分的。 (站在 HTTP 的角度,只能看到資料部分。)使用 Socket 編程,簡單來說就是監聽一個端口,一旦有連接到來,就進行處理。 (這裡使用傳統的 BIO,NIO 那部分我不會。)
這裡我的處理是,使用一個線程池進行處理,每一個連接使用一個線程進行處理。關於這個類別(Server類別)的完整程式碼,請參見下面。
public void receive() { //使用线程池处理请求 ExecutorService pool = Executors.newFixedThreadPool(THREAD_NUMBER); while (true) { try { Socket connection = server.accept(); pool.submit(new UserConnection(connection)); } catch (IOException e) { System.out.println(this.getDate()+" 用户连接断开"); e.printStackTrace(); } } }
package com.dragon; import java.io.IOException; import java.net.ServerSocket; import java.net.Socket; import java.text.SimpleDateFormat; import java.util.Date; import java.util.concurrent.ExecutorService; import java.util.concurrent.Executors; public class Server { private static final int THREAD_NUMBER = 10; private ServerSocket server; private int port; public Server(int port) { this.port = port; } //启动服务。 public void start() { try { server = new ServerSocket(port); System.out.println(this.getDate()+" 服务启动!"); this.receive(); } catch (IOException e) { System.out.println(this.getDate()+" 服务启动失败!"); e.printStackTrace(); } } public void receive() { //使用线程池处理请求 ExecutorService pool = Executors.newFixedThreadPool(THREAD_NUMBER); while (true) { try { Socket connection = server.accept(); pool.submit(new UserConnection(connection)); } catch (IOException e) { System.out.println(this.getDate()+" 用户连接断开"); e.printStackTrace(); } } } private String getDate() { String format = "yyyy-MM-dd HH:mm:ss"; Date now = new Date(); SimpleDateFormat dateFormat = new SimpleDateFormat(format); return dateFormat.format(now); } }
Http 請求訊息從TCP 的層次來看就是一段二進位資料流(網路是分層的),所以我們可以直接使用TCP 接收這個流,因為涉及二進位資料(如檔案上傳)的報文解析比較複雜,我也不知道該怎麼做,所以這裡我只是測試簡單的不含二進位檔案的請求。 )
註:因為具體的解析也是很複雜的,這涉及到HTTP 報文的結構,但是如果不涉及文件上傳,那麼整個報文都是一些字符數據,所以一次性讀取全部請求報文,然後轉成字串,使用字串來進行解析。
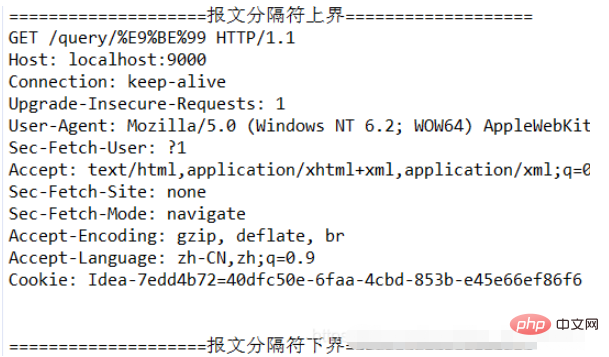
in = connection.getInputStream(); out = connection.getOutputStream(); //这个数字是随便设置的,因为要一次性读取整个请求报文,不能太小。(但是其实这个也很大了) byte[] b = new byte[5*1024]; BufferedInputStream input = new BufferedInputStream(in); int count = input.read(b); String requestMessage = new String(b, 0, count); System.out.println("====================报文分隔符上界==================="); System.out.println(requestMessage); System.out.println("====================报文分隔符下界===================");
請求和回應訊息初始化說明:使用靜態初始化區塊來初始化訊息,將使用者提前配置好的xml資訊讀取入內存,前面提到這部分。
// 初始化配置好的信息 static { try { requestAndResponses = RequestAndResponseResolver.listRequestAndResponse("./src/com/dragon/request_and_response.xml"); } catch (DocumentException e) { e.printStackTrace(); } }
請求處理和取得回應資訊因為這裡是模擬呼叫,所以我主要關注請求頭中的三個部分資料:請求方法(method)、請求路徑(path)、請求參數(param)。對於 GET 方式和 POST 方式分開進行處理,上面簡單介紹了 GET 和 POST 的區別(但是不夠詳細,可以去參考網上的其它資料了解)。
透過這段程式碼,如果是 GET 方式,就將 RequestAndResponse 物件中的 content_type(傳回值資料型別) 和 value (傳回值資料)取出來,並賦值給局部變數 content_type 和 value。
if ("GET".compareTo(method) == 0) { for (RequestAndResponse r : requestAndResponses) { //这里需要对 get 方式时的请求进行解码,因为一些非 ASCII 码字符会被编码,比如汉字。 path = URLDecoder.decode(path, ENCODE); if (r.getMethod().equals(method) && r.getPath().equals(path)) { content_type = r.getContent_type(); value = r.getValue(); break; } } } else { //POST 方式,请求参数是在请求体中的,请求头和请求体中间有一个换行符。 String param = requestMessage.substring(requestMessage.lastIndexOf(CRLF) + 2); //这里是不包括 CRLF 的两个字符的。 for (RequestAndResponse r : requestAndResponses) { //因为这个get方式的 参数为空,所以这里必须是 param 在前。 if (r.getMethod().equals(method) && r.getPath().equals(path) && param.equals(r.getParam())) { content_type = r.getContent_type(); value = r.getValue(); break; } } }
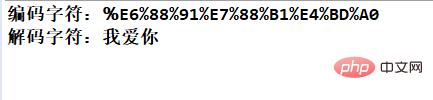
这里介绍一个知识:URL 中的字符是特定的,不允许中文等字符的出现,所以发送请求时会对中文等字符进行编码,如果直接使用 equals 方法的,当然不会相等了,所以需要先对数据进行解码,然后再调用 equals 方法进行处理。这个是我们平时广泛使用的东西,有时候使用浏览器可以看到带很多奇怪字符 URL,它们都是被处理过的。
举一个简单的例子:
String str = "我爱你"; String en_str = java.net.URLEncoder.encode(str, "UTF-8"); String de_str = java.net.URLDecoder.decode(en_str, "UTF-8"); System.out.println("编码字符:" + en_str); System.out.println("解码字符:" + de_str);
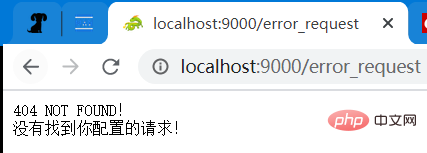
注意:这里有一个特殊的情况,如果发起了没有配置的请求方法和路径,那么程序会出错。所以,这里的 content_type 和 value 有一个默认的值,而且非常有趣!
执行响应响应信息主要关注几点:响应信息长度(Content-Length)(按字节数计算)、响应内容类型(Content-Type)。
虽然发送的请求里不能带二进制文件,但是响应信息是可以返回文件的,而且使用 Content-Length (一次性发送),不使用 Chunked 分块发送(这里我还不太明白,而且只是模拟,应该使用一些简单的小文件。)。
下面是区分响应类型为 json(字符串)还是文件(二进制数据)的代码:
如果是字符串,则 value 的值是字符串的值,如果是文件,则 value 的值为一个具体的本地路径。(不应该使用网络图片,即使修改程序可以做到也没有必要,因为这样就需要依赖网络了。)
//这里我只处理字符串类和文件类两种响应体 //响应体 int len = 0; String responseBody = null; //响应值是 json 数据 File file = null; //响应值是 文件 if (content_type.equals("application/json")) { //如果是 json 数据,否则就是 文件类数据(图片、文档或其它文件) responseBody = value; len = responseBody.getBytes().length; //响应体的字节数,注意是字节数! } else { file = new File(value); len = (int) file.length(); }
然后就可以准备发送响应数据了,下面是发送响应的代码,注意报文的具体结构。
//响应头 responseHeader.append("HTTP/1.1").append(BLANK); responseHeader.append(200).append(BLANK); responseHeader.append("OK").append(CRLF); responseHeader.append("Server:"+"CrazyDragon").append(CRLF); responseHeader.append("Date:").append(BLANK).append(date).append(CRLF); responseHeader.append("Content-Type:").append(BLANK).append(content_type).append(CRLF); responseHeader.append("Content-Length:").append(BLANK).append(len).append(CRLF); responseHeader.append(CRLF); //如果 字符串变量 responseBody 不为空,则说明返回值是 json 数据(字符串) //否则就是文件类的流了。 if (responseBody != null) { String response = responseHeader.toString() + responseBody; out.write(response.getBytes("UTF-8")); } else { out.write(responseHeader.toString().getBytes("UTF-8")); int hasRead = 0; byte[] data = new byte[4*1024]; try (BufferedInputStream inputStream = new BufferedInputStream(new FileInputStream(file))) { while ((hasRead = inputStream.read(data)) != -1) { out.write(data, 0, hasRead); } } } out.flush(); //必要的刷新流操作。
User Connection 的完整代码:
package com.dragon; import java.io.BufferedInputStream; import java.io.File; import java.io.FileInputStream; import java.io.IOException; import java.io.InputStream; import java.io.OutputStream; import java.net.Socket; import java.net.URLDecoder; import java.text.SimpleDateFormat; import java.util.Date; import java.util.List; import java.util.Locale; import java.util.TimeZone; import org.dom4j.DocumentException; public class UserConnection implements Runnable{ private static final String BLANK = " "; private static final String CRLF = "\r\n"; //换行符,不能写反了! private static final String ENCODE = "UTF-8"; private static final String default_content_type = "application/json"; //当任何匹配路径都没有时。 private static final String default_value = "404 NOT FOUND!\n没有找到你配置的请求!"; private static List

          requestAndResponses; private Socket connection; // 初始化配置好的信息 static { try { requestAndResponses = RequestAndResponseResolver.listRequestAndResponse("./src/com/dragon/request_and_response.xml"); } catch (DocumentException e) { e.printStackTrace(); } } public UserConnection(Socket connection) { this.connection = connection; } @Override public void run() { InputStream in = null; OutputStream out = null; try { in = connection.getInputStream(); out = connection.getOutputStream(); //这个数字是随便设置的,因为要一次性读取整个请求报文,不能太小。(但是其实这个也很大了) byte[] b = new byte[5*1024]; BufferedInputStream input = new BufferedInputStream(in); int count = input.read(b); String requestMessage = new String(b, 0, count); System.out.println("====================报文分隔符上界==================="); System.out.println(requestMessage); System.out.println("====================报文分隔符下界==================="); //以第一个 换行符 CRLF 为界限取出 请求路径和请求参数 String requestLine = requestMessage.substring(0, requestMessage.indexOf(CRLF)); String[] line = requestLine.split("\\s"); String method = line[0]; //考虑大小写。 String path = line[1]; //这个数组是有三个元素,最后一个是 协议的版本,这里不需要,就不处理了。 String content_type = default_content_type; String value = default_value; if ("GET".compareTo(method) == 0) { // System.out.println("请求方式:" + method + " 请求路径(含参数):" + path); for (RequestAndResponse r : requestAndResponses) { //这里需要对 get 方式时的请求进行解码,因为一些非 ASCII 码字符会被编码,比如汉字。 path = URLDecoder.decode(path, ENCODE); if (r.getMethod().equals(method) && r.getPath().equals(path)) { content_type = r.getContent_type(); value = r.getValue(); break; } } } else { //POST 方式,请求参数是在请求体中的,请求头和请求体中间有一个换行符。 String param = requestMessage.substring(requestMessage.lastIndexOf(CRLF) + 2); //这里是不包括 CRLF 的两个字符的。 for (RequestAndResponse r : requestAndResponses) { //因为这个get方式的 参数为空,所以这里必须是 param 在前。 if (r.getMethod().equals(method) && r.getPath().equals(path) && param.equals(r.getParam())) { content_type = r.getContent_type(); value = r.getValue(); System.out.println(content_type+" "+value); break; } } } StringBuilder responseHeader = new StringBuilder(); String date = this.getDate(); //这里我只处理字符串类和文件类两种响应体 //响应体 int len = 0; String responseBody = null; //响应值是 json 数据 File file = null; //响应值是 文件 if (content_type.equals("application/json")) { //如果是 json 数据,否则就是 文件类数据(图片、文档或其它文件) responseBody = value; len = responseBody.getBytes().length; //响应体的字节数,注意是字节数! } else { file = new File(value); len = (int) file.length(); } //响应头 responseHeader.append("HTTP/1.1").append(BLANK); responseHeader.append(200).append(BLANK); responseHeader.append("OK").append(CRLF); responseHeader.append("Server:"+"CrazyDragon").append(CRLF); responseHeader.append("Date:").append(BLANK).append(date).append(CRLF); responseHeader.append("Content-Type:").append(BLANK).append(content_type).append(CRLF); responseHeader.append("Content-Length:").append(BLANK).append(len).append(CRLF); responseHeader.append(CRLF); //如果 字符串变量 responseBody 不为空,则说明返回值是 json 数据(字符串) //否则就是文件类的流了。 if (responseBody != null) { String response = responseHeader.toString() + responseBody; out.write(response.getBytes("UTF-8")); } else { out.write(responseHeader.toString().getBytes("UTF-8")); int hasRead = 0; byte[] data = new byte[4*1024]; try (BufferedInputStream inputStream = new BufferedInputStream(new FileInputStream(file))) { while ((hasRead = inputStream.read(data)) != -1) { out.write(data, 0, hasRead); } } } out.flush(); //必要的刷新流操作。 } catch (IOException e) { e.printStackTrace(); } finally { try { if (in != null) in.close(); } catch (IOException e) { e.printStackTrace(); } } } private String getDate() { Date date = new Date(); SimpleDateFormat format = new SimpleDateFormat("EEE, d MMM yyyy HH:mm:ss 'GMT'", Locale.CHINA); format.setTimeZone(TimeZone.getTimeZone("GMT")); // 设置时区为GMT return format.format(date); } }
package com.dragon; public class Main { public static void main(String[] args) { Server server = new Server(9000); server.start(); } }
更多的测试示例
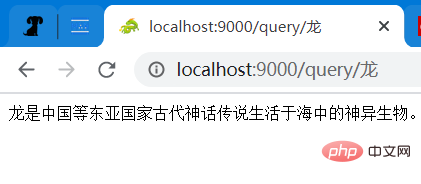
请求方式:GET 请求路径和参数:/query/龙 预期的响应类型:application/json 预期的响应值:龙是中国等东亚国家古代神话传说生活于海中的神异生物。 测试结果:
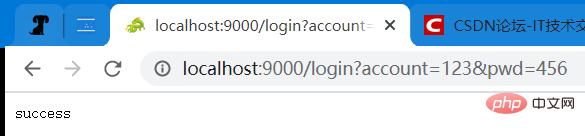
请求方式:GET 请求路径和参数:/login?account=123&pwd=456 预期的响应类型:application/json 预期的响应值:success 测试结果:
请求方式:GET 请求路径和参数:/pictures/husky.jpeg 预期的响应类型:image/jpeg 预期的响应值:一张图片(地址为:D:/DB/husky.jpeg)
请求方式:POST 请求路径:/login 请求参数:account=123&pwd=456 预期的响应类型:application/json 预期的响应值:{“result”:success} 测试结果:
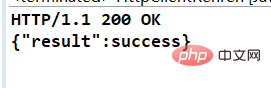
注:这是使用 HttpClient 发送的 POST 请求。

接收到的 POST 请求:

接收到的 GET 请求(含中文参数):/query/龙 注意:“龙” 已经被编码了。
以上是Java怎麼實作HttpServer模擬前端介面調用的詳細內容。更多資訊請關注PHP中文網其他相關文章!


