Matplotlib是一個Python2D繪圖庫,它可以在各種平台上以各種硬拷貝格式和互動式環境產生出具有出版品質的圖形。

在上篇 Matplotlib 資料視覺化教學中,我們要介紹如何建立堆疊圖和圓餅圖。今天帶給大家是針對於圖形顏色和線條的填滿。
顏色
我們要做的第一個改變是將plt.title改為stock變數。
plt.title(stock)
現在,讓我們來介紹如何更改標籤顏色。我們可以透過修改我們的軸物件來實現:
ax1.xaxis.label.set_color('c') ax1.yaxis.label.set_color('r')
如果我們運行它,我們會看到標籤改變了顏色,就像在單字中一樣。
接下來,我們可以為要顯示的軸指定具體數字,而不是像這樣的自動選擇:
ax1.set_yticks([0,25,50,75])
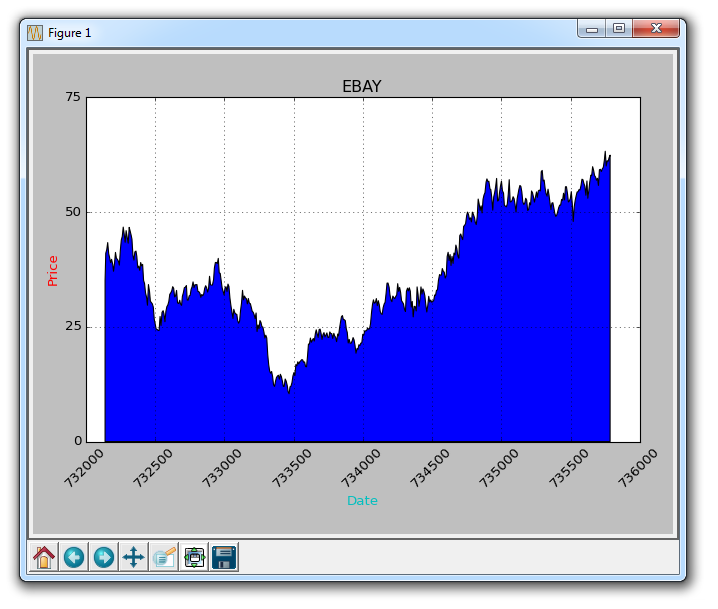
接下來,我想介紹填充。填滿所做的事情,就是在變數和你選擇的一個數值之間填滿顏色。例如,我們可以這樣:
ax1.fill_between(date, 0, closep)
所以到這裡,我們的程式碼為:
import matplotlib.pyplot as plt import numpy as np import urllib import datetime as dt import matplotlib.dates as mdates def bytespdate2num(fmt, encoding='utf-8'): strconverter = mdates.strpdate2num(fmt) def bytesconverter(b): s = b.decode(encoding) return strconverter(s) return bytesconverter def graph_data(stock): fig = plt.figure() ax1 = plt.subplot2grid((1,1), (0,0)) stock_price_url = 'http://chartapi.finance.yahoo.com/instrument/1.0/'+stock+'/chartdata;type=quote;range=10y/csv' source_code = urllib.request.urlopen(stock_price_url).read().decode() stock_data = [] split_source = source_code.split('\n') for line in split_source: split_line = line.split(',') if len(split_line) == 6: if 'values' not in line and 'labels' not in line: stock_data.append(line) date, closep, highp, lowp, openp, volume = np.loadtxt(stock_data, delimiter=',', unpack=True, converters={0: bytespdate2num('%Y%m%d')}) ax1.fill_between(date, 0, closep) for label in ax1.xaxis.get_ticklabels(): label.set_rotation(45) ax1.grid(True)#, color='g', linestyle='-', linewidth=5) ax1.xaxis.label.set_color('c') ax1.yaxis.label.set_color('r') ax1.set_yticks([0,25,50,75]) plt.xlabel('Date') plt.ylabel('Price') plt.title(stock) plt.legend() plt.subplots_adjust(left=0.09, bottom=0.20, right=0.94, top=0.90, wspace=0.2, hspace=0) plt.show() graph_data('EBAY')
結果為:
填充的一個問題是,我們可能最後會把東西都覆蓋起來。我們可以用透明度來解決它:
ax1.fill_between(date, 0, closep)
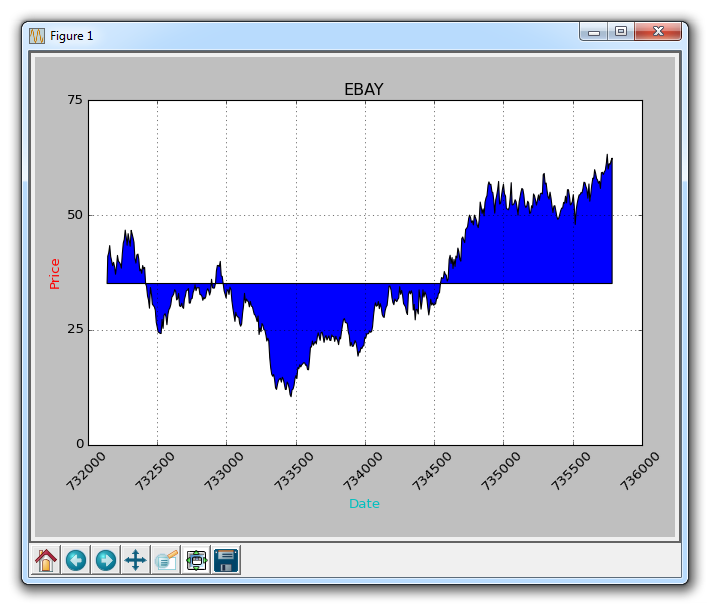
現在,讓我們介紹條件填入。讓我們假設圖表的起始位置是我們開始買入 eBay 的地方。這裡,如果價格低於這個價格,我們可以向上填充到原來的價格,然後如果它超過了原始價格,我們可以向下填充。我們可以這樣做:
ax1.fill_between(date, closep[0], closep)
會產生:
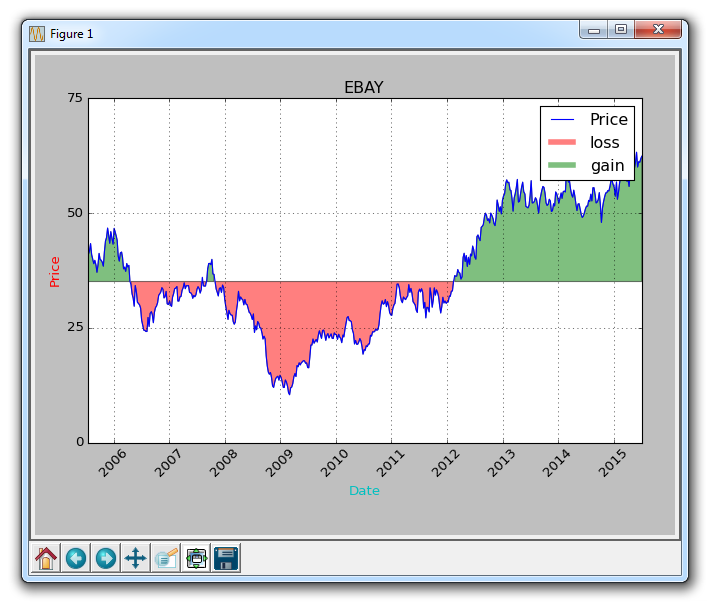
如果我們想用紅色和綠色填充來展示收益/損失,那麼與原始價格相比,綠色填充用於上升(註:國外股市的顏色和國內相反),紅色填充用於下跌?沒問題!我們可以新增一個where參數,如下所示:
ax1.fill_between(date, closep, closep[0],where=(closep > closep[0]), facecolor='g', alpha=0.5)
這裡,我們填入目前價格和原始價格之間的區域,其中當前價格高於原始價格。我們給予它綠色的前景色,因為這是一個上升,而且我們使用微小的透明度。
線條
我們仍然無法對多邊形資料(如填滿)套用標籤,但我們可以像以前一樣實作空線條,因此我們可以:
ax1.plot([],[],linewidth=5, label='loss', color='r',alpha=0.5) ax1.plot([],[],linewidth=5, label='gain', color='g',alpha=0.5) ax1.fill_between(date, closep, closep[0],where=(closep > closep[0]), facecolor='g', alpha=0.5) ax1.fill_between(date, closep, closep[0],where=(closep < closep[0]), facecolor='r', alpha=0.5)
這向我們提供了一些填充,以及用於處理標籤的空線條,我們打算將其顯示在圖例中。這裡完整的程式碼是:
import matplotlib.pyplot as plt import numpy as npimport urllib import datetime as dt import matplotlib.dates as mdates def bytespdate2num(fmt, encoding='utf-8'): strconverter = mdates.strpdate2num(fmt) def bytesconverter(b): s = b.decode(encoding) return strconverter(s) return bytesconverter def graph_data(stock): fig = plt.figure() ax1 = plt.subplot2grid((1,1), (0,0)) stock_price_url = 'http://chartapi.finance.yahoo.com/instrument/1.0/'+stock+'/chartdata;type=quote;range=10y/csv' source_code = urllib.request.urlopen(stock_price_url).read().decode() stock_data = [] split_source = source_code.split('\n') for line in split_source: split_line = line.split(',') if len(split_line) == 6: if 'values' not in line and 'labels' not in line: stock_data.append(line) date, closep, highp, lowp, openp, volume = np.loadtxt(stock_data, delimiter=',', unpack=True, converters={0: bytespdate2num('%Y%m%d')}) ax1.plot_date(date, closep,'-', label='Price') ax1.plot([],[],linewidth=5, label='loss', color='r',alpha=0.5) ax1.plot([],[],linewidth=5, label='gain', color='g',alpha=0.5) ax1.fill_between(date, closep, closep[0],where=(closep > closep[0]), facecolor='g', alpha=0.5) ax1.fill_between(date, closep, closep[0],where=(closep < closep[0]), facecolor='r', alpha=0.5) for label in ax1.xaxis.get_ticklabels(): label.set_rotation(45) ax1.grid(True)#, color='g', linestyle='-', linewidth=5) ax1.xaxis.label.set_color('c') ax1.yaxis.label.set_color('r') ax1.set_yticks([0,25,50,75]) plt.xlabel('Date') plt.ylabel('Price') plt.title(stock) plt.legend() plt.subplots_adjust(left=0.09, bottom=0.20, right=0.94, top=0.90, wspace=0.2, hspace=0) plt.show() graph_data('EBAY')
現在我們的結果是:
以上是Matplotlib中圖形顏色和線條的填充的詳細內容。更多資訊請關注PHP中文網其他相關文章!
