#入坑前不得先看看文檔嘛,Angular quickstart 。
然後開擼~
前置項目
安裝Node ,需要注意版本,node 6.9.x 和 npm 3.x.x。
然後全域安裝 Angular CLI 。
npm install -g @angular/cli
建立專案
ng new ng-first
#啟動開發伺服器
cd ng-first
ng serve --open
瀏覽器自動開啟http://localhost:4200/ ,看到了ng的標,是不是好激動(手動滑稽)。
建立元件
這個動作會直接建立文件,並且在根元件配置。
ng g component components/todolist
建立服務
保持隊形,再來一個。
ng g service services/storage
小試牛刀, 打個招呼
按照國際慣例,先來問好!
在app.component中插入自訂元件app-todolist,這個名字取決於 todolist.component.ts中selector: 'app-todolist'。
<!--app.component.html-->
<app-todolist></app-todolist>
繼續,在todolist.component.ts中定義一個變數msg,這種語法是ts的預設套路。 (手動摀臉,其實我也不太會ts啦)
//todolist.component.ts
export class TodolistComponent implements OnInit {
  public msg: any = 'Hello World !';

  constructor() { }

  ngOnInit() {
  }

}在todolist.component.html中綁定資料
//todolist.component.html
<h3> {{msg}} </h3>/*todolist.component.css*/
h3{
text-align: center;
color: #369;
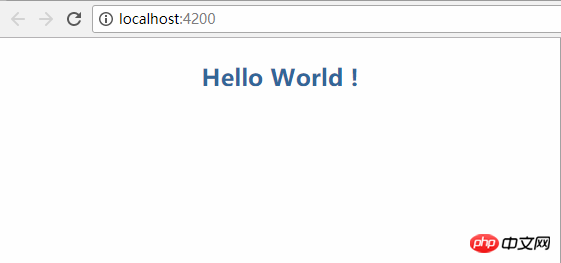
}切到瀏覽器,噔噔噔噔!

哇咔咔,下面開始進入正題。
這個不重要,不是本文重點,打開控制台抄一抄就好了(好不要臉呀)。
這是html,直接複製到todolist.component.html,去掉一些用不到的程式碼。
<!--todolist.component.html-->
<header>
  <section>
    <label>ToDoList</label>
    <input>
  </section>
</header>
<section>
  <h2>正在进行
    <span>1</span>
  </h2>
  <ol>
    <li>
      <input>
      <p>记得吃药</p>
      <a>-</a>
    </li>
  </ol>
  <h2>已经完成
    <span>1</span>
  </h2>
  <ul>
    <li>
      <input>
      <p>记得吃饭</p>
      <a>-</a>
    </li>
  </ul>
</section>
<footer>
  Copyright © 2014 todolist.cn
  <a>clear</a>
</footer>
這是css樣式,直接複製到todolist.component.css,把body的樣式複製到src目錄下的styles.css。
/*todolist.component.css*/
header {height:50px;background:#333;background:rgba(47,47,47,0.98);}
section{margin:0 auto;}
label{float:left;width:100px;line-height:50px;color:#DDD;font-size:24px;cursor:pointer;font-family: "Helvetica Neue",Helvetica,Arial,sans-serif;}
header input{float:right;width:60%;height:24px;margin-top:12px;text-indent:10px;border-radius:5px;box-shadow: 0 1px 0 rgba(255,255,255,0.24), 0 1px 6px rgba(0,0,0,0.45) inset;border:none}
input:focus{outline-width:0}
h2{position:relative;}
span{position:absolute;top:2px;right:5px;display:inline-block;padding:0 5px;height:20px;border-radius:20px;background:#E6E6FA;line-height:22px;text-align:center;color:#666;font-size:14px;}
ol,ul{padding:0;list-style:none;}
li input{position:absolute;top:2px;left:10px;width:22px;height:22px;cursor:pointer;}
p{margin: 0;}
li p input{top:3px;left:40px;width:70%;height:20px;line-height:14px;text-indent:5px;font-size:14px;}
li{height:32px;line-height:32px;background: #fff;position:relative;margin-bottom: 10px;
    padding:0 45px;border-radius:3px;border-left: 5px solid #629A9C;box-shadow: 0 1px 2px rgba(0,0,0,0.07);}
ol li{cursor:move;}
ul li{border-left: 5px solid #999;opacity: 0.5;}
li a{position:absolute;top:2px;right:5px;display:inline-block;width:14px;height:12px;border-radius:14px;border:6px double #FFF;background:#CCC;line-height:14px;text-align:center;color:#FFF;font-weight:bold;font-size:14px;cursor:pointer;}
footer{color:#666;font-size:14px;text-align:center;}
footer a{color:#666;text-decoration:none;color:#999;}
@media screen and (max-device-width: 620px) {section{width:96%;padding:0 2%;}}
@media screen and (min-width: 620px) {section{width:600px;padding:0 10px;}}/*src/styles.css*/
body {margin:0;padding:0;font-size:16px;background: #CDCDCD;}複製完之後,頁面應該長這樣。
好了,以上是不必要的前戲 (手動滑稽)。
研究ToDoList 上的js原始碼,大概的邏輯就是使用者輸入待辦事項後,加入一個done屬性,預設值為false,表示正在進行;點擊完成按鈕,done屬性變成true,表示已經完。且可以刪除。瀏覽器刷新後,資料仍然存在,因為使用了HTML5的localStorage。
宣告todo變數
//todolist.component.ts
export class TodolistComponent implements OnInit {
  public todo: any = '';
  public todoList = [];

  constructor() { }

  ngOnInit() {
  }

  addTodo(e) {
    let todoObj = {
      todo: this.todo,
      done: false
    }

    if (e.keyCode == 13) {  //表示回车按钮
      this.todoList.push(todoObj);
      this.todo = '';       //清空输入框
    }
  }
}<!--todolist.component.html--> <header> <section> <label>ToDoList</label> <input> </section> </header>
[(ngModel)]是一個Angular語法,用來把todo綁定到輸入框。它的資料流是雙向的:從屬性到輸入框,並且從輸入框回到屬性。
到這一步的時候,控制台報錯啦。
解救的辦法就是我們必須選擇使用FormsModule模組。
import { BrowserModule } from '@angular/platform-browser';
import { NgModule } from '@angular/core';
import { FormsModule } from '@angular/forms';  //NgModel lives here

@NgModule({

  imports: [
    BrowserModule,
    FormsModule  //import the FormsModule before binding with [(ngModel)]
  ],

})新增內建指令*ngFor,循環列表。
<h2>正在进行
    <span>{{todoList.length}}</span>
  </h2>
  <ol>
    <li>
      <input>
      <p>{{item.todo}}</p>
      <a>-</a>
    </li>
</ol>能看到新增的事項咯。
綁定changeTodo、deleteTodo事件
  <h2>正在进行
    <span>{{todoList.length}}</span>
  </h2>
  <ol>
    <li>
      <input>
      <p>{{item.todo}}</p>
      <a>-</a>
    </li>
  </ol>
  已经完成
    {{doneList.length}}
{{item.todo}}
-將新增的事項和完成的事項分成兩個數組,(或放在一個數組裡,然後根據done的值來控制是否顯示),但是我覺得分成兩個比較容易操作。
  public doneList = [];  //再声明一个已完成的数组

  deleteTodo(index, done) {
    if (done) {
      this.todoList.splice(index, 1);
    } else {
      this.doneList.splice(index, 1);
    }
  }

  changeTodo(index, done) {
    if (done) {
      var tempTodo = this.todoList[index]
      this.doneList.push(tempTodo);
      this.todoList.splice(index, 1);
    } else {
      var tempDone = this.doneList[index]
      this.todoList.push(tempDone);
      this.doneList.splice(index, 1);
    }

}到此,這個功能就算完成啦~
等等,刷新頁面,歐漏,剛剛輸入的事項不見了。 (想看更多就到PHP中文網AngularJS開發手冊中學習)
這時候,localStorage閃亮登場! !
為了不再把相同的程式碼複製一遍又一遍,我們要建立一個單一的可重複使用的資料服務,並且把它注入到需要它的那些元件中。
在(一) 基本功中第6步,創建服務時,angular-cli已經幫我們產生了一個服務的基本結構。
建立服務,方便在任何地方使用。
//storage.service.ts
export class StorageService {

  constructor() { }

  setItem(key, value) {
    localStorage.setItem(key, JSON.stringify(value))
  }
  getItem(key) {
    return JSON.parse(localStorage.getItem(key))
  }

}使用該服務,只需要注入它。
//todolist.component.ts
import { StorageService } from '../../services/storage.service'  //导入服务
...
constructor(private storage: StorageService) { } //注入服务好了,我們就可以輕鬆愉快的使用它了。
使用this.storage就可以使用封裝好的服務。
每次操作資料後都要存一遍。是不是有點雞肋~
  addTodo(e) {
    let todoObj = {
      todo: this.todo,
      done: false
    }

    if (e.keyCode == 13) {
      var tempList = this.storage.getItem('todoList');
      if (tempList) {
        tempList.push(todoObj)
        this.storage.setItem('todoList', tempList);
      } else {
        var tempData = []
        tempData.push(todoObj)
        this.storage.setItem('todoList', tempData);
      }
      this.todoList.push(todoObj);
      this.todo = '';
    }
  }

  deleteTodo(index, done) {
    if (done) {
      this.todoList.splice(index, 1);
      this.storage.setItem('todoList', this.todoList)
    } else {
      this.doneList.splice(index, 1);
      this.storage.setItem('doneList', this.doneList)
    }
  }

  changeTodo(index, done) {
    if (done) {
      var tempTodo = this.todoList[index]
      console.log(tempTodo)
      this.doneList.push(tempTodo);
      console.log(this.doneList)
      this.todoList.splice(index, 1);
      this.storage.setItem('todoList', this.todoList)
      this.storage.setItem('doneList', this.doneList)
    } else {
      var tempDone = this.doneList[index]
      this.todoList.push(tempDone);
      this.doneList.splice(index, 1);
      this.storage.setItem('todoList', this.todoList)
      this.storage.setItem('doneList', this.doneList)
    }
}OnInit介面的鉤子方法叫做ngOnInit, Angular在創建元件後立刻呼叫它。
我的理解就是,類似vue中的mounted?
  ngOnInit() {
    this.initTodo();
  }
  initTodo() {
    var todoArr = this.storage.getItem('todoList');
    if (todoArr) {
      this.todoList = todoArr
    }
    var doneArr = this.storage.getItem('doneList');
    if (doneArr) {
      this.doneList = doneArr
    }
}然後,大功告成!
<!--todolist.component.html-->
<footer>
  Copyright © 2014 todolist.cn
  <a>clear</a>
</footer>
clearData() {
    localStorage.clear();
    this.todoList = [];
    this.doneList = [];
}还有拖拽排序的的功能,不写了。
好了,以上就是本篇文章的内容(想看更多就到PHP中文网AngularJS使用手册中学习),有问题的可以在下方留言提问。
以上是Angular入門,Angular版的ToDoList你真的會嗎?的詳細內容。更多資訊請關注PHP中文網其他相關文章!


