
這篇文章主要介紹了vue2.0 vue-dplayer實作hls播放的範例,現在分享給大家,也給大家做個參考。
起因
之前寫了一篇《 vue2.0 vue-video-player實作hls播放》,裡邊有提到在用vue-video-player之前,我嘗試著使用vue-dplayer實現hls播放,但是當時時間緊迫,還沒完成,就換方案了。現在抽空把它補齊吧。
開始
安裝相依
npm install vue-dplayer -S
寫元件HelloWorld.vue
<template>
<p class="hello">
<d-player ref="player" @play="play" :video="video" :contextmenu="contextmenu"></d-player>
</p>
</template>
<script>
import VueDPlayer from './VueDPlayerHls';
export default {
name: 'HelloWorld',
data () {
return {
msg: 'Welcome to Your Vue.js App',
video: {
url: 'https://logos-channel.scaleengine.net/logos-channel/live/biblescreen-ad-free/chunklist_w630020335.m3u8',
pic: 'http://static.smartisanos.cn/pr/img/video/video_03_cc87ce5bdb.jpg',
type: 'hls'
},
autoplay: false,
player: null,
contextmenu: [
{
text: 'GitHub',
link: 'https://github.com/MoePlayer/vue-dplayer'
}
]
}
},
components: {
'd-player': VueDPlayer
},
methods: {
play() {
console.log('play callback')
}
},
mounted() {
this.player = this.$refs.player.dp;
// console.log(this.player);
var hls = new Hls();
hls.loadSource('https://logos-channel.scaleengine.net/logos-channel/live/biblescreen-ad-free/chunklist_w630020335.m3u8');
hls.attachMedia(this.player);
}
}
</script>
<!-- Add "scoped" attribute to limit CSS to this component only -->
<style scoped>
</style>引入hls.js
本來是使用import引入,可是執行報錯。所以就先在index.html內用script標籤引進來。
<!DOCTYPE html>
<html>
 <head>
  <meta charset="utf-8">
  <meta name="viewport" content="width=device-width,initial-scale=1.0">
  <title>vue-dplayer-hls</title>
 </head>
 <body>
  <p id="app"></p>
  <!-- built files will be auto injected -->
  <script src="https://cdn.jsdelivr.net/npm/hls.js@latest"></script>
 </body>
</html>
注意:
根據DPlayer Demo頁面程式碼,想支援hls,需要將video. type 設定為”hls”,但是我修改之後發現無法播放。於是去看了源碼,發現源碼內有這樣一處:
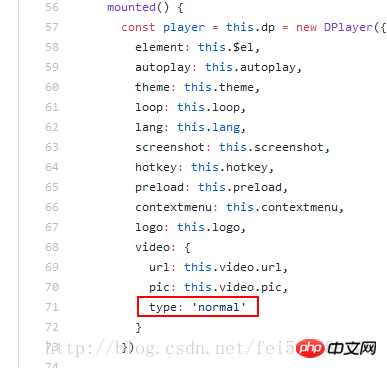
#也就是說你在自己的元件內填寫的是什麼,其實都是使用的'normal'來new的Dplayer實例。
修改原始碼
自訂一個元件VueDPlayerHls.vue,然後 copy原始碼,問題處修改為: type: this.video.type
#<template>
<p class="dplayer"></p>
</template>
<script>
require('../../node_modules/dplayer/dist/DPlayer.min.css');
import DPlayer from 'DPlayer'
export default {
props: {
autoplay: {
type: Boolean,
default: false
},
theme: {
type: String,
default: '#FADFA3'
},
loop: {
type: Boolean,
default: true
},
lang: {
type: String,
default: 'zh'
},
screenshot: {
type: Boolean,
default: false
},
hotkey: {
type: Boolean,
default: true
},
preload: {
type: String,
default: 'auto'
},
contextmenu: {
type: Array
},
logo: {
type: String
},
video: {
type: Object,
required: true,
validator(value) {
return typeof value.url === 'string'
}
}
},
data() {
return {
dp: null
}
},
mounted() {
const player = this.dp = new DPlayer({
element: this.$el,
autoplay: this.autoplay,
theme: this.theme,
loop: this.loop,
lang: this.lang,
screenshot: this.screenshot,
hotkey: this.hotkey,
preload: this.preload,
contextmenu: this.contextmenu,
logo: this.logo,
video: {
url: this.video.url,
pic: this.video.pic,
type: this.video.type
}
})
player.on('play', () => {
this.$emit('play')
})
player.on('pause', () => {
this.$emit('pause')
})
player.on('canplay', () => {
this.$emit('canplay')
})
player.on('playing', () => {
this.$emit('playing')
})
player.on('ended', () => {
this.$emit('ended')
})
player.on('error', () => {
this.$emit('error')
})
}
}
</script>在原始元件(HelloWorld.vue)內import新元件
import VueDPlayer from './VueDPlayerHls';
實作播放
#上面是我整理給大家的,希望今後會對大家有幫助。
相關文章:
在vue中如何解決v-for使用報紅並出現警告的問題(詳細教學)
#在vue.js中利用select下拉方塊實作綁定和取值方法
#
以上是使用vue2.0+vue-dplayer這些技術如何實現hls播放的範例的詳細內容。更多資訊請關注PHP中文網其他相關文章!


