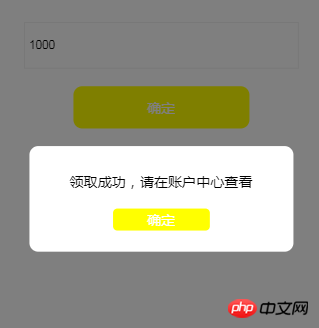
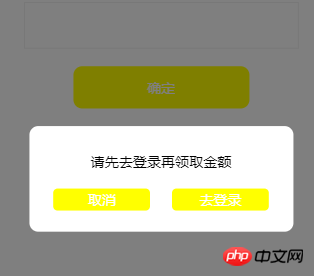
這次帶給大家怎麼實作vue模態對話框,實作vue模態對話框的注意事項有哪些,下面就是實戰案例,一起來看一下。
寫在前面
對話框是很常用的元件, 在很多地方都會用到,一般我們可以使用自帶的alert來彈出對話框,但是假如是設計出的圖該怎麼辦呢,所以我們需要自己寫一個對話框,並且如果有很多地方都用到,那我們很有必要寫成一個通用的組件形式,在需要的地方之間引用。
現在我們來動手實作一個對話框元件,依照先前的習慣,我們先看下實現的效果圖


1.首先,透過template定義一個元件
<template id="dialog">
    <p class="dialog">
      <p class="dialog_mask"></p>
      <p class="dialog_container">
        <p class="dialog_content">
          <p class="dialog_content_top">提示内容</p>
          <p class="dialog_btn">
            <a href="javascript:;" rel="external nofollow" rel="external nofollow" rel="external nofollow" rel="external nofollow" rel="external nofollow" rel="external nofollow" class="btn" @click="close">确定</a>
            <a href="javascript:;" rel="external nofollow" rel="external nofollow" rel="external nofollow" rel="external nofollow" rel="external nofollow" rel="external nofollow" class="btn" @click="close">取消</a>
            <a href="javascript:;" rel="external nofollow" rel="external nofollow" rel="external nofollow" rel="external nofollow" rel="external nofollow" rel="external nofollow" class="btn" @click="login">去登录</a>
          </p>
        </p>
      </p>
    </p>
  </template>
並加入對應的對話框樣式
/*对话框style*/
    .dialog{
    }
    .dialog_mask{
      position: fixed;
  left: 0;
  top: 0;
  width: 100%;
  height: 100%;
  background: rgba(0,0,0,0.5);
    }
    .dialog_container{
        background: #fff;
  width: 300px;
  height: 120px;
  position: relative;
  border-radius: 10px;
  margin: 0 auto;
    }
    .dialog_content{
      text-align: center;
  padding-top: 30px;
    }
    .dialog_btn{
      margin-top: 20px;
    }
    .dialog_btn a{
      background: yellow;
        padding: 2px 30px;
  border-radius: 5px;
  color: #fff;
  text-decoration: none;
    width: 50px;
  display: inline-block;
    }
    .dialog_btn a:nth-child(2){
        margin-left: 20px;
}2.使用Vue.component註冊一個全域Vue元件,我們將這個元件叫做v-dialog,然後透過template指定這個元件
Vue.component('v-dialog', {
      template: '#dialog',
      data:function(){
        return {
        }
      },
      methods:{
      },
      created:function(){
      }
})#3.最後,在我們需要的地方透過v-dialog標籤來引用這個元件
<v-dialog></v-dialog>
建立vue元件步驟大致就是這樣,但是,父元件和子元件該怎麼進行通信呢?
這裡主要使用props傳遞資料到子元件
修改如下上面的程式碼,加入props屬性
Vue.component('v-dialog', {
      template: '#dialog',
          props:['dialogShow','msg'],
      data:function(){
        return {
        }
      },
      methods:{
      },
      created:function(){
      }
})可以看到我們是透過字串陣列來定義prop的,除此之外我們也可以用物件的形式來定義prop,用來為元件的prop 指定驗證規則,如果型別錯誤,在vue中會有警告,其中type的值可以是這些:String Number Boolean Function Object Array Symbol
props: {
    name: String,
    showDialog: {
      type: Boolean,
      default: false
    }
}在元件模板中透過 v-if="showDialog"判斷是否顯示或隱藏對話框,透過 v-text=" msg"綁定對話方塊提示內容,
v-if="type==1"用於判斷對話方塊類型,顯示對應的按鈕,程式碼如下:
<template id="dialog">
    <p class="dialog" v-if="showDialog">
      <p class="dialog_mask"></p>
      <p class="dialog_container">
        <p class="dialog_content">
          <p class="dialog_content_top" v-text="msg">提示内容</p>
          <p class="dialog_btn">
            <a v-if="type==1" href="javascript:;" rel="external nofollow" rel="external nofollow" rel="external nofollow" rel="external nofollow" rel="external nofollow" rel="external nofollow" class="btn" @click="close">确定</a>
            <a v-if="type==2" href="javascript:;" rel="external nofollow" rel="external nofollow" rel="external nofollow" rel="external nofollow" rel="external nofollow" rel="external nofollow" class="btn" @click="close">取消</a>
            <a v-if="type==2" href="javascript:;" rel="external nofollow" rel="external nofollow" rel="external nofollow" rel="external nofollow" rel="external nofollow" rel="external nofollow" class="btn" @click="login">去登录</a>
          </p>
        </p>
      </p>
    </p>
  </template>
在引用元件的地方加入:show-dialog="showDialog" :msg="msg" :type="type"這幾個屬性,將其值傳遞給對話方塊元件
<v-dialog :show-dialog="showDialog" :msg="msg" :type="type"></v-dialog>
要注意的是showDialog在元件中需要寫成show-dialog這種形式,不然會取得不到資料
我們在data中定義這些屬性
data: {
        msg:'',
        showDialog:false,
        type:1,// 提示类型 1单按钮提示框 2双按钮提示框
},然後,我們在按鈕點擊提交的時候觸發彈出對話框事件
submit:function(){
          //弹出对话框组件
          if(!this.isLogin){//未登录
            this.msg = "请先去登录再领取金额";
            this.showDialog = !this.showDialog;
            this.type = 2;
            return;
          }
          if(this.amount){
            if(this.amount<1 || this.amount>1000){
              this.msg = "输入金额不能低于1元大于1000";
              this.showDialog = !this.showDialog;
              this.type = 1;
            }else{
              this.msg = "领取成功,请在账户中心查看";
              this.showDialog = !this.showDialog;
              this.type = 1;
            }
          }else{
            this.msg = "领取金额不能为空";
            this.showDialog = !this.showDialog;
              this.type = 1;
          }
}這樣,我們就能彈出對話框組件了,透過msg設定不同的提示訊息
那麼,我們該怎麼關閉這個對話框呢,這裡就涉及到子元件需要向父元件傳遞訊息了
主要透過$emit來觸發父類別事件,如:this.$emit('close-dialog');然後在父類別透過v-on來監聽子類別觸發的事件,v-on:close-dialog="closeDialog" ,也可簡寫寫成@close-dialog="closeDialog"
程式碼如下:
在v-dialog標籤中新增@close-dialog="closeDialog"監聽子元件觸發的事件
<v-dialog :show-dialog="showDialog" :msg="msg" :type="type" @close-dialog="closeDialog"></v-dialog>
然後定義closeDialog函數修改showDialog 的狀態
  closeDialog:function(){//关闭对话框
          this.showDialog = false;
}這樣同樣也需要注意的是監聽函數closeDialog需要寫成close-dialog形式
#ok,以上我們就實現了一個對話框元件
########################################################################################################################################################################## #看了本文案例你已經掌握了方法,更多精彩請關注php中文網其它相關文章! ######推薦閱讀:#########Vue.js內偵聽器使用案例解析###############如何使用Vue SSR 元件載入# ########以上是怎樣實作vue模態對話框的詳細內容。更多資訊請關注PHP中文網其他相關文章!


