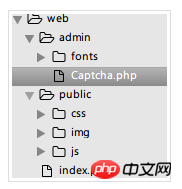
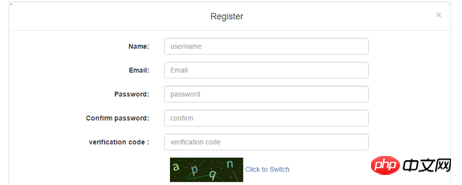
本課程透過使用PHP及Web前端技術實現一個網站註冊登入入口頁面,學習並實踐PHP程式設計等,有興趣的同學可以參考一下。
本文介紹的是基於PHP實現使用者註冊登入功能,本專案分為四部分內容:1前端頁面製作,2驗證碼製作,3實現註冊登陸,4功能完善。具體情況可以往下看。
驗證碼製作
一、實驗簡介
#本實驗將會帶領大家使用物件導向的想法封裝驗證碼類。並在註冊和登陸介面展示使用。透過本實驗的學習,你將會領悟到 PHP 的 OOP 思想,以及 GD 函式庫的使用,驗證碼產生。
1.1 所涉及的知識點
#PHP

<?php
/**
* Captcha class
*/
class Captcha
{

  function __construct()
  {
    # code...
  }
}<?php
/**
* Captcha class
*/
class Captcha
{
private $codeNum; //验证码位数
private $width; //验证码图片宽度
private $height; //验证码图片高度
private $img; //图像资源句柄
private $lineFlag; //是否生成干扰线条
private $piexFlag; //是否生成干扰点
private $fontSize; //字体大小
private $code; //验证码字符
private $string; //生成验证码的字符集
private $font; //字体
function __construct($codeNum = 4,$height = 50,$width = 150,$fontSize = 20,$lineFlag = true,$piexFlag = true)
{
$this->string = 'qwertyupmkjnhbgvfcdsxa123456789'; //去除一些相近的字符
$this->codeNum = $codeNum;
$this->height = $height;
$this->width = $width;
$this->lineFlag = $lineFlag;
$this->piexFlag = $piexFlag;
$this->font = dirname(__FILE__).'/fonts/consola.ttf';
$this->fontSize = $fontSize;
}
}$ wget http://labfile.oss.aliyuncs.com/courses/587/consola.ttf
//创建图像资源
public function createImage(){
    $this->img = imagecreate($this->width, $this->height);  //创建图像资源
    imagecolorallocate($this->img,mt_rand(0,100),mt_rand(0,100),mt_rand(0,100));  //填充图像背景(使用浅色)
}//创建验证码
public function createCode(){
$strlen = strlen($this->string)-1;
for ($i=0; $i < $this->codeNum; $i++) {
$this->code .= $this->string[mt_rand(0,$strlen)]; //从字符集中随机取出四个字符拼接
}
$_SESSION['code'] = $this->code; //加入 session 中
//计算每个字符间距
$diff = $this->width/$this->codeNum;
for ($i=0; $i < $this->codeNum; $i++) {
//为每个字符生成颜色(使用深色)
$txtColor = imagecolorallocate($this->img,mt_rand(100,255),mt_rand(100,255),mt_rand(100,255));
//写入图像
imagettftext($this->img, $this->fontSize, mt_rand(-30,30), $diff*$i+mt_rand(3,8), mt_rand(20,$this->height-10), $txtColor, $this->font, $this->code[$i]);
}
}##imagecolorallocate:為一個圖片指派顏色
建立驗證碼字串並輸出到映像
#
//创建验证码
public function createCode(){
$strlen = strlen($this->string)-1;
for ($i=0; $i < $this->codeNum; $i++) {
$this->code .= $this->string[mt_rand(0,$strlen)]; //从字符集中随机取出四个字符拼接
}
$_SESSION['code'] = $this->code; //加入 session 中
//计算每个字符间距
$diff = $this->width/$this->codeNum;
for ($i=0; $i < $this->codeNum; $i++) {
//为每个字符生成颜色(使用深色)
$txtColor = imagecolorallocate($this->img,mt_rand(100,255),mt_rand(100,255),mt_rand(100,255));
//写入图像
imagettftext($this->img, $this->fontSize, mt_rand(-30,30), $diff*$i+mt_rand(3,8), mt_rand(20,$this->height-10), $txtColor, $this->font, $this->code[$i]);
}
}建立幹擾線條
//创建干扰线条(默认四条)
public function createLines(){
    for ($i=0; $i < 4; $i++) {
      $color = imagecolorallocate($this->img,mt_rand(0,155),mt_rand(0,155),mt_rand(0,155));  //使用浅色
      imageline($this->img,mt_rand(0,$this->width),mt_rand(0,$this->height),mt_rand(0,$this->width),mt_rand(0,$this->height),$color);
    }
}建立幹擾點
//创建干扰点 (默认一百个点)
public function createPiex(){
    for ($i=0; $i < 100; $i++) {
      $color = imagecolorallocate($this->img,mt_rand(0,255),mt_rand(0,255),mt_rand(0,255));
      imagesetpixel($this->img,mt_rand(0,$this->width),mt_rand(0,$this->height),$color);
    }
  }
 public function show()
  {
    $this->createImage();
    $this->createCode();
    if ($this->lineFlag) {  //是否创建干扰线条
      $this->createLines();
    }
    if ($this->piexFlag) {  //是否创建干扰点
      $this->createPiex();
    }
    header('Content-type:image/png');  //请求页面的内容是png格式的图像
    imagepng($this->img);  //以png格式输出图像
    imagedestroy($this->img);  //清除图像资源,释放内存
}imagepng:以PNG 格式將映像輸出到瀏覽器或檔案
imagedestroy:銷毀一個圖片
對外提供驗證碼:

##
public function getCode(){
return $this->code;
}
完整代码如下:
<?php
/**
* Captcha class
*/
class Captcha
{
private $codeNum;
private $width;
private $height;
private $img;
private $lineFlag;
private $piexFlag;
private $fontSize;
private $code;
private $string;
private $font;
function __construct($codeNum = 4,$height = 50,$width = 150,$fontSize = 20,$lineFlag = true,$piexFlag = true)
{
$this->string = 'qwertyupmkjnhbgvfcdsxa123456789';
$this->codeNum = $codeNum;
$this->height = $height;
$this->width = $width;
$this->lineFlag = $lineFlag;
$this->piexFlag = $piexFlag;
$this->font = dirname(__FILE__).'/fonts/consola.ttf';
$this->fontSize = $fontSize;
}
public function createImage(){
$this->img = imagecreate($this->width, $this->height);
imagecolorallocate($this->img,mt_rand(0,100),mt_rand(0,100),mt_rand(0,100));
}
public function createCode(){
$strlen = strlen($this->string)-1;
for ($i=0; $i < $this->codeNum; $i++) {
$this->code .= $this->string[mt_rand(0,$strlen)];
}
$_SESSION['code'] = $this->code;
$diff = $this->width/$this->codeNum;
for ($i=0; $i < $this->codeNum; $i++) {
$txtColor = imagecolorallocate($this->img,mt_rand(100,255),mt_rand(100,255),mt_rand(100,255));
imagettftext($this->img, $this->fontSize, mt_rand(-30,30), $diff*$i+mt_rand(3,8), mt_rand(20,$this->height-10), $txtColor, $this->font, $this->code[$i]);
}
}
public function createLines(){
for ($i=0; $i < 4; $i++) {
$color = imagecolorallocate($this->img,mt_rand(0,155),mt_rand(0,155),mt_rand(0,155));
imageline($this->img,mt_rand(0,$this->width),mt_rand(0,$this->height),mt_rand(0,$this->width),mt_rand(0,$this->height),$color);
}
}
public function createPiexs(){
for ($i=0; $i < 100; $i++) {
$color = imagecolorallocate($this->img,mt_rand(0,255),mt_rand(0,255),mt_rand(0,255));
imagesetpixel($this->img,mt_rand(0,$this->width),mt_rand(0,$this->height),$color);
}
}
public function show()
{
$this->createImage();
$this->createCode();
if ($this->lineFlag) {
$this->createLines();
}
if ($this->piexFlag) {
$this->createPiexs();
}
header('Content-type:image/png');
imagepng($this->img);
imagedestroy($this->img);
}
public function getCode(){
return $this->code;
}
}以上就是驗證碼類別的全部程式碼。看起來確實挺簡單的,不過用的圖像處理函數比較多,上面相關的函數我也做了必要的連結和用途說明。這些函數也不用死記硬背,遇到不清楚的,隨時查閱 PHP 官方文檔,最重要的是還有中文文檔。
######2.2 使用驗證碼#########既然已經封裝完畢,那就可以開始使用了。這裡為了方便,直接在Captcha 類別的下方呼叫該類別:############session_start(); //开启session $captcha = new Captcha(); //实例化验证码类(可自定义参数) $captcha->show(); //调用输出
<p class="form-group"> <p class="col-sm-12"> <img src="admin/Captcha.php" alt="" id="codeimg" onclick="javascript:this.src = 'admin/Captcha.php?'+Math.random();"> <span>Click to Switch</span> </p> </p>
總結:以上就是這篇文章的全部內容,希望能對大家的學習有所幫助。
相關推薦:
##php 利用cookie實作網頁記住使用者名稱和密碼的功能
##
以上是PHP實作使用者註冊登入功能的方法的詳細內容。更多資訊請關注PHP中文網其他相關文章!


