這篇文章主要介紹了在react-router4中進行程式碼拆分的方法(基於webpack),現在分享給大家,也給大家做個參考。
前言
隨著前端專案的不斷擴大,一個原本簡單的網頁應用程式所引用的js檔案可能變得越來越龐大。尤其在近期流行的單頁面應用程式中,越來越依賴一些打包工具(例如webpack),透過這些打包工具將需要處理、相互依賴的模組直接打包成一個單獨的bundle文件,在頁面第一次載入時,就會將所有的js全部載入。但是,往往有許多的場景,我們並不需要在一次性將單頁應用的全部依賴都載下來。例如:我們現在有一個帶有權限的"訂單後台管理"單頁應用,普通管理員只能進入"訂單管理"部分,而超級用戶則可以進行"系統管理";或者,我們有一個龐大的單頁應用,使用者在第一次開啟頁面時,需要等待較長時間載入無關資源。這些時候,我們就可以考慮進行一定的程式碼分割(code splitting)。
實作方式
簡單的按需載入
#程式碼分割的核心目的,就是實作資源的按需載入.考慮這麼一個場景,在我們的網站中,右下角有一個類似聊天框的元件,當我們點擊圓形按鈕時,頁面會顯示聊天元件。
btn.addEventListener('click', function(e) {
  // 在这里加载chat组件相关资源 chat.js
});從這個例子我們可以看出,透過將載入chat.js的操作綁定在btn點擊事件上,可以實現點擊聊天按鈕後聊天元件的按需載入。而要動態載入js資源的方式也非常簡單(方式類似熟悉的jsonp)。透過動態在頁面中加入
btn.addEventListener('click', function(e) {
  // 在这里加载chat组件相关资源 chat.js
  var ele = document.createElement('script');
  ele.setAttribute('src','/static/chat.js');
  document.getElementsByTagName('head')[0].appendChild(ele);
});程式碼拆分就是為了要實現按需載入所做的工作。想像一下,我們使用打包工具,將所有的js全部打包到了bundle.js這個文件,這種情況下是沒有辦法做到上面所述的按需加載的,因此,我們需要講按需加載的程式碼在打包的過程中拆分出來,這就是程式碼拆分。那麼,對於這些資源,我們需要手動拆分麼?當然不是,還是要藉助打包工具。下面就來介紹webpack中的程式碼拆分。
程式碼分割
這裡回到應用程式場景,介紹如何在webpack中進行程式碼分割。在webpack有多種方式來實現建置是的程式碼拆分。
import()
這裡的import不同於模組引入時的import,可以理解為一個動態載入的模組的函數(function-like),傳入其中的參數就是對應的模組。例如對於原有的模組引入import react from 'react'可以寫為import('react')。但是要注意的是,import()會回傳一個Promise物件。因此,可以透過以下方式使用:
btn.addEventListener('click', e => {
  // 在这里加载chat组件相关资源 chat.js
  import('/components/chart').then(mod => {
    someOperate(mod);
  });
});可以看到,使用方式非常簡單,和平時我們使用的Promise並沒有區別。當然,也可以再加入一些異常處理:
btn.addEventListener('click', e => {
  import('/components/chart').then(mod => {
    someOperate(mod);
  }).catch(err => {
    console.log('failed');
  });
});當然,由於import()會傳回一個Promise對象,因此要注意一些相容性問題。要解決這個問題也不困難,可以使用一些Promise的polyfill來實現相容。可以看到,動態import()的方式不論在語意上或文法使用上都是比較清晰簡潔的。
require.ensure()
在webpack 2的官網上寫了這麼一句話:
require.ensure() is specific to webpack和 superseded by import().
所以,在webpack 2裡面應該是不建議使用require.ensure()這個方法的。但是目前方法仍然有效,所以可以簡單介紹一下。包括在webpack 1也可以使用。下面是require.ensure()的語法:
require.ensure(dependencies: String[], callback: function(require), errorCallback: function(error), chunkName: String)
require.ensure()接受三個參數:
第一個參數dependencies是一個數組,代表了目前require進來的模組的一些依賴;
第二個參數callback就是回呼函數。其中要注意的是,這個回呼函數有一個參數require,透過這個require就可以在回呼函數內動態引入其他模組。值得注意的是,雖然這個require是回呼函數的參數,理論上可以換其他名稱,但其實是不能換的,否則webpack就無法靜態分析的時候處理它;
第三個參數errorCallback比較好理解,就是處理error的回呼;
第四個參數chunkName則是指定打包的chunk名稱。
因此,require.ensure()具體的用法如下:
btn.addEventListener('click', e => {
  require.ensure([], require => {
    let chat = require('/components/chart');
    someOperate(chat);
  }, error => {
    console.log('failed');
  }, 'mychat');
});Bundle Loader
除了使用上述兩種方法,還可以使用webpack的一些元件。例如使用Bundle Loader:
npm i --save bundle-loader
使用require("bundle-loader!./file.js")來進行對應chunk的載入。這個方法會傳回一個function,這個function接受一個回呼函數作為參數。
let chatChunk = require("bundle-loader?lazy!./components/chat");
chatChunk(function(file) {
  someOperate(file);
});和其他loader类似,Bundle Loader也需要在webpack的配置文件中进行相应配置。Bundle-Loader的代码也很简短,如果阅读一下可以发现,其实际上也是使用require.ensure()来实现的,通过给Bundle-Loader返回的函数中传入相应的模块处理回调函数即可在require.ensure()的中处理,代码最后也列出了相应的输出格式:
/*
Output format:
  var cbs = [],
    data;
  module.exports = function(cb) {
    if(cbs) cbs.push(cb);
      else cb(data);
  }
  require.ensure([], function(require) {
    data = require("xxx");
    var callbacks = cbs;
    cbs = null;
    for(var i = 0, l = callbacks.length; i < l; i++) {
      callbacks[i](data);
    }
  });
*/react-router v4 中的代码拆分
最后,回到实际的工作中,基于webpack,在react-router4中实现代码拆分。react-router 4相较于react-router 3有了较大的变动。其中,在代码拆分方面,react-router 4的使用方式也与react-router 3有了较大的差别。
在react-router 3中,可以使用Route组件中getComponent这个API来进行代码拆分。getComponent是异步的,只有在路由匹配时才会调用。但是,在react-router 4中并没有找到这个API,那么如何来进行代码拆分呢?
在react-router 4官网上有一个代码拆分的例子。其中,应用了Bundle Loader来进行按需加载与动态引入
import loadSomething from 'bundle-loader?lazy!./Something'
然而,在项目中使用类似的方式后,出现了这样的警告:
Unexpected '!' in 'bundle-loader?lazy!./component/chat'. Do not use import syntax to configure webpack loaders import/no-webpack-loader-syntax
Search for the keywords to learn more about each error.
在webpack 2中已经不能使用import这样的方式来引入loader了(no-webpack-loader-syntax)
Webpack allows specifying the loaders to use in the import source string using a special syntax like this:
var moduleWithOneLoader = require("my-loader!./my-awesome-module");This syntax is non-standard, so it couples the code to Webpack. The recommended way to specify Webpack loader configuration is in a Webpack configuration file.
我的应用使用了create-react-app作为脚手架,屏蔽了webpack的一些配置。当然,也可以通过运行npm run eject使其暴露webpack等配置文件。然而,是否可以用其他方法呢?当然。
这里就可以使用之前说到的两种方式来处理:import()或require.ensure()。
和官方实例类似,我们首先需要一个异步加载的包装组件Bundle。Bundle的主要功能就是接收一个组件异步加载的方法,并返回相应的react组件:
export default class Bundle extends Component {
  constructor(props) {
    super(props);
    this.state = {
      mod: null
    };
  }

  componentWillMount() {
    this.load(this.props)
  }

  componentWillReceiveProps(nextProps) {
    if (nextProps.load !== this.props.load) {
      this.load(nextProps)
    }
  }

  load(props) {
    this.setState({
      mod: null
    });
    props.load((mod) => {
      this.setState({
        mod: mod.default ? mod.default : mod
      });
    });
  }

  render() {
    return this.state.mod ? this.props.children(this.state.mod) : null;
  }
}在原有的例子中,通过Bundle Loader来引入模块:
import loadSomething from 'bundle-loader?lazy!./About'

const About = (props) => (
  <Bundle load={loadAbout}>
    {(About) => <About {...props}/>}
  </Bundle>
)由于不再使用Bundle Loader,我们可以使用import()对该段代码进行改写:
const Chat = (props) => (
<Bundle load={() => import('./component/chat')}>
{(Chat) => <Chat {...props}/>}
</Bundle>
);需要注意的是,由于import()会返回一个Promise对象,因此Bundle组件中的代码也需要相应进行调整
export default class Bundle extends Component {
  constructor(props) {
    super(props);
    this.state = {
      mod: null
    };
  }

  componentWillMount() {
    this.load(this.props)
  }

  componentWillReceiveProps(nextProps) {
    if (nextProps.load !== this.props.load) {
      this.load(nextProps)
    }
  }

  load(props) {
    this.setState({
      mod: null
    });
    //注意这里,使用Promise对象; mod.default导出默认
    props.load().then((mod) => {
      this.setState({
        mod: mod.default ? mod.default : mod
      });
    });
  }

  render() {
    return this.state.mod ? this.props.children(this.state.mod) : null;
  }
}路由部分没有变化
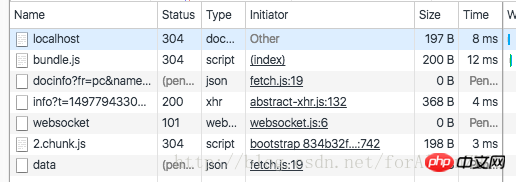
<Route path="/chat" component={Chat}/>这时候,执行npm run start,可以看到在载入最初的页面时加载的资源如下

而当点击触发到/chat路径时,可以看到

动态加载了2.chunk.js这个js文件,如果打开这个文件查看,就可以发现这个就是我们刚才动态import()进来的模块。
当然,除了使用import()仍然可以使用require.ensure()来进行模块的异步加载。相关示例代码如下:
const Chat = (props) => (
<Bundle load={(cb) => {
require.ensure([], require => {
cb(require('./component/chat'));
});
}}>
{(Chat) => <Chat {...props}/>}
</Bundle>
);export default class Bundle extends Component {
constructor(props) {
super(props);
this.state = {
mod: null
};
}
load = props => {
this.setState({
mod: null
});
props.load(mod => {
this.setState({
mod: mod ? mod : null
});
});
}
componentWillMount() {
this.load(this.props);
}
render() {
return this.state.mod ? this.props.children(this.state.mod) : null
}
}此外,如果是直接使用webpack config的话,也可以进行如下配置
output: {
  // The build folder.
  path: paths.appBuild,
  // There will be one main bundle, and one file per asynchronous chunk.
  filename: 'static/js/[name].[chunkhash:8].js',
  chunkFilename: 'static/js/[name].[chunkhash:8].chunk.js',
},结束
代码拆分在单页应用中非常常见,对于提高单页应用的性能与体验具有一定的帮助。我们通过将第一次访问应用时,并不需要的模块拆分出来,通过scipt标签动态加载的原理,可以实现有效的代码拆分。在实际项目中,使用webpack中的import()、require.ensure()或者一些loader(例如Bundle Loader)来做代码拆分与组件按需加载。
上面是我整理给大家的,希望今后会对大家有帮助。
相关文章:
如何在JS中实现字符串拼接的功能(扩展String.prototype.format)
如何通过JavaScript实现微信号随机切换代码(详细教程)
以上是在react-router4中進行程式碼拆分的方法(基於webpack)的詳細內容。更多資訊請關注PHP中文網其他相關文章!


