

下面小編就為大家帶來一個使用Node.js實作簡易MVC框架的方法。小編覺得蠻不錯的,現在就分享給大家,也給大家做個參考。一起跟隨小編過來看看吧
在使用Node.js搭建靜態資源伺服器一文中我們完成了伺服器對靜態資源請求的處理,但並未涉及動態請求,目前還無法根據客戶端發出的不同請求而傳回個人化的內容。單靠靜態資源豈能撐得起這些複雜的網站應用,本文將介紹如何使用<span style="font-family:NSimsun">Node</span>處理動態請求,以及如何建立一個簡易的 MVC 框架。因為前文已經詳細介紹過靜態資源請求如何回應,本文將略過所有靜態部分。
一個簡單的範例
先從一個簡單範例入手,並明白在 Node 中如何向客戶端傳回動態內容。
假設我們有這樣的需求:
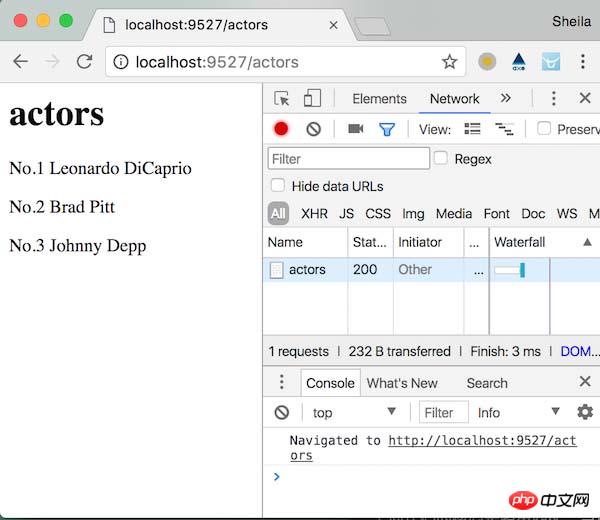
當用戶訪問<span style="font-family:NSimsun">/actors</span>時返回男演員列表頁
當用戶訪問<span style="font-family:NSimsun">/actresses</span>時返回女演員清單
可以用以下的程式碼完成功能:
const http = require('http');
const url = require('url');
http.createServer((req, res) => {
const pathName = url.parse(req.url).pathname;
if (['/actors', '/actresses'].includes(pathName)) {
res.writeHead(200, {
'Content-Type': 'text/html'
});
const actors = ['Leonardo DiCaprio', 'Brad Pitt', 'Johnny Depp'];
const actresses = ['Jennifer Aniston', 'Scarlett Johansson', 'Kate Winslet'];
let lists = [];
if (pathName === '/actors') {
lists = actors;
} else {
lists = actresses;
}
const content = lists.reduce((template, item, index) => {
return template + `<p>No.${index+1} ${item}</p>`;
}, `<h1>${pathName.slice(1)}</h1>`);
res.end(content);
} else {
res.writeHead(如何利用Node.js實作MVC框架的簡單實例分析);
res.end('<h1>Requested page not found.</h1>')
}
}).listen(9527);上面程式碼的核心是路由匹配,當請求抵達時,檢查是否有對應其路徑的邏輯處理,當請求匹配不上任何路由時,返回如何利用Node.js實作MVC框架的簡單實例分析。匹配成功時處理對應的邏輯。
上面的程式碼顯然並不通用,而且在僅有兩種路由匹配候選項(且尚未區分請求方法),以及尚未使用資料庫以及模板檔案的前提下,程式碼都已經有些糾結了。因此接下來我們將建構一個簡易的MVC框架,讓資料、模型、表現分開離開來,各司其職。
建置簡易MVC框架
MVC 分別指的是:
M: Model (資料)
V: View (表現)
C: Controller (邏輯)
在Node 中,MVC 架構下處理請求的過程如下:
##請求抵達服務端
服務端將請求交由路由處理路由透過路徑匹配,將請求導向對應的controllercontroller 收到請求,向model 索取資料model 給controller 回傳其所需資料controller 可能需要對收到的資料做一些再加工controller 將處理好的資料交給viewview 根據資料和範本產生回應內容服務端將此內容傳回客戶端#以此為依據,我們需要準備以下模組:#server : 監聽和回應請求router: 將請求交由正確的controller處理controllers: 執行業務邏輯,從model 中取出數據,傳遞給view#model:提供資料view: 提供html建立下列目錄:-- server.js -- lib -- router.js -- views -- controllers -- models
const http = require('http');
const router = require('./lib/router')();

router.get('/actors', (req, res) => {
  res.end('Leonardo DiCaprio, Brad Pitt, Johnny Depp');
});

http.createServer(router).listen(9527, err => {
  if (err) {
    console.error(err);
    console.info('Failed to start server');
  } else {
    console.info(`Server started`);
  }
});先不管這個檔案裡的細節,router是下面將要完成的模組,這裡先引入,請求抵達後即交由它處理。
router 模組
router模組其實只要完成一件事,將請求導向正確的controller處理,理想中它可以這樣使用:
const router = require('./lib/router')();
const actorsController = require('./controllers/actors');

router.use((req, res, next) => {
  console.info('New request arrived');
  next()
});

router.get('/actors', (req, res) => {
  actorsController.fetchList();
});

router.post('/actors/:name', (req, res) => {
  actorsController.createNewActor();
});要注意的是,如果在某個中間件內既沒有終結回應,也沒有呼叫next 方法將控制權交給下一個中間件, 則請求就會掛起
例如上面的範例:router.use(fn);
登入後複製
router.use((req, res, next) => {
  console.info('New request arrived');
  next()
});__路由中間件__透過以下方式添加,以請求方法和路徑精確匹配:
router.HTTP_METHOD(path, fn)
/lib/router.js
######const METHODS = ['GET', 'POST', 'PUT', 'DELETE', 'HEAD', 'OPTIONS'];
module.exports = () => {
const routes = [];
const router = (req, res) => {
};
router.use = (fn) => {
routes.push({
method: null,
path: null,
handler: fn
});
};
METHODS.forEach(item => {
const method = item.toLowerCase();
router[method] = (path, fn) => {
routes.push({
method,
path,
handler: fn
});
};
});
};依据 method、pathname 将请求与routes数组内各个 route 按它们被添加的顺序依次匹配
如果与某个route匹配成功,执行 route.handler,执行完后与下一个 route 匹配或结束流程 (后面详述)
如果匹配不成功,继续与下一个 route 匹配,重复3、4步骤
 const router = (req, res) => {
    const pathname = decodeURI(url.parse(req.url).pathname);
    const method = req.method.toLowerCase();
    let i = 0;

    const next = () => {
      route = routes[i++];
      if (!route) return;
      const routeForAllRequest = !route.method && !route.path;
      if (routeForAllRequest || (route.method === method && pathname === route.path)) {
        route.handler(req, res, next);
      } else {
        next();
      }
    }

    next();
};对于非路由中间件,直接调用其 handler。对于路由中间件,只有请求方法和路径都匹配成功时,才调用其 handler。当没有匹配上的 route 时,直接与下一个route继续匹配。
需要注意的是,在某条 route 匹配成功的情况下,执行完其 handler 之后,还会不会再接着与下个 route 匹配,就要看开发者在其 handler 内有没有主动调用 next() 交出控制权了。
在__server.js__中添加一些route:
router.use((req, res, next) => {
  console.info('New request arrived');
  next()
});

router.get('/actors', (req, res) => {
  res.end('Leonardo DiCaprio, Brad Pitt, Johnny Depp');
});

router.get('/actresses', (req, res) => {
  res.end('Jennifer Aniston, Scarlett Johansson, Kate Winslet');
});

router.use((req, res, next) => {
  res.statusCode = 如何利用Node.js實作MVC框架的簡單實例分析;
  res.end();
});每个请求抵达时,首先打印出一条 log,接着匹配其他route。当匹配上 actors 或 actresses 的 get 请求时,直接发回演员名字,并不需要继续匹配其他 route。如果都没匹配上,返回 如何利用Node.js實作MVC框架的簡單實例分析。
在浏览器中依次访问 http://localhost:9527/erwe、http://localhost:9527/actors、http://localhost:9527/actresses 测试一下:
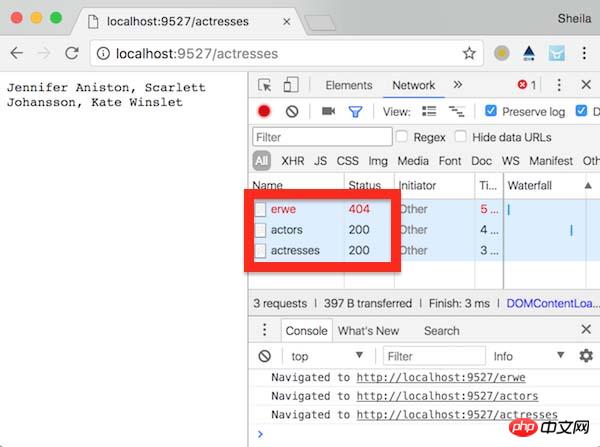
<span style="font-family:NSimsun">network</span> 中观察到的结果符合预期,同时后台命令行中也打印出了三条 <span style="font-family:NSimsun">New request arrived</span>语句。
接下来继续改进 router 模块。
首先添加一个 router.all 方法,调用它即意味着为所有请求方法都添加了一条 route:
router.all = (path, fn) => {
    METHODS.forEach(item => {
      const method = item.toLowerCase();
      router[method](path, fn);
    })
};接着,添加错误处理。
/lib/router.js
const defaultErrorHander = (err, req, res) => {
  res.statusCode = 500;
  res.end();
};

module.exports = (errorHander) => {
  const routes = [];

  const router = (req, res) => {
      ...
    errorHander = errorHander || defaultErrorHander;

    const next = (err) => {
      if (err) return errorHander(err, req, res);
      ...
    }

    next();
};server.js
...
const router = require('./lib/router')((err, req, res) => {
  console.error(err);
  res.statusCode = 500;
  res.end(err.stack);
});
...默认情况下,遇到错误时会返回 500,但开发者使用 router 模块时可以传入自己的错误处理函数将其替代。
修改一下代码,测试是否能正确执行错误处理:
router.use((req, res, next) => {
  console.info('New request arrived');
  next(new Error('an error'));
});这样任何请求都应该返回 500:

继续,修改 route.path 与 pathname 的匹配规则。现在我们认为只有当两字符串相等时才让匹配通过,这没有考虑到 url 中包含路径参数的情况,比如:
localhost:9527/actors/Leonardo
与
router.get('/actors/:name', someRouteHandler);
这条route应该匹配成功才是。
新增一个函数用来将字符串类型的 route.path 转换成正则对象,并存入 route.pattern:
const getRoutePattern = pathname => {
 pathname = '^' + pathname.replace(/(\:\w+)/g, '\(\[a-zA-Z0-9-\]\+\\s\)') + '$';
 return new RegExp(pathname);
};这样就可以匹配上带有路径参数的url了,并将这些路径参数存入 req.params 对象:
    const matchedResults = pathname.match(route.pattern);
    if (route.method === method && matchedResults) {
      addParamsToRequest(req, route.path, matchedResults);
      route.handler(req, res, next);
    } else {
      next();
}const addParamsToRequest = (req, routePath, matchedResults) => {
req.params = {};
let urlParameterNames = routePath.match(/:(\w+)/g);
if (urlParameterNames) {
for (let i=0; i < urlParameterNames.length; i++) {
req.params[urlParameterNames[i].slice(1)] = matchedResults[i + 1];
}
}
}添加个 route 测试一下:
router.get('/actors/:year/:country', (req, res) => {
  res.end(`year: ${req.params.year} country: ${req.params.country}`);
});访问<span style="font-family:NSimsun">http://localhost:9527/actors/1990/China</span>试试:

router 模块就写到此,至于查询参数的格式化以及获取请求主体,比较琐碎就不试验了,需要可以直接使用 bordy-parser 等模块。
现在我们已经创建好了router模块,接下来将 route handler 内的业务逻辑都转移到 controller 中去。
修改__server.js__,引入 controller:
...
const actorsController = require('./controllers/actors');
...
router.get('/actors', (req, res) => {
  actorsController.getList(req, res);
});

router.get('/actors/:name', (req, res) => {
  actorsController.getActorByName(req, res);
});

router.get('/actors/:year/:country', (req, res) => {
  actorsController.getActorsByYearAndCountry(req, res);
});
...新建__controllers/actors.js__:
const actorsTemplate = require('../views/actors-list');
const actorsModel = require('../models/actors');

exports.getList = (req, res) => {
  const data = actorsModel.getList();
  const htmlStr = actorsTemplate.build(data);
  res.writeHead(200, {
    'Content-Type': 'text/html'
  });
  res.end(htmlStr);
};

exports.getActorByName = (req, res) => {
  const data = actorsModel.getActorByName(req.params.name);
  const htmlStr = actorsTemplate.build(data);
  res.writeHead(200, {
    'Content-Type': 'text/html'
  });
  res.end(htmlStr);
};

exports.getActorsByYearAndCountry = (req, res) => {
  const data = actorsModel.getActorsByYearAndCountry(req.params.year, req.params.country);
  const htmlStr = actorsTemplate.build(data);
  res.writeHead(200, {
    'Content-Type': 'text/html'
  });
  res.end(htmlStr);
};在 controller 中同时引入了 view 和 model, 其充当了这二者间的粘合剂。回顾下 controller 的任务:
controller 收到请求,向 model 索要数据
model 给 controller 返回其所需数据
controller 可能需要对收到的数据做一些再加工
controller 将处理好的数据交给 view
在此 controller 中,我们将调用 model 模块的方法获取演员列表,接着将数据交给 view,交由 view 生成呈现出演员列表页的 html 字符串。最后将此字符串返回给客户端,在浏览器中呈现列表。
从 model 中获取数据
通常 model 是需要跟数据库交互来获取数据的,这里我们就简化一下,将数据存放在一个 json 文件中。
/models/test-data.json
[
  {
    "name": "Leonardo DiCaprio",
    "birth year": 1974,
    "country": "US",
    "movies": ["Titanic", "The Revenant", "Inception"]
  },
  {
    "name": "Brad Pitt",
    "birth year": 1963,
    "country": "US",
    "movies": ["Fight Club", "Inglourious Basterd", "Mr. & Mrs. Smith"]
  },
  {
    "name": "Johnny Depp",
    "birth year": 1963,
    "country": "US",
    "movies": ["Edward Scissorhands", "Black Mass", "The Lone Ranger"]
  }
]接着就可以在 model 中定义一些方法来访问这些数据。
models/actors.js
const actors = require('./test-data');

exports.getList = () => actors;

exports.getActorByName = (name) => actors.filter(actor => {
  return actor.name == name;
});

exports.getActorsByYearAndCountry = (year, country) => actors.filter(actor => {
  return actor["birth year"] == year && actor.country == country;
});当 controller 从 model 中取得想要的数据后,下一步就轮到 view 发光发热了。view 层通常都会用到模板引擎,如 dust 等。同样为了简化,这里采用简单替换模板中占位符的方式获取 html,渲染得非常有限,粗略理解过程即可。
创建 /views/actors-list.js:
const actorTemplate = `
<h1>{name}</h1>
<p><em>Born: </em>{contry}, {year}</p>
<ul>{movies}</ul>
`;
exports.build = list => {
let content = '';
list.forEach(actor => {
content += actorTemplate.replace('{name}', actor.name)
.replace('{contry}', actor.country)
.replace('{year}', actor["birth year"])
.replace('{movies}', actor.movies.reduce((moviesHTML, movieName) => {
return moviesHTML + `<li>${movieName}</li>`
}, ''));
});
return content;
};在浏览器中测试一下:

至此,就大功告成啦!
以上是如何利用Node.js實作MVC框架的簡單實例分析的詳細內容。更多資訊請關注PHP中文網其他相關文章!


