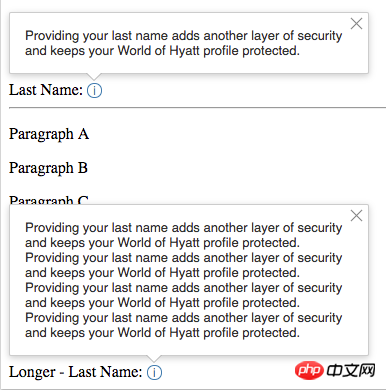
效果圖:

注意下列重點:
1、提示方塊的箭頭效果,且箭頭隨位置變動。
2、提示框的關閉按鈕,且提示框內容高度隨意。
3、陰影效果
代碼:
<!DOCTYPE HTML>
<HTML>
<HEAD>
<script src="https://code.jquery.com/jquery-3.2.1.min.js"></script>
<script>
$(function(){
function showTip(flag){
var tip = $("div.tool-tip-content-wrapper, div.tool-tip-info-border");
if(flag) tip.show();
else tip.hide();
}
$("span.tool-tip-info").on("click",function(){
showTip(true);
});
$("div.tip-content-btn").on("click",function(){
showTip(false);
});
});
</script>
<style>
.tool-tip-info-border{
display:none;
}
.tool-tip-info-border-b{
border-top-color: #fff;
border-left-color: transparent;
border-right-color: transparent;
border-bottom-color: transparent;
border-style: dashed dashed solid;
border-width: 8px;
position: absolute;
top: -12px;
left: -2px;
z-index:2000;
height: 0;
width: 0;
}
.tool-tip-info-border-a{
border-top-color: #aaa;
border-left-color: transparent;
border-right-color: transparent;
border-bottom-color:transparent;
border-style: dashed dashed solid;
border-width: 8px;
position: absolute;
top: -11px;
left: -2px;
z-index:2000;
height: 0;
width: 0;
}
.tool-tip-content {
background: #fff;
border: 1px solid #ccc;
border-color: rgba(0,0,0,.2);
-webkit-box-shadow: 0 2px 10px rgba(0,0,0,.2);
box-shadow: 0 2px 10px rgba(0,0,0,.2);
outline: none;
overflow: hidden;
position: absolute;
left: 0px;
bottom: 7px;
-webkit-animation: gb__a .2s;
animation: gb__a .2s;
-webkit-border-radius: 2px;
border-radius: 2px;
-webkit-user-select: text;
width:360px;
height:auto;
padding:15px;
font: 13px 'Lato',sans-serif;
color:rgb(51,51,51);
box-sizing: border-box;
}
.tool-tip-info{
position:relative;
display:inline-block;
width:13px;
height:13px;
text-align:center;
line-height:13px;
border: 1px solid #407bae;
border-radius:10px;
color:#407bae;
font: 12px 'Lato',sans-serif;
cursor:pointer;
}
.tip-content-btn{
position:absolute;
top:2px;
right:2px;
width:13px;
height:13px;
cursor:pointer;
}
.tip-content-btn:before{
position:absolute;
top:1px;
left:3px;
width:1px;
height:15px;
background-color:#888;
transform: rotate(-45deg);
-webkit-transform: rotate(-45deg);
-moz-transform: rotate(-45deg);
-ms-transform: rotate(-45deg);
-o-transform: rotate(-45deg);
content:"";
}
.tip-content-btn:hover:before{
background-color:#333;
}
.tip-content-btn:after{
position:absolute;
top:1px;
left:3px;
width:1px;
height:15px;
background-color:#888;
transform: rotate(45deg);
-webkit-transform: rotate(45deg);
-moz-transform: rotate(45deg);
-ms-transform: rotate(45deg);
-o-transform: rotate(45deg);
content:"";
}
.tip-content-btn:hover:after{
background-color:#333;
}
.tool-tip-content-wrapper{
position:relative !important;
height:0px;
display:none;
z-index:1000;
}
</style>
</HEAD>
<BODY>
<p>Paragraph A</p>
<p>Paragraph B</p>
<p>Paragraph C</p>
<p>Paragraph D</p>
<p>Paragraph E</p>
<p>Paragraph F</p>
<p>Paragraph G</p>
<div class="tool-tip-content-wrapper">
<div class="tool-tip-content">
<div class="tip-content-msg">
Providing your last name adds another
layer of security and keeps your World Of Tester profile protected.
</div>
<div class="tip-content-btn"></div>
</div>
</div>
<div>
Last Name:
<span class="tool-tip-info">
<span>i</span>
<div class="tool-tip-info-border">
<div class="tool-tip-info-border-a"></div>
<div class="tool-tip-info-border-b"></div>
</div>
</span>
</div>
<hr/>
<!--======== TEST CODE ONLY :::::::: Test Begin =========== -->
<p>Paragraph A</p>
<p>Paragraph B</p>
<p>Paragraph C</p>
<p>Paragraph D</p>
<p>Paragraph E</p>
<p>Paragraph F</p>
<p>Paragraph G</p>
<div class="tool-tip-content-wrapper">
<div class="tool-tip-content">
<div class="tip-content-msg">
Providing your last name adds another
layer of security and keeps your World Of Tester profile protected.
Providing your last name adds another
layer of security and keeps your World Of Tester profile protected.
Providing your last name adds another
layer of security and keeps your World Of Tester profile protected.
Providing your last name adds another
layer of security and keeps your World Of Tester profile protected.
</div>
<div class="tip-content-btn"></div>
</div>
</div>
<div>
Longer - Last Name:
<span class="tool-tip-info">
<span>i</span>
<div class="tool-tip-info-border">
<div class="tool-tip-info-border-a"></div>
<div class="tool-tip-info-border-b"></div>
</div>
</span>
</div>
<!--======== TEST CODE ONLY :::::::: Test End =========== -->
<BODY>
</HTML>以上是CSS如何實作提示框的實例詳解的詳細內容。更多資訊請關注PHP中文網其他相關文章!


