作者:Ivy Walobwa✏️
隨著您的 Web 應用程式變得越來越複雜,掌握除錯藝術變得至關重要。
有效的 JavaScript 偵錯不僅涉及修復錯誤。它需要了解您的程式碼在幕後如何運作,以確保您的應用程式順利運行並提供最佳的用戶體驗。
縮小的程式碼,即在生產中到達使用者的程式碼版本,針對效能進行了最佳化。然而,精簡的程式碼對於調試來說可能是一場噩夢。當使用者遇到錯誤時,在精簡程式碼中重現和診斷問題通常具有挑戰性。
但是,使用正確的工具,JavaScript 偵錯會變得更加容易。本文將探討如何利用來源映射來偵錯精簡程式碼,並深入研究使用 Chrome DevTools 的其他技術來有效識別和解決 Web 應用程式中的問題。
我們將開發一個簡單的應用程序,該應用程式會增加計數並將其記錄到控制台上。此應用程式演示了精簡程式碼如何使偵錯變得棘手,以及來源映射如何幫助簡化流程。
建立下面的 .js 檔案並加入程式碼片段,如下所示:
1. src/counterCache.js
export const countCache = {
     previousCount: 0,
     currentCount: 0,
     totalCount: 0
}
export function updateCache(currentCount, previousCount) {
     countCache.currentCount = currentCount;
     countCache.previousCount = previousCount; c
     ountCache.totalCount = countCache.totalCount + countCache.currentCount;
}
2.src/counter.js:
import { updateCache } from './counterCache.js';
let count = 0;
export function incrementCounter()
     { count += 1;
     const previousCount = count;
     updateCache(count, previousCount);
}
3.src/index.js:
import { incrementCounter } from './counter';
import { countCache } from './counterCache';
const button = document.createElement('button');
const previousElement = document.getElementById('previous');
const currentElement = document.getElementById('current');
const totalElement = document.getElementById('total');
button.innerText = 'Click me';
document.body.appendChild(button);
button.addEventListener('click', () => {
     incrementCounter();
     previousElement.innerText = countCache.previousCount;
     currentElement.innerText = countCache.currentCount;
     totalElement.innerText = countCache.total();
});
在 package.json 檔案中,加入如下所示的 webpack 套件,然後執行 npm i 來安裝它們。我們將使用 webpack 作為建置流程的一部分來產生用於生產的精簡程式碼:
  "devDependencies": {
    "webpack": "^5.96.1",
    "webpack-cli": "^5.1.4"
  }
要啟用程式碼精簡,請新增包含下列程式碼片段的 webpack.config.js 檔案。將模式設定為生產告訴 webpack 應用最佳化,例如修改:
 const path = require('path');
    module.exports = {
        mode: 'production', // Enables optimizations like minification and tree-shaking
        entry: './src/index.js', // Specifies the entry point of your application
        output: {
            path: path.resolve(__dirname, 'dist'),// Defines the output directory for bundled files
            filename: 'bundle.js',// Specifies the name of the bundled file
        },
    };
現在運行 npx webpack 來捆綁並縮小您的程式碼。產生的 dist/bundle.js 檔案的內容如下所示。縮小模糊變數和函數名稱,並刪除不必要的字符,如空格、註釋和未使用的程式碼,使輸出檔更小,載入速度更快:
(()=>{"use strict";const t={};let e=0;const n=document.createElement("button"),o=document.getElementById("previous"),u=document.getElementById("current"),r=document.getElementById("total");n.innerText="Click me",document.body.appendChild(n),n.addEventListener("click",(()=>{var n,c;e+=1,n=e,c=e,t.currentCount=n,t.previousCount=c,t.totalCount=t.totalCount||0+t.currentCount,o.innerText=t.previousCount,u.innerText=t.currentCount,r.innerText=t.total()}))})();
接下來,更新 index.html 檔案以引用捆綁的輸出,確保您的應用程式使用縮小的程式碼:
<<!DOCTYPE html>
<html lang="en">
<head>
    <meta charset="UTF-8">
    <meta name="viewport" content="width=device-width, initial-scale=1.0">
    <title>Web Debugging Example</title>
    <link rel="stylesheet" href="styles.css">
</head>
<body>
    <h1>Web Debug App</h1>
    <p>Check console for bug</p>
    <table>
        <thead>
            <tr>
                <th>Previous count</th>
                <th>Current count</th>
                <th>Total count</th>
            </tr>
        </thead>
        <tbody>
            <tr>
                <td>


<p>Finally, run the app and check the console after clicking the button. To preview the app locally, you can use the Live Server extension in VS Code:</p>

<p><img src="https://img.php.cn/upload/article/000/000/000/173705233279872.png" alt="app error using minified code" loading="lazy"    style="max-width:90%"  style="max-width:90%"></p>

<p><img src="https://img.php.cn/upload/article/000/000/000/173705233320770.png" alt="Bundled source file" loading="lazy"    style="max-width:90%"  style="max-width:90%"></p>

<p>The error in the console, t.total is not a function, is difficult to interpret. Clicking on the file in the console does not help pinpoint the issue due to the compact and obfuscated nature of minified code. Identifying the root cause of such an error in a large codebase can be frustrating and time-consuming, as the minified code obscures the original logic and context.</p>

<h2>


  8 JavaScript debugging strategies for web apps
</h2>

<p>Let’s demonstrate eight methods to help make JavaScript debugging a bit easier:</p>

<h3>


  1. Source maps
</h3>

<p>Source maps are files that map your minified code back to the original source code. They make debugging easier and help investigate issues in production. The file names of source maps end with .map.</p>

<p>To generate source maps using webpack, update the webpack.config.js file as follows:</p>

<p>The devtool: 'source-map' or devtool: 'eval-source-map' line tells webpack to generate an external .map file which maps the minified code back to your original source code. The source map file URL is also added to the minified code in the bundle.js file.</p>

<p>Now run npx webpack. The .map file will generate alongside your minified bundle. Serve the application using a local server, and open it in an Incognito browser window. This prevents browser extensions and cached files from interfering with your debugging process.</p>

<p>With source maps generated, the following observations are made:</p>

<ol>
<li> The error is linked to the counter.js file, which is the original source code</li>
<li> The source map, bundle.js.map is successfully fetched and is visible under the <strong>Developer resources</strong> tab</li>
<li> In the <strong>Sources</strong> tab, the developer tools display the original source code and the problematic line</li>
</ol>

<p>The exact code and file causing the bug are easy to identify using source maps:</p>

<p><img src="https://img.php.cn/upload/article/000/000/000/173705233514189.png" alt="app error from source maps" loading="lazy"    style="max-width:90%"  style="max-width:90%"></p>

<p><img src="https://img.php.cn/upload/article/000/000/000/173705233621716.png" alt="mapped source code javascript debugging" loading="lazy"    style="max-width:90%"  style="max-width:90%"></p>

<p>With the clear error above, we are able to fix the error and access the correct property on countCache.</p>

<p>Our guide on how to use Chrome DevTools should provide a great start. To open the <strong>Developer resources</strong> tab, click on the <strong>More</strong> icon, then <strong>More tools</strong> then <strong>Developer resources</strong>. This tab allows you to view the source map load status and even load source maps manually:</p>

<p><img src="https://img.php.cn/upload/article/000/000/000/173705233875017.png" alt="accessing developer resources tab javascript debugging" loading="lazy"    style="max-width:90%"  style="max-width:90%"></p>

<p>The code snippet below fixes the bug on the console. Update your code, then run npx webpack to compile the changes. Once completed, serve the application and view the updated output in the table:<br>
</p>

<pre class="brush:php;toolbar:false">totalElement.innerText = countCache.totalCount;
按一下該按鈕目前會更新表中的先前計數、目前計數和總計。前一個計數應該會傳回計數的前一個值,而總計數則傳回所有計數值的總和。目前,先前的計數顯示目前計數,而總計數停留在 1。
在下一節中,我們將探索其他 JavaScript 偵錯技術,例如使用斷點和單步執行程式碼,以識別並修復此問題:

斷點可讓您在特定行暫停程式碼的執行,幫助您檢查變數、計算表達式並理解程式碼流。根據您的目標,您可以使用不同的斷點。例如:
在我們的範例應用程式中,我們將在incrementCounter 函數上套用一個斷點。在 Sources 面板上,開啟 counter.js 檔案並點擊第六行左側。這會在計數增加後設定程式碼行斷點:

我們將在第五行設定另一個斷點並編輯它。要編輯斷點,我們將右鍵單擊突出顯示的部分,然後單擊 編輯斷點:

我們將斷點類型設定為Logpoint,然後輸入要記錄到控制台的訊息:

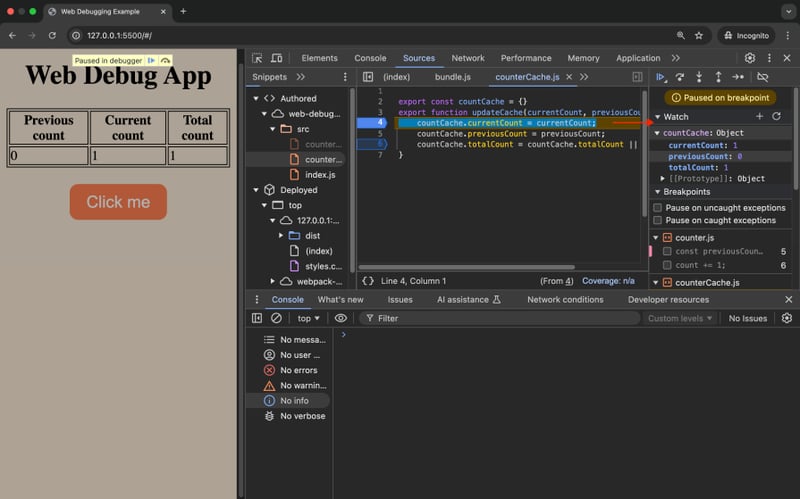
透過點擊按鈕,我們的應用程式會在程式碼行斷點處暫停,並從 Logpoint 集在控制台上列印偵錯日誌:

從圖像中我們可以看到以下部分:
有了這個,我們可以進一步調試我們的應用程式。
範圍面板對於JavaScript調試非常有效,因為它允許您查看原始來源中的變數:

我們可以看到以下範圍變數:
從範圍面板和日誌點斷點,我們可以看到當前計數為1,而增加之前的計數為0。因此,我們需要將增量之前的計數儲存為先前的計數。
單步執行程式碼涉及在 JavaScript 偵錯期間以不同方式瀏覽程式:
您可以使用偵錯控制項來單步執行程式碼。 Step 控制項可讓您一次執行一行程式碼。點選步驟將執行第六行並移至第七行。注意 previousCount 的值在範圍內如何變化:

Step over 控制項可讓您執行函數而無需逐行執行:

Step into 控制項可讓您進入函數。在函數中,您可以逐行單步執行程式碼或 Step out 函數,如下所示。跳出此函數將完成剩餘行的執行:

為了解決我們的問題,我們將更新程式碼,如下所示。現在可以正確顯示表格上先前的計數:
export const countCache = {
     previousCount: 0,
     currentCount: 0,
     totalCount: 0
}
export function updateCache(currentCount, previousCount) {
     countCache.currentCount = currentCount;
     countCache.previousCount = previousCount; c
     ountCache.totalCount = countCache.totalCount + countCache.currentCount;
}
呼叫堆疊顯示導致程式碼中目前點的函數呼叫順序。
如圖所示在 counterCache.js 檔案中新增一個新斷點,然後按一下 按鈕。觀察呼叫堆疊面板:

當應用程式執行 counterCache.js 的第六行時,會進行三個函數呼叫。要觀察堆疊中任何函數的流程,您可以使用重新啟動框架重新啟動它們的執行,如下所示:

偵錯時,您可能會想要在工作流程中忽略某些腳本。這有助於跳過庫或程式碼產生器中程式碼的複雜性。在我們的例子中,我們希望在偵錯時忽略 counter.js 腳本。
在頁面標籤上,右鍵點選要忽略的文件,並將腳本加入忽略清單:

運行應用程式並在斷點處暫停,我們可以看到呼叫堆疊上的incrementCounter函數現在被忽略。您可以隱藏或顯示忽略的畫面:

您可以在頁面標籤中對文件進行分組,以便於導航,如下圖所示:

監視表達式可讓您在程式碼執行時追蹤特定變數或表達式,幫助您即時監控變更。您可以新增 countCache 等表達式來在單步執行程式碼時監視值:

要嘗試修復總計數的錯誤,您可以在控制台上執行程式碼片段以了解邏輯錯誤。當偵錯在控制台上重複運行的程式碼時,可以使用 Snippets.
在 Snippets 標籤上,新增範例偵錯腳本,儲存腳本,然後按一下 Enter 執行腳本:

您可以觀察到需要重新排列有錯誤的表達式來解決問題:
export const countCache = {
     previousCount: 0,
     currentCount: 0,
     totalCount: 0
}
export function updateCache(currentCount, previousCount) {
     countCache.currentCount = currentCount;
     countCache.previousCount = previousCount; c
     ountCache.totalCount = countCache.totalCount + countCache.currentCount;
}
您可以探索有關偵錯 Web 應用程式的其他資源,例如這篇關於使用 React DevTools 偵錯 React 應用程式的文章,它提供了調試基於 React 的應用程式的寶貴見解。此外,本關於使用 Chrome DevTools 調試 Node.js 的指南提供了使用觀察器和其他高級 DevTools 功能調試伺服器端 JavaScript 的技巧。這些資源可以補充此處討論的技術,並拓寬您對調試 Web 應用程式的理解。
本教學探討了使用來源映射和 Chrome DevTools 偵錯精簡程式碼。透過產生來源映射,我們將縮小的程式碼映射回其原始來源,從而更輕鬆地偵錯我們的 Web 應用程式。 Chrome DevTools 透過斷點、單步執行程式碼、監視表達式等方法進一步增強了 JavaScript 偵錯過程。
使用這些工具,開發人員可以有效地調試和優化他們的應用程序,即使在處理複雜、精簡的程式碼庫時也是如此。這個專案的完整程式碼可以在 GitHub 上找到。
NPM:
import { updateCache } from './counterCache.js';
let count = 0;
export function incrementCounter()
     { count += 1;
     const previousCount = count;
     updateCache(count, previousCount);
}
腳本標籤:
import { incrementCounter } from './counter';
import { countCache } from './counterCache';
const button = document.createElement('button');
const previousElement = document.getElementById('previous');
const currentElement = document.getElementById('current');
const totalElement = document.getElementById('total');
button.innerText = 'Click me';
document.body.appendChild(button);
button.addEventListener('click', () => {
     incrementCounter();
     previousElement.innerText = countCache.previousCount;
     currentElement.innerText = countCache.currentCount;
     totalElement.innerText = countCache.total();
});
3.(可選)安裝插件以與您的堆疊進行更深入的整合:
現在就開始。
以上是如何掌握 Web 應用程式的 JavaScript 偵錯的詳細內容。更多資訊請關注PHP中文網其他相關文章!


