


Angular 中的組件生命週期

Angular 生命週期鉤子是允許開發人員利用 Angular 元件生命週期的關鍵時刻的方法,從創建到銷毀,包括初始化、更改和銷毀。最常用的生命週期鉤子是:
- 建構子:頁面第一次載入時呼叫。只打過一次電話。
- ngOnChanges:執行多次。第一次將在元件建立/載入時執行。當 @input 裝飾器的自訂屬性發生變更時,每次都會呼叫此鉤子。與爭論一起工作 - 簡單的改變
- ngOnInit:組件初始化後呼叫。非常適合設定組件的狀態。
- ngDoCheck:用於手動偵測變更(在每個變更偵測週期呼叫)。
- ngAfterContentInit:內容投影到元件後呼叫。
- ngAfterContentChecked:檢查投影內容後呼叫。
- ngAfterViewInit:在視圖初始化後呼叫。
- ngAfterViewChecked:在 Angular 檢查元件視圖後呼叫。
- ngOnDestroy:在元件被銷毀之前呼叫。用它來清理資源,例如取消訂閱 observables。

在深入之前,讓我們先建立先決項目:
我們將需要父元件和子元件。我們將在父組件中有輸入字段,並將輸入的值傳遞給子組件,並將顯示在子組件中。
parent.component.ts
import { Component, OnInit } from '@angular/core';

@Component({
  selector: 'app-parent',
  templateUrl: './parent.component.html',
  styleUrls: ['./parent.component.css']
})
export class ParentComponent implements OnInit {

  constructor() { }

  ngOnInit(): void {
  }

  value:string = '';
  SubmitValue(val: any) {
    this.value = val.value;
  }

}
parent.component.html
<h1>Lifecycle Hooks</h1>

<input type="text" placeholder="Input here..." #val>
<button (click)="SubmitValue(val)">Submit Value</button>

<br><br>
<app-child [inputValue]="value"></app-child>
child.component.ts
import { Component, Input, OnInit } from '@angular/core';

@Component({
  selector: 'app-child',
  templateUrl: './child.component.html',
  styleUrls: ['./child.component.css']
})
export class ChildComponent implements OnInit {

  constructor() { }

  @Input() inputValue: string = "LifeCycle Hooks";

  ngOnInit(): void {
  }

}
child.component.html
<div>
    Input Value: <strong>{{inputValue}}</strong>
</div>
我們將得到以下輸出:

1.建構子
- 建構子是用來初始化元件的 TypeScript 類別方法。它在任何 Angular 生命週期鉤子之前調用。
- 主要用途:初始化依賴注入並設定變數。
export class ChildComponent implements OnInit {

  constructor() {
    **console.log("Constructor Called");**
  }

  @Input() inputValue: string = "LifeCycle Hooks";

  ngOnInit(): void {}

}

2.ngOnChanges
- 當元件的任何輸入屬性變更時呼叫。
- 提供一個 SimpleChanges 對象,其中包含輸入屬性的先前值和目前值。
- 用法:更新父元件的資料輸入屬性來觸發此鉤子。
import { Component, OnInit } from '@angular/core';

@Component({
  selector: 'app-parent',
  templateUrl: './parent.component.html',
  styleUrls: ['./parent.component.css']
})
export class ParentComponent implements OnInit {

  constructor() { }

  ngOnInit(): void {
  }

  value:string = '';
  SubmitValue(val: any) {
    this.value = val.value;
  }

}

我再次輸入了值,並再次呼叫了 ngOnChanges,但建構子只呼叫了一次。

讓我們看看更改參數中有什麼:
<h1>Lifecycle Hooks</h1>

<input type="text" placeholder="Input here..." #val>
<button (click)="SubmitValue(val)">Submit Value</button>

<br><br>
<app-child [inputValue]="value"></app-child>

讓我們輸入一些數值來看:

3.ngOnInit
- 在第一個 ngOnChanges 之後呼叫一次。
- 主要用途:初始化元件並設定渲染所需的任何資料。
import { Component, Input, OnInit } from '@angular/core';

@Component({
  selector: 'app-child',
  templateUrl: './child.component.html',
  styleUrls: ['./child.component.css']
})
export class ChildComponent implements OnInit {

  constructor() { }

  @Input() inputValue: string = "LifeCycle Hooks";

  ngOnInit(): void {
  }

}

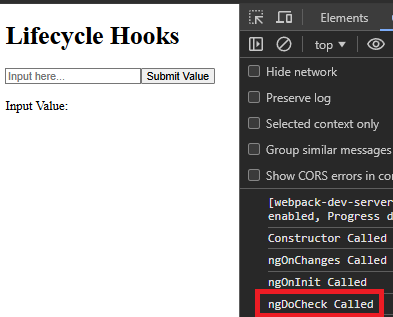
4.ngDoCheck
- 每次 Angular 偵測到元件或其子元件發生變更時執行。
- 將其用於自訂變更偵測邏輯。
<div>
    Input Value: <strong>{{inputValue}}</strong>
</div>
5.ngAfterContentInit
- 內容(例如,
)投影到元件後呼叫一次。
child.component.html
export class ChildComponent implements OnInit {

  constructor() {
    **console.log("Constructor Called");**
  }

  @Input() inputValue: string = "LifeCycle Hooks";

  ngOnInit(): void {}

}
parent.component.html
export class ChildComponent implements OnInit, OnChanges {

  constructor() {
    console.log("Constructor Called");
  }

  ngOnChanges(changes: SimpleChanges): void {
    console.log("ngOnChanges Called");
  }

  @Input() inputValue: string = "LifeCycle Hooks";

  ngOnInit(): void {}

}
child.component.ts
 ngOnChanges(changes: SimpleChanges): void {
    console.log("ngOnChanges Called", changes);
  }

6.ngAfterContentChecked
- 每次檢查投影內容後呼叫。
- 謹慎使用以避免效能問題。
export class ChildComponent implements OnInit, OnChanges {

  constructor() {
    console.log("Constructor Called");
  }
  ngOnChanges(changes: SimpleChanges): void {
    console.log("ngOnChanges Called");
  }

  @Input() inputValue: string = "LifeCycle Hooks";

  ngOnInit(): void {
    console.log("ngOnInit Called");
  }

}

讓我們來玩一下這個:
export class ChildComponent implements OnInit, OnChanges, DoCheck {

  constructor() {
    console.log("Constructor Called");
  }
  ngOnChanges(changes: SimpleChanges): void {
    console.log("ngOnChanges Called", changes);
  }

  @Input() inputValue: string = "LifeCycle Hooks";

  ngOnInit(): void {
    console.log("ngOnInit Called");
  }

  ngDoCheck() {
    console.log("ngDoCheck Called");
  }

}
當 ng-content 再次改變時,ngAfterContentChecked 被呼叫。

7.ngAfterViewInit
- 元件視圖及其子視圖初始化後呼叫一次。
- 對於初始化第三方函式庫或 DOM 操作很有用。

8.ngAfterViewChecked
- 每次檢查元件視圖及其子視圖後呼叫。

9.ngOnDestroy
- 在元件被銷毀之前呼叫。
- 將其用於清理任務,例如取消訂閱 Observables 或分離事件偵聽器。
ngOnDestroy 僅在我們銷毀任何組件時才會調用,因此讓我們嘗試在單擊“銷毀組件”按鈕時刪除子組件。
讓我們來安排一下:
parent.component.ts
import { Component, OnInit } from '@angular/core';

@Component({
  selector: 'app-parent',
  templateUrl: './parent.component.html',
  styleUrls: ['./parent.component.css']
})
export class ParentComponent implements OnInit {

  constructor() { }

  ngOnInit(): void {
  }

  value:string = '';
  SubmitValue(val: any) {
    this.value = val.value;
  }

}
parent.component.html
<h1>Lifecycle Hooks</h1>

<input type="text" placeholder="Input here..." #val>
<button (click)="SubmitValue(val)">Submit Value</button>

<br><br>
<app-child [inputValue]="value"></app-child>
在我們點擊「銷毀組件」按鈕之前:

點選「銷毀組件」按鈕後:

生命週期掛鉤序列:
- 建構子
- ngOnChanges(如果 @Input 屬性存在)
- ngOnInit
- ngDoCheck
- ngAfterContentInit
- ngAfterContentChecked
- ngAfterViewInit
- ngAfterViewChecked
- ngOnDestroy
透過有效地理解和使用這些鉤子,您可以管理元件在其生命週期的不同階段的行為。
以上是Angular 中的組件生命週期的詳細內容。更多資訊請關注PHP中文網其他相關文章!

熱AI工具

Undress AI Tool
免費脫衣圖片

Undresser.AI Undress
人工智慧驅動的應用程序,用於創建逼真的裸體照片

AI Clothes Remover
用於從照片中去除衣服的線上人工智慧工具。

Clothoff.io
AI脫衣器

Video Face Swap
使用我們完全免費的人工智慧換臉工具,輕鬆在任何影片中換臉!

熱門文章
熱工具

記事本++7.3.1
好用且免費的程式碼編輯器

SublimeText3漢化版
中文版,非常好用

禪工作室 13.0.1
強大的PHP整合開發環境

Dreamweaver CS6
視覺化網頁開發工具

SublimeText3 Mac版
神級程式碼編輯軟體(SublimeText3)


 如何在node.js中提出HTTP請求?
Jul 13, 2025 am 02:18 AM
如何在node.js中提出HTTP請求?
Jul 13, 2025 am 02:18 AM
在Node.js中發起HTTP請求有三種常用方式:使用內置模塊、axios和node-fetch。 1.使用內置的http/https模塊無需依賴,適合基礎場景,但需手動處理數據拼接和錯誤監聽,例如用https.get()獲取數據或通過.write()發送POST請求;2.axios是基於Promise的第三方庫,語法簡潔且功能強大,支持async/await、自動JSON轉換、攔截器等,推薦用於簡化異步請求操作;3.node-fetch提供類似瀏覽器fetch的風格,基於Promise且語法簡單
 JavaScript數據類型:原始與參考
Jul 13, 2025 am 02:43 AM
JavaScript數據類型:原始與參考
Jul 13, 2025 am 02:43 AM
JavaScript的數據類型分為原始類型和引用類型。原始類型包括string、number、boolean、null、undefined和symbol,其值不可變且賦值時復制副本,因此互不影響;引用類型如對象、數組和函數存儲的是內存地址,指向同一對象的變量會相互影響。判斷類型可用typeof和instanceof,但需注意typeofnull的歷史問題。理解這兩類差異有助於編寫更穩定可靠的代碼。
 JavaScript時間對象,某人構建了一個eactexe,在Google Chrome上更快的網站等等
Jul 08, 2025 pm 02:27 PM
JavaScript時間對象,某人構建了一個eactexe,在Google Chrome上更快的網站等等
Jul 08, 2025 pm 02:27 PM
JavaScript開發者們,大家好!歡迎閱讀本週的JavaScript新聞!本週我們將重點關注:Oracle與Deno的商標糾紛、新的JavaScript時間對象獲得瀏覽器支持、GoogleChrome的更新以及一些強大的開發者工具。讓我們開始吧! Oracle與Deno的商標之爭Oracle試圖註冊“JavaScript”商標的舉動引發爭議。 Node.js和Deno的創建者RyanDahl已提交請願書,要求取消該商標,他認為JavaScript是一個開放標準,不應由Oracle
 處理諾言:鏈接,錯誤處理和承諾在JavaScript中
Jul 08, 2025 am 02:40 AM
處理諾言:鏈接,錯誤處理和承諾在JavaScript中
Jul 08, 2025 am 02:40 AM
Promise是JavaScript中處理異步操作的核心機制,理解鍊式調用、錯誤處理和組合器是掌握其應用的關鍵。 1.鍊式調用通過.then()返回新Promise實現異步流程串聯,每個.then()接收上一步結果並可返回值或Promise;2.錯誤處理應統一使用.catch()捕獲異常,避免靜默失敗,並可在catch中返回默認值繼續流程;3.組合器如Promise.all()(全成功才成功)、Promise.race()(首個完成即返回)和Promise.allSettled()(等待所有完成)
 什麼是緩存API?如何與服務人員使用?
Jul 08, 2025 am 02:43 AM
什麼是緩存API?如何與服務人員使用?
Jul 08, 2025 am 02:43 AM
CacheAPI是瀏覽器提供的一種緩存網絡請求的工具,常與ServiceWorker配合使用,以提升網站性能和離線體驗。 1.它允許開發者手動存儲如腳本、樣式表、圖片等資源;2.可根據請求匹配緩存響應;3.支持刪除特定緩存或清空整個緩存;4.通過ServiceWorker監聽fetch事件實現緩存優先或網絡優先等策略;5.常用於離線支持、加快重複訪問速度、預加載關鍵資源及後台更新內容;6.使用時需注意緩存版本控制、存儲限制及與HTTP緩存機制的區別。
 JS綜述:深入研究JavaScript事件循環
Jul 08, 2025 am 02:24 AM
JS綜述:深入研究JavaScript事件循環
Jul 08, 2025 am 02:24 AM
JavaScript的事件循環通過協調調用棧、WebAPI和任務隊列來管理異步操作。 1.調用棧執行同步代碼,遇到異步任務時交由WebAPI處理;2.WebAPI在後台完成任務後將回調放入相應的隊列(宏任務或微任務);3.事件循環檢查調用棧是否為空,若為空則從隊列中取出回調推入調用棧執行;4.微任務(如Promise.then)優先於宏任務(如setTimeout)執行;5.理解事件循環有助於避免阻塞主線程並優化代碼執行順序。
 了解事件在JavaScript DOM事件中冒泡和捕獲
Jul 08, 2025 am 02:36 AM
了解事件在JavaScript DOM事件中冒泡和捕獲
Jul 08, 2025 am 02:36 AM
事件冒泡是從目標元素向外傳播到祖先節點,事件捕獲則是從外層向內傳播到目標元素。 1.事件冒泡:點擊子元素後,事件依次向上觸發父級元素的監聽器,例如點擊按鈕後先輸出Childclicked,再輸出Parentclicked。 2.事件捕獲:設置第三個參數為true,使監聽器在捕獲階段執行,如點擊按鈕前先觸發父元素的捕獲監聽器。 3.實際用途包括統一管理子元素事件、攔截預處理和性能優化。 4.DOM事件流分為捕獲、目標和冒泡三個階段,默認監聽器在冒泡階段執行。
 超越地圖和過濾器的高階功能的JS綜述
Jul 10, 2025 am 11:41 AM
超越地圖和過濾器的高階功能的JS綜述
Jul 10, 2025 am 11:41 AM
JavaScript數組中,除了map和filter,還有其他強大且不常用的方法。 1.reduce不僅能求和,還可計數、分組、展平數組、構建新結構;2.find和findIndex用於查找單個元素或索引;3.some和every用於判斷是否存在或全部滿足條件;4.sort可排序但會改變原數組;5.使用時注意複製數組避免副作用。這些方法使代碼更簡潔高效。
