影像壓縮是電腦視覺中的關鍵技術,它使我們能夠更有效地儲存和傳輸影像,同時保持視覺品質。理想情況下,我們希望擁有最佳品質的小文件。然而,我們必須做出權衡並決定哪個更重要。
本教學將教授使用 OpenCV 進行影像壓縮,涵蓋理論和實際應用。最後,您將了解如何為電腦視覺專案(或您可能擁有的任何其他專案)成功壓縮照片。
影像壓縮正在減少影像的檔案大小,同時保持可接受的視覺品質水準。有兩種主要的壓縮類型:
如果正如我們經常聽到的那樣“磁碟空間很便宜”,那麼為什麼還要壓縮映像呢?在小範圍內,影像壓縮並不重要,但在大範圍內,它至關重要。
例如,如果您的硬碟上有一些影像,您可以壓縮它們並保存幾兆位元組的資料。當硬碟以 TB 為單位時,這不會產生太大影響。但如果您的硬碟上有 100,000 張影像怎麼辦?一些基本的壓縮可以節省即時時間和金錢。從性能的角度來看,是一樣的。如果您的網站包含大量圖像,並且每天有 10,000 人造訪您的網站,那麼壓縮就很重要。
這就是我們這樣做的原因:
影像壓縮技術利用兩種類型的冗餘:
空間冗餘利用了相鄰像素在大多數自然影像中往往具有相似值的事實。這會產生平滑的過渡。許多照片“看起來很真實”,因為從一個區域到另一個區域是一種自然的流動。當相鄰像素具有截然不同的值時,您會得到「雜訊」的影像。像素發生變化,透過將像素分組為單一顏色,使這些過渡變得不那麼“平滑”,從而使影像更小。

顏色冗餘重點關注影像中的相鄰區域如何經常共享相似的顏色。想像一下藍天或綠地-影像的大部分可能具有非常相似的顏色值。它們也可以組合在一起並製成單一顏色以節省空間。

OpenCV 提供了處理這些想法的可靠工具。例如,OpenCV 的 cv2.inpaint() 函數利用空間冗餘,使用附近像素的資訊填充圖片中缺失或損壞的區域。 OpenCV 允許開發人員使用 cv2.cvtColor() 在多個關於顏色冗餘的色彩空間之間轉換影像。這作為許多壓縮技術中的預處理步驟可能會有所幫助,因為某些色彩空間在編碼特定類型的影像時比其他色彩空間更有效。
我們現在將測試這個理論的一些內容。我們來玩一下吧。
讓我們來探索如何使用 OpenCV 的 Python 綁定來壓縮映像。寫下此程式碼或複製它:
您也可以在這裡取得原始碼
import cv2
import numpy as np

def compress_image(image_path, quality=90):
    # Read the image
 img = cv2.imread(image_path)

    # Encode the image with JPEG compression
 encode_param = [int(cv2.IMWRITE_JPEG_QUALITY), quality]
 _, encoded_img = cv2.imencode('.jpg', img, encode_param)

    # Decode the compressed image
 decoded_img = cv2.imdecode(encoded_img, cv2.IMREAD_COLOR)

    return decoded_img

# Example usage
original_img = cv2.imread('original_image.jpg')
compressed_img = compress_image('original_image.jpg', quality=50)

# Display results
cv2.imshow('Original', original_img)
cv2.imshow('Compressed', compressed_img)
cv2.waitKey(0)
cv2.destroyAllWindows()

# Calculate compression ratio
original_size = original_img.nbytes
compressed_size = compressed_img.nbytes
compression_ratio = original_size / compressed_size
print(f"Compression ratio: {compression_ratio:.2f}")
此範例包含一個 compress_image 函數,該函數採用兩個參數:
然後,我們將原始圖片載入到original_img中。然後,我們將相同圖片壓縮 50% 並將其載入到新實例壓縮映像中。
然後我們將顯示原始圖像和壓縮圖像,以便您可以並排查看它們。
然後我們計算並顯示壓縮比。
此範例示範如何在 OpenCV 中使用 JPEG 壓縮來壓縮影像。品質參數控製檔案大小和影像品質的權衡。
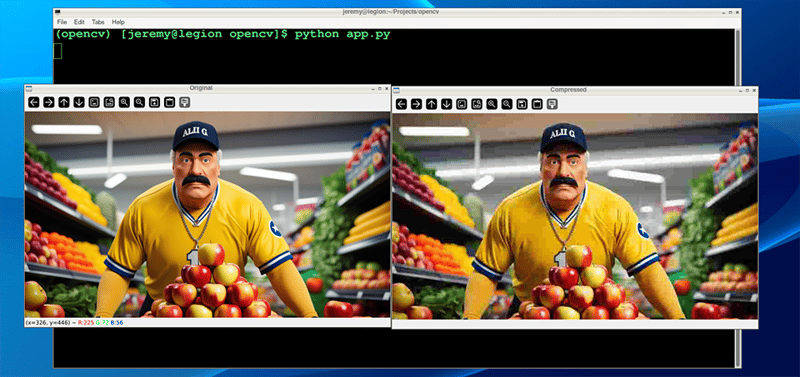
讓我們運行它:

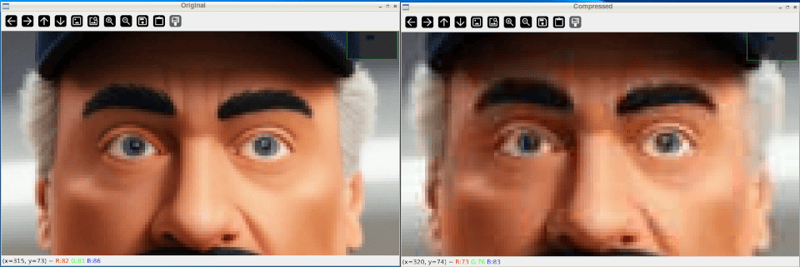
While intially looking at the images, you see little difference. However, zooming in shows you the difference in the quality:

And after closing the windows and looking at the files, we can see the file was reduced in size dramatically:

Also, if we take it down further, we can change our quality to 10%
compressed_img = compress_image('sampleimage.jpg', quality=10)
And the results are much more drastic:

And the file size results are more drastic as well:

You can adjust these parameters quite easily and achieve the desired balance between quality and file size.
To assess the impact of compression, we can use metrics like:
Mean Squared Error (MSE) measures how different two images are from each other. When you compress an image, MSE helps you determine how much the compressed image has changed compared to the original.
It does this by sampling the differences between the colors of corresponding pixels in the two images, squaring those differences, and averaging them. The result is a single number: a lower MSE means the compressed image is closer to the original. In comparison, a higher MSE means there's a more noticeable loss of quality.
Here's some Python code to measure that:
def calculate_mse(img1, img2):
    return np.mean((img1 - img2) ** 2)

mse = calculate_mse(original_img, compressed_img)
print(f"Mean Squared Error: {mse:.2f}")
Here's what our demo image compression looks like:

Peak Signal-to-Noise Ratio (PSNR) is a measure that shows how much an image's quality has degraded after compression. This is often visible with your eyes, but it assigns a set value. It compares the original image to the compressed one and expresses the difference as a ratio.
A higher PSNR value means the compressed image is closer in quality to the original, indicating less loss of quality. A lower PSNR means more visible degradation. PSNR is often used alongside MSE, with PSNR providing an easier-to-interpret scale where higher is better.
Here is some Python code that measures that:
def calculate_psnr(img1, img2):
 mse = calculate_mse(img1, img2)
    if mse == 0:
        return float('inf')
 max_pixel = 255.0
    return 20 * np.log10(max_pixel / np.sqrt(mse))

psnr = calculate_psnr(original_img, compressed_img)
print(f"PSNR: {psnr:.2f} dB")
Here's what our demo image compression looks like:

"Eyeballing" your images after compression to determine quality is fine; however, at a large scale, having scripts do this is a much easier way to set standards and ensure the images follow them.
Let's look at a couple other techniques:
For more advanced compression, OpenCV supports various algorithms:
You can convert your images to PNG format, which has many advantages. Use the following line of code, and you can set your compression from 0 to 9, depending on your needs. 0 means no compression whatsoever, and 9 is maximum. Keep in mind that PNGs are a "lossless" format, so even at maximum compression, the image should remain intact. The big trade-off is file size and compression time.
Here is the code to use PNG compression with OpenCV:
cv2.imwrite('compressed.png', img, [cv2.IMWRITE_PNG_COMPRESSION, 9])
And here is our result:

Note: You may notice sometimes that PNG files are actually larger in size, as in this case. It depends on the content of the image.
You can also convert your images to .webp format. This is a newer method of compression that's gaining in popularity. I have been using this compression on the images on my blog for years.
In the following code, we can write our image to a webp file and set the compression level from 0 to 100. It's the opposite of PNG's scale because 0, because we're setting quality instead of compression. This small distinction matters, because a setting of 0 is the lowest possible quality, with a small file size and significant loss. 100 is the highest quality, which means large files with the best image quality.
Here's the Python code to make that happen:
cv2.imwrite('compressed.webp', img, [cv2.IMWRITE_WEBP_QUALITY, 80])
And here is our result:

These two techniques are great for compressing large amounts of data. You can write scripts to compress thousands or hundreds of thousands of images automatically.
Image compression is fantastic. It's essential for computer vision tasks in many ways, especially when saving space or increasing processing speed. There are also many use cases outside of computer vision anytime you want to reduce hard drive space or save bandwidth. Image compression can help a lot.
By understanding the theory behind it and applying it, you can do some powerful things with your projects.
Remember, the key to effective compression is finding the sweet spot between file size reduction and maintaining acceptable visual quality for your application.
Thanks for reading, and feel free to reach out if you have any comments or questions!
以上是OpenCV 影像壓縮完整指南的詳細內容。更多資訊請關注PHP中文網其他相關文章!


