

소개
샘플 이미지
YOLOv8
을 사용하여 객체 감지 다양한 YOLOv8 모델에 대해 자세히 알아보기
모델을 실행하여 물체를 감지하세요
구문 분석 결과
배경이 있는 개체 추출
배경 없이 개체 추출
결론
이 튜토리얼에서는 신경망을 사용하여 이미지의 모든 객체를 감지하고 추출한 후 별도의 파일에 저장하는 방법을 보여 드리겠습니다.
이것은 일반적인 작업이며 이를 수행하는 데는 다양한 옵션이 있습니다. 이 글에서는 YOLOv8 신경망과 OpenCV를 사용하는 아주 간단한 방법을 보여드리겠습니다.
이 튜토리얼에서는 이 주제만 다루므로 YOLOv8 신경망 및 컴퓨터 비전에 대해 자세히 알아보려면 YOLOv8 시리즈의 이전 기사를 읽어보세요.
이 글에서는 모든 코드를 Python을 사용하여 작성할 것이므로 Python으로 개발이 가능하다고 가정합니다. 또한 Jupyter Notebook을 사용하지만 필수는 아닙니다. IDE 또는 텍스트 편집기를 사용하여 코드를 작성하고 실행할 수 있습니다.
이 튜토리얼에서는 YOLOv8 신경망과 OpenCV를 사용하여 이미지에서 객체를 감지하고 추출합니다. 예시 이미지로 Wikipedia 페이지에서 가져온 다음 이미지를 사용하겠습니다.
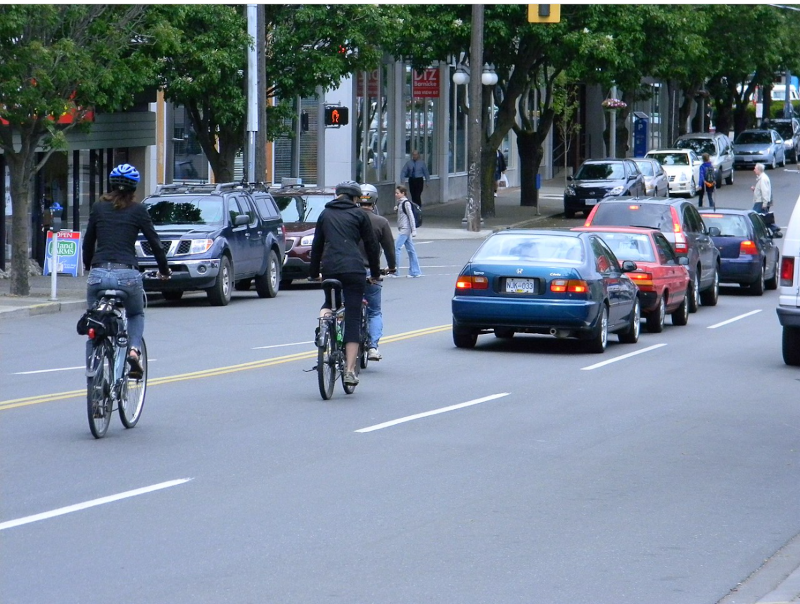
출처: https://en.wikipedia.org/wiki/Vehcular_cycling
이 이미지에서 모든 사람과 자동차를 감지하고 추출하여 별도의 이미지 파일에 저장합니다. 배경이 있거나 없이 추출된 개체를 저장하는 방법을 보여 드리겠습니다. 필요에 따라 첫 번째 또는 두 번째 옵션을 선택할 수 있습니다.
자, 시작해 보겠습니다. 첫 번째로 해야 할 일은 YOLOv8.2 패키지가 아직 설치되어 있지 않다면 설치하는 것입니다. 이렇게 하려면 Jupyter 노트북에서 다음을 실행하세요.
그런 다음 YOLOv8 API를 가져옵니다.
완료된 후 YOLOv8 신경망 모델을 로드해 보겠습니다.
이 코드 줄은 yolov8m-seg.pt 신경망 모델을 다운로드하여 모델 변수에 로드합니다.
이 튜토리얼에서는 80개의 일반적인 객체 클래스를 감지하는 데 사용할 수 있는 사전 훈련된 YOLOv8 모델 중 하나를 사용합니다. YOLOv8 모델에는 3가지 유형이 있으며 5가지 크기가 있습니다.
| 분류 | 탐지 | 분할 | 친절 |
| yolov8n-cls.pt | yolov8n.pt | yolov8n-seg.pt | 나노 |
| yolov8s-cls.pt | yolov8s.pt | yolov8s-seg.pt | 작다 |
| yolov8m-cls.pt | yolov8m.pt | yolov8m-seg.pt | 중간 |
| yolov8l-cls.pt | yolov8l.pt | yolov8l-seg.pt | 대형 |
| yolov8x-cls.pt | yolov8x.pt | yolov8x-seg.pt | 거대 |
The bigger model you choose, the more quality results you'll get, but the slower it works.
There are three types of YOLOv8 models exist: for classification, for object detection and for instance segmentation. The classification models used only to detect a class of object on the image, so it can't be used for our task. The object detection models can detect bounding boxes of detected objects. These models can be used to get x1,y1,x2,y2 coordinates of each object, and you can use this coordinates to extract the object with background. Finally, segmentation models can be used to detect not only bounding boxes of the objects, but also exact shapes (bounding polygons) for them. Using bounding polygon, you can extract an object without background.
In the code above, I've loaded the middle-sized model for segmentation yolov8m-seg.pt, that can be used both to extract object with background and without it.
To detect specific object classes, that do not exist in pretrained models, you can create and train your own model, save it to the .pt file and load it. Read the first part of my YOLOv8 series to learn how to do this.
To detect objects on images, you can pass the list of image file names to the model object and receive the array of results for each image:
results = model(["road.jpg"])
This code assumes, that the sample image saved to the road.jpg file. If you send a single image in the list, the results array will contain a single element. You can send more and in this case, the result will contain more elements.
Now, let's get detection results for the first image (road.jpg)
result = results[0]
The result is an object of the ultralytics.engine.results.Results class, which contains different information about detected objects on the image.
You can use a link above to learn more about all methods and properties, that this object contains, but here we need only few of them:
result.boxes.xyxy - array of bounding boxes for all objects, detected on the image.
result.masks.xy - array of bounding polygons for all objects, detected on the image.
For example, the result.boxes.xyxy[0] will contain [x1,y1,x2,y2] coordinates for the first object, detected on the image:
print(result.boxes.xyxy[0])
tensor([2251.1409, 1117.8158, 3216.7141, 1744.1128], device='cuda:0')
and the bounding polygon for the same object:
print(result.masks.xy[0])
[[ 2500 1125] [ 2493.8 1131.2] [ 2481.2 1131.2] [ 2475 1137.5] [ 2468.8 1137.5] [ 2462.5 1143.8] [ 2456.2 1143.8] [ 2418.8 1181.2] [ 2418.8 1187.5] [ 2381.2 1225] [ 2381.2 1231.2] [ 2350 1262.5] [ 2350 1268.8] [ 2337.5 1281.2] [ 2337.5 1287.5] [ 2325 1300] [ 2325 1306.2] [ 2306.2 1325] [ 2306.2 1331.2] [ 2300 1337.5] [ 2300 1343.8] [ 2287.5 1356.2] [ 2287.5 1362.5] [ 2281.2 1368.8] [ 2281.2 1387.5] [ 2275 1393.8] [ 2275 1700] [ 2281.2 1706.2] [ 2281.2 1712.5] [ 2287.5 1718.8] [ 2356.2 1718.8] [ 2368.8 1706.2] [ 2368.8 1700] [ 2381.2 1687.5] [ 2381.2 1681.2] [ 2393.8 1668.8] [ 2393.8 1662.5] [ 2412.5 1643.8] [ 2456.2 1643.8] [ 2462.5 1650] [ 2468.8 1650] [ 2481.2 1662.5] [ 2562.5 1662.5] [ 2568.8 1656.2] [ 2575 1656.2] [ 2581.2 1650] [ 2712.5 1650] [ 2718.8 1656.2] [ 2737.5 1656.2] [ 2743.8 1662.5] [ 2768.8 1662.5] [ 2775 1668.8] [ 2831.2 1668.8] [ 2837.5 1675] [ 2868.8 1675] [ 2875 1681.2] [ 2887.5 1681.2] [ 2900 1693.8] [ 2906.2 1693.8] [ 2912.5 1700] [ 2918.8 1700] [ 2931.2 1712.5] [ 2931.2 1718.8] [ 2937.5 1718.8] [ 2950 1731.2] [ 2956.2 1731.2] [ 2962.5 1737.5] [ 3018.8 1737.5] [ 3018.8 1731.2] [ 3037.5 1712.5] [ 3037.5 1706.2] [ 3043.8 1700] [ 3043.8 1681.2] [ 3050 1675] [ 3050 1668.8] [ 3056.2 1662.5] [ 3062.5 1662.5] [ 3068.8 1668.8] [ 3081.2 1668.8] [ 3100 1687.5] [ 3106.2 1687.5] [ 3112.5 1693.8] [ 3175 1693.8] [ 3181.2 1687.5] [ 3187.5 1687.5] [ 3193.8 1681.2] [ 3193.8 1662.5] [ 3200 1656.2] [ 3200 1562.5] [ 3193.8 1556.2] [ 3193.8 1500] [ 3187.5 1493.8] [ 3187.5 1468.8] [ 3181.2 1462.5] [ 3181.2 1437.5] [ 3175 1431.2] [ 3175 1418.8] [ 3168.8 1412.5] [ 3168.8 1400] [ 3143.8 1375] [ 3143.8 1368.8] [ 3125 1350] [ 3125 1343.8] [ 3112.5 1331.2] [ 3112.5 1325] [ 3100 1312.5] [ 3100 1306.2] [ 3087.5 1293.8] [ 3087.5 1287.5] [ 3075 1275] [ 3075 1268.8] [ 3068.8 1262.5] [ 3068.8 1256.2] [ 3050 1237.5] [ 3050 1231.2] [ 3006.2 1187.5] [ 3006.2 1181.2] [ 3000 1175] [ 3000 1168.8] [ 2993.8 1162.5] [ 2993.8 1156.2] [ 2987.5 1150] [ 2987.5 1143.8] [ 2975 1143.8] [ 2968.8 1137.5] [ 2950 1137.5] [ 2943.8 1131.2] [ 2868.8 1131.2] [ 2862.5 1125]]
This is a list of [x,y] coordinates for all points in the polygon.
You can see below the bounding box and the bounding polygon for the first detected object:
| Bounding box | Bounding polygon |
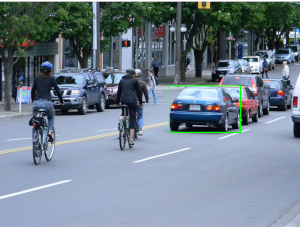 |
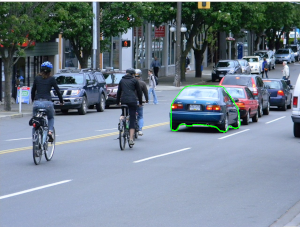 |
As you may assume, to extract the object with background you can use the bounding box, but to extract the object without background, you will need to use the bounding polygon.
To extract all objects and save to separate files, you need to run the code for each detected object in a loop.
In the next sections, I will show how to achieve both.
First, I will show how to crop a single object, using coordinates of bounding box. Then, we will write a loop to extract all detected objects.
So, in the previous section, we extracted the bounding box for the first detected object as result.boxes.xyxy[0]. It contains an [x1,y1,x2,y2] array with coordinates. However, this is a PyTorch Tensor with values of Float32 type, but coordinates must be integers. Let's convert the tensor for appropriate coordinates:
x1,y1,x2,y2 = result.boxes.xyxy[0].cpu().numpy().astype(int);
Now, you need to load the image and crop it, using the coordninates above.
I will use a OpenCV library for this. Ensure that it's installed in your system or install it:
%pip install opencv-python
Then import it and load the image:
import cv2 img = cv2.imread("road.jpg")
The OpenCV image is a regular NumPy array. You can see it shape:
print(img.shape)
(604, 800, 3)
The first dimension is a number of rows (height of the image), the second dimensions is a number of columns (width of the image), and the third dimension is a number of color channels, which is 3 for standard RGB images.
Now, it's easy to crop the part of this array, using x1,y1,x2,y2 coordinates that we have:
img[y1:y2,x1:x2,:]
This way you get only rows from y1 to y2 and columns from x1 to x2, e.g. only the object, that is required. Let's save this cropped image to a new file:
cv2.imwrite("image1.png",img[y1:y2,x1:x2,:])
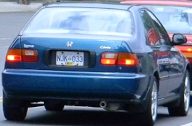
That's all. After running this code, you should see the new file image1.png. If you open it, you should see the cropped object with background:
Now, you can write a loop, to extract and save all detected objects:
for idx,box in enumerate(result.boxes.xyxy): x1,y1,x2,y2 = box.cpu().numpy().astype(int) cv2.imwrite(f"image{idx}.png", img[y1:y2,x1:x2,:])
After running this, you'll see the files image0.png, image1.png ... etc. with all detected objects on the image.
This is a full solution:
from ultralytics import YOLO import cv2 model = YOLO("yolov8m-seg.pt") results = model(["road.jpg"]) result = results[0] img = cv2.imread("road.jpg") for idx,box in enumerate(result.boxes.xyxy): x1,y1,x2,y2 = box.cpu().numpy().astype(int) cv2.imwrite(f"image{idx}.png", img[y1:y2,x1:x2,:])
First, to make an image transparent, we need to add a transparency channel to the input image. By default, JPG images do not have this channel, so, to add it using OpenCV you have to run this line of code:
img = cv2.cvtColor(img,cv2.COLOR_BGR2BGRA)
It's easy to cut the image, using the rectangular area, as you seen in the previous section, but I did not find any Python library, that can crop a part of image, using custom polygon.That is why, we will go other way. First, we will make transparent all pixels of the whole input image, that are not in a bounding polygon and then, we will cut the object from this transparent image, using the bounding box, as we did in the previous section.
To implement the first part (make the image transparent), we will need to create and apply a binary mask to the image. The binary mask is a black and white image, on which all pixels that are white treated as pixels, that belong to object and all pixels that are black treated as transparent pixels. For example, the binary mask for the image, that contains the first object will look like this:
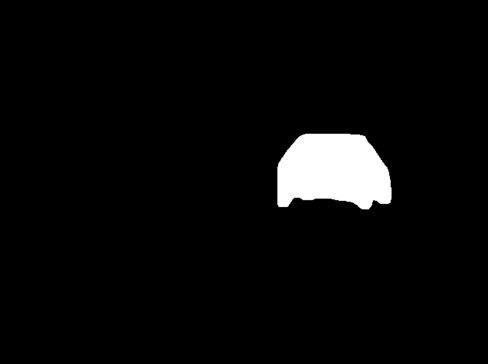
OpenCV has a function, that allows to apply the binary mask to the image and this operation makes all pixels on the image transparent, except pixels, that are white on the binary mask.
But first, we need to create a binary mask for OpenCV: the black image with white bounding polygon.
As I said above, the OpenCV image is a NumPy array, so, to create a black binary image, you need to create the NumPy array of the same size as original image, filled with 0.
import numpy as np mask = np.zeros_like(img,dtype=np.int32)
This code created array with the same size as original road.jpg image, filled with 0. The data type of items in this image must beinteger. Now, you need to draw white bounding polygon on it, to make it look the same, as binary mask on the previous image.
The bounding polygon for the first object located in the result.masks.xy[0]. The type of items in this polygon is float32, but for images they must be int32. To convert the polygon to correct type, use the following code:
polygon = result.masks.xy[0].astype(np.int32)
Now, the fillPoly function of the OpenCV library can be used to draw white polygon on the black mask:
cv2.fillPoly(mask,[polygon],color=(255, 255, 255))
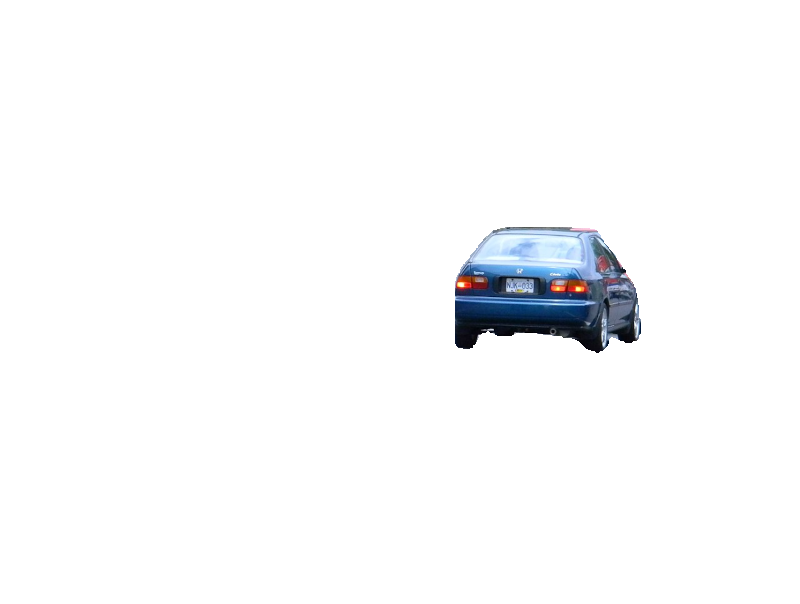
Finally, let's make everything except the object transparent on the image, using OpenCV binary AND operation:
img = cv2.bitwise_and(img, img, mask=mask[:,:,0].astype('uint8'))
It applies binary AND operation for each pixel on the img image using the mask. So, all pixels of the image that have 0 on the mask will be transparent.
As a result, of this operation, you will have the following image:
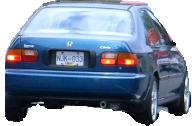
Finally, you can crop the object from it, using the bounding box coordinates, as in previous section:
x1,y1,x2,y2 = result.boxes.xyxy[0].cpu().numpy().astype(int) cv2.imwrite("image1.png",img[y1:y2,x1:x2,:])
after running this, the image.png file will contain the object, without background:
Now, let's extract all detected objects from the image. To do this, we need to repeat all the code from this section for each detected object in a loop:
for idx,polygon in enumerate(result.masks.xy): polygon = polygon.astype(np.int32) img = cv2.imread("road.jpg") img = cv2.cvtColor(img,cv2.COLOR_BGR2BGRA) mask = np.zeros_like(img,dtype=np.int32) cv2.fillPoly(mask,[polygon],color=(255, 255, 255)) x1,y1,x2,y2 = result.boxes.xyxy[idx].cpu().numpy().astype(int) img = cv2.bitwise_and(img, img, mask=mask[:,:,0].astype('uint8')) cv2.imwrite(f"image{idx}.png", img[y1:y2,x1:x2,:])
After running this code, you should see the image files image0.png, image1.png, image2.png and so on. Each image will have transparent background.
Here is a whole solution to extract all objects from the image with transparent background using YOLOv8.2 and OpenCV and save them to files:
from ultralytics import YOLO import cv2 import numpy as np model = YOLO("yolov8m-seg.pt") results = model(["road.jpg"]) result = results[0] for idx,polygon in enumerate(result.masks.xy): polygon = polygon.astype(np.int32) img = cv2.imread("road.jpg") img = cv2.cvtColor(img,cv2.COLOR_BGR2BGRA) mask = np.zeros_like(img,dtype=np.int32) cv2.fillPoly(mask,[polygon],color=(255, 255, 255)) x1,y1,x2,y2 = result.boxes.xyxy[idx].cpu().numpy().astype(int) img = cv2.bitwise_and(img, img, mask=mask[:,:,0].astype('uint8')) cv2.imwrite(f"image{idx}.png", img[y1:y2,x1:x2,:])
In this article I showed a simple way to extract and save all detected objects from image using YOLOv8 and OpenCV in less than 20 lines of code. I did not dive to many details in this post. If you want to know more about computer vision and YOLOv8, welcome to read previous articles from my YOLOv8 article series. Links to them you can find either in the beginning or in the end of this article.
You can follow me on LinkedIn, Twitter, and Facebook to know first about new articles like this one and other software development news.
Have a fun coding and never stop learning!
以上是使用 YOLOv 和 OpenCV 從圖像中提取所有檢測到的物件並將它們保存為單獨文件的簡單方法的詳細內容。更多資訊請關注PHP中文網其他相關文章!


